EasyManua.ls Logo

Schumacher Electric BT-100 - User Manual

Schumacher Electric BT-100
2 pages
Print Icon
To Next Page IconTo Next Page
Loading...
WARRANTY CARD
SAVE ON POSTAGE! ACTIVATE YOUR WARRANTY ONLINE –
THE QUICK AND EASY WAY!
Go to www.batterychargers.com to register your product online.
(No internet access? Send in the completed warranty card.)
6 MONTH LIMITED
WARRANTY PROGRAM
REGISTRATION
MODEL: _____________________ DESCRIPTION: ________________________
This is the only express limited warranty, and the manufacturer neither assumes
nor authorizes anyone to assume or make any other obligation. There is no other
warranty, other than what is described in the product owner’s manual.
The warranty card should be submitted within 30 days of purchase. The customer
must keep the ORIGINAL receipt because it will be required for any warranty claims.
This warranty is not transferable. Send warranty card only.
DO NOT SEND UNIT TO THIS ADDRESS FOR REPAIR.
Mail this card to: Schumacher Electric Corporation
801 Business Center Drive
Mount Prospect, IL 60056-2179
Name ______________________________________________________________
Street Address _______________________________________________________
City ________________________________State _________ Zip Code _________
Phone _____________________Email ___________________________________
Store Name Where Purchased ___________________ Date of Purchase _________
Store Location ____________________ UPC Number ________________________
Serial Number ______________________________________ (SEE PRODUCT)
For faster warranty activation, go to www.batterychargers.com to register your product online.
0099001450-02
READ THE ENTIRE MANUAL BEFORE USING THIS PRODUCT.
FAILURE TO DO SO COULD RESULT IN SERIOUS INJURY.
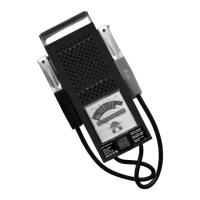
Model: BT-100
Battery Load Tester/Charging System Analyzer
For 6 and 12 Volt Batteries
OWNERS MANUAL
IMPORTANT SAFETY INSTRUCTIONS
SAVE THESE INSTRUCTIONS – This manual will show you how to use your
tester safely and effectively. Please read, understand and follow these instructions
and precautions carefully, as this manual contains important safety and operating
instructions.
WORKING IN THE VICINITY OF A LEAD-ACID BATTERY IS DANGEROUS.
BATTERIES GENERATE EXPLOSIVE GASES DURING NORMAL OPERATION. FOR
THIS REASON, IT IS IMPORTANT THAT YOU FOLLOW THESE INSTRUCTIONS
EACH TIME YOU USE THE TESTER.
Read the entire manual before using this product. Failure to do so could result
in serious injury.
Use the tester in a well-ventilated area.
This tester is not intended for use by children.
Do not expose the tester to rain or snow.
Do not operate the tester if it has received a sharp blow, been dropped or
otherwise damaged in any way; take it to a qualied service person.
Inspect the battery for a cracked or broken case or cover. If the battery is
damaged, do not use the tester.
Do not disassemble the tester; take it to a qualied service person when
service or repair is required. Incorrect reassembly may result in a risk of re or
electric shock.
Follow these instructions and those published by the battery manufacturer and
the manufacturer of any equipment you intend to use in the vicinity of the
battery. Review the cautionary markings on these products and on the engine.
PERSONAL SAFETY PRECAUTIONS
Wear complete eye protection and protective clothing when working near
lead-acid batteries. Always have someone nearby for help.
Have plenty of fresh water, soap and baking soda nearby for use, in case
battery acid contacts your eyes, skin or clothing. Wash immediately with soap
and water and seek medical attention.
If battery acid comes into contact with eyes, ush eyes immediately for at least
10 minutes and get medical attention.
Neutralize any acid spills thoroughly with baking soda before attempting to
clean up.
Remove all personal metal items from your body, such as rings, bracelets,
necklaces and watches. A lead-acid battery can produce a short circuit current
high enough to weld a ring to metal, causing a severe burn.
Never smoke or allow a spark or ame in the vicinity of the battery or engine.
OPERATING INSTRUCTIONS
BATTERY TEST
IMPORTANT: During the rst use of this tester, you will notice a little smoke
and/or a burning smell. This is normal and will stop after a short burn-in period.
Also, during regular use, the metal housing of the unit will get hot enough to
burn skin or cause property damage; carry by the handle. Neither of these
factors will affect the performance of your tester.
1. Turn off the ignition, all accessories and any loads.
2. Clean the battery terminals.
3. Clip the red clamp to the positive (POS, P, +) battery terminal.
4. Clip the black clamp to the negative (NEG. N, -) battery terminal.
6V BATTERY ANALYSIS
1. Read the meter and conrm the battery voltage is in the green “OK” area
(see illustration).
2. Press and hold the load switch “on” for a maximum of 10 seconds and read
the meter with the load still on. The needle should remain in the green area.
If it doesn’t, the battery is weak or bad.
CAUTION: To prevent overheating, allow tester to cool for 5 minutes before
depressing the load switch again, if further testing is required.
12V BATTERY ANALYSIS
1. Find the Cold Cranking Amps (CCA) range on the meter (see illustration)
that matches the CCA rating of the battery being tested.
2. Press and hold the load switch “on” for a maximum of 10 seconds and read
the meter with the load still on. Then, refer to Table 1 or the back of the tester.
CAUTION: To prevent overheating,
allow tester to cool for 5 minutes before depressing the load switch again, if
further testing is required.
Question and Answer IconNeed help?

Do you have a question about the Schumacher Electric BT-100 and is the answer not in the manual?

Summary

Important Safety Instructions

General Safety Warnings

Crucial safety guidelines for using the battery load tester, emphasizing hazard awareness and proper handling.

Personal Safety Precautions

Essential safety measures for personal protection when working near lead-acid batteries, including eye protection.

Operating Instructions

Battery Test Procedure

Steps for performing a basic battery load test, including connecting clamps and initial observations.

6 V Battery Analysis

Procedure for analyzing a 6-volt battery's condition using the load switch and meter.

12 V Battery Analysis

Procedure for analyzing a 12-volt battery's condition using CCA ratings and the load switch.

Testing the Charging System

Steps to test the vehicle's charging system, including engine RPM and accessory load.

Starter Motor Test

Procedure to test for excessive starter current draw by monitoring voltage during cranking.

Limited Warranty

Warranty Terms

Details the six-month limited warranty for material and workmanship, excluding accessories and misuse.

Warranty Limitations

Excludes incidental, special, or consequential damages and disclaims implied warranties.

Overview

This document describes the Schumacher Model BT-100 Battery Load Tester/Charging System Analyzer, designed for use with 6 and 12 Volt batteries. It serves as an owner's manual, providing important safety instructions, operating procedures, and warranty information.

Function Description:

The Schumacher BT-100 is a diagnostic tool used to test the condition of lead-acid batteries and analyze the vehicle's charging system. It performs a load test on the battery to determine its capacity and overall health, and it can also assess the performance of the starter motor and the charging system (alternator). The device features a built-in analog meter that displays voltage readings and indicates battery condition (Good, Weak, Bad) and charging system status (OK, trouble).

Important Technical Specifications:

  • Compatibility: Designed for 6 and 12 Volt lead-acid batteries.
  • Measurement: Displays voltage and provides indicators for battery capacity in Cold Cranking Amps (CCA), charging system test range, and starter test voltage.
  • Load Test Duration: The load switch should be pressed for a maximum of 10 seconds during testing to prevent overheating.
  • Cool-down Period: A 5-minute cool-down period is required between successive load tests to prevent overheating of the tester.
  • Meter Scales: The analog meter includes scales for 6-volt and 12-volt battery load testing, CCA range, charging system test range, and a general voltage scale.
  • Starter Test Voltage Table: A specific table (Table 2) is provided to correlate load voltage with minimum cranking voltage for starter motor analysis.

Usage Features:

General Safety Precautions:

  • Always read the entire manual before use to prevent serious injury.
  • Use the tester in a well-ventilated area.
  • Not intended for use by children.
  • Do not expose to rain or snow.
  • Do not operate if damaged; take it to a qualified service person.
  • Inspect the battery for physical damage before testing.
  • Do not disassemble the tester; refer service to qualified personnel.
  • Follow instructions from both the tester manual and battery/equipment manufacturers.
  • Wear complete eye protection and protective clothing when working near lead-acid batteries.
  • Have fresh water, soap, and baking soda nearby for acid contact.
  • Flush eyes with water for at least 10 minutes if acid contact occurs and seek medical attention.
  • Neutralize acid spills with baking soda.
  • Remove all personal metal items (rings, bracelets, necklaces, watches) to prevent severe burns from short circuits.
  • Never smoke or allow sparks/flames near the battery or engine.

Battery Test Procedure:

  1. Turn off ignition, accessories, and loads.
  2. Clean battery terminals.
  3. Clip the red clamp to the positive (+) battery terminal.
  4. Clip the black clamp to the negative (-) battery terminal.

6V Battery Analysis:

  1. Read the meter to confirm the battery voltage is in the green "OK" area.
  2. Press and hold the load switch "on" for a maximum of 10 seconds.
  3. Read the meter with the load on; the needle should remain in the green area. If not, the battery is weak or bad.
  4. Allow 5 minutes cool-down between tests.

12V Battery Analysis:

  1. Identify the Cold Cranking Amps (CCA) range on the meter that matches the battery's CCA rating.
  2. Press and hold the load switch "on" for a maximum of 10 seconds.
  3. Read the meter with the load on and refer to Table 1 or the back of the tester for interpretation.
  4. Allow 5 minutes cool-down between tests.

Interpreting Load Test Results (Table 1):

  • Good (green): Battery capacity OK, may or may not be fully charged. Check specific gravity, electrical drain, or charging system trouble. Recharge to full level.
  • Weak or bad, but steady (yellow or red): Battery capacity not satisfactory, may be defective or not fully charged. Check specific gravity. Replace if charging doesn't bring it to full charge.
  • Weak or bad, but falling (yellow or red): Battery may be defective or very run-down. Release load switch; voltage recovery to 12V+ within seconds indicates a defective battery. Slow recovery indicates run-down. Check specific gravity.

Testing the Charging System:

  1. Connect the tester.
  2. Start the engine and run at 1200-1500 rpm. (CAUTION: Stay clear of moving engine parts.)
  3. Note meter reading with all electrical accessories off; it should be in the green "OK" band on the "charging system" scale.
  4. With headlights and blower motor on high, the meter should remain in the green "OK" band.
  5. If the meter reads in the red band or outside the charging system zone, trouble is indicated (likely a defective alternator).

Starter Motor Test:

  • This test identifies excessive starter current draw.
  • Perform battery load test first to ensure battery is in good condition.
  • Engine must be at normal operating temperature.
  1. Perform a basic battery load test and note the exact voltage with the load on.
  2. Using the load voltage, refer to Table 2 or the meter face to find the minimum cranking voltage. Use the next higher minimum cranking voltage if the engine is less than 200 CID.
  3. If possible, disable the vehicle's ignition system. Test works best if the starter cranks for 2-5 seconds.
  4. Crank the engine and note the voltage reading during cranking.
  5. If cranking voltage is below the minimum cranking voltage in Table 2, the starter current draw is excessive. If the starter cranks slowly, check for high resistance or poor connections.

Maintenance Features:

  • Warranty: Six (6) months limited warranty from the date of purchase against defective material or workmanship under normal use.
  • Warranty Activation: Register product online at www.batterychargers.com or mail the completed warranty card.
  • Proof of Purchase: Original receipt is required for warranty claims.
  • Service/Repair: Do not ship the unit for repair without first contacting Customer Service and obtaining a Return Merchandise Authorization (RMA) number.
  • Troubleshooting: Before returning for repairs, read the complete manual and contact Customer Service for assistance (services@schumacherelectric.com, www.batterychargers.com, or 1-800-621-5485).
  • Initial Use: During the first use, a little smoke and/or burning smell is normal and will stop after a short burn-in period.
  • Heat during Use: The metal housing will get hot enough to burn skin or cause property damage during regular use; carry by the handle. This does not affect performance.

Schumacher Electric BT-100 Specifications

General IconGeneral
BrandSchumacher Electric
ModelBT-100
CategoryTest Equipment
LanguageEnglish

Related product manuals