Do you have a question about the ScorpionExo EXO-T520 and is the answer not in the manual?
Guides on ensuring a snug and comfortable fit for maximum safety and retention.
Step-by-step guide for removing and installing the faceshield using the Ellip-Tec II system.
Instructions for inflating and deflating the AirFit system for a personalized fit.
Procedure for using the emergency release system for cheek pads, intended for medical personnel.
Instructions on how to properly wear and secure the ScorpionEXO helmet using the chinstrap.
Lists critical 'DO NOT' actions to prevent helmet damage, injury, or warranty invalidation.
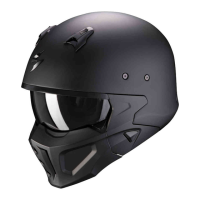
The ScorpionEXO EXO-T520 is a premium helmet designed for motorcycle riders, offering a blend of advanced protection, comfort, and integrated technology. Its primary function is to safeguard the rider's head from impact in the event of an accident, achieved through a matrix of materials engineered to absorb and dissipate impact energy. Beyond protection, the helmet is also designed to enhance rider comfort across various weather conditions.
The core function of the EXO-T520 is head protection. It encases the head with carefully selected materials that work in concert to mitigate the forces of an impact. While providing this crucial safety, the helmet also aims to offer a comfortable riding experience. It's important to note that, as a consequence of its protective design, a helmet may slightly reduce hearing sensitivity and peripheral vision.
The helmet features an EverClear® Faceshield, which is anti-fog treated internally and hard-coated externally. This shield provides 95% UV-A & UV-B protection, ensuring clear vision and protection from harmful sun rays. For added convenience, a SpeedView® Retractable SunVisor is integrated, accessible externally, and also boasts EverClear® Anti-fog Coating, offering 95% UV protection.
The Ellip-Tec® II Ratchet System facilitates easy, secure, and tool-less faceshield changes. This system employs a 2-axis movement that pulls the shield firmly into the eye port gasket, ensuring maximum seal against the elements. A dedicated Faceshield Lock system securely fastens the shield in place, further sealing out environmental factors.
To open the faceshield, the rider presses their thumb up on the faceshield lever until it snaps open, then lifts it all the way up. For "City Mode," the faceshield can be left open at the first detent to allow airflow at low speeds. To close and lock, the faceshield is slid all the way down, and the lever is pressed until it snaps shut, confirming it's locked.
To remove the faceshield, the helmet should be placed with the eye port facing away. The faceshield is ratcheted to the fully open position. Using both hands, the Y-shaped release latchets are pushed upward, allowing the shield to release from the locking mechanism. Then, with both thumbs pushing on the center of the Ellip-Tec® II, the faceshield is gently pulled away. Installation involves ensuring the faceshield axis and stopper are correctly positioned, then pushing the axis first, followed by the stopper, to snap them onto the track. The faceshield should be opened and closed several times to verify proper installation. It's crucial that the faceshield is in the fully open position for both removal and installation, and the "Y" release ratchet must be latched up during removal. Adjustments should not be attempted while riding.
The retractable internal SunVisor can be lowered by sliding the lever down and retracted by sliding the lever up. For removal, the main shield must be open to its highest position, and the SunVisor lowered to its lowest position. The SunVisor is then firmly held and gently pulled out from one side of the helmet to release, and the process is repeated for the opposite side. Installation is the reverse process.
The helmet incorporates an Aero-Tuned Ventilation system with adjustable ram-air front intakes. This system channels fresh air through multiple internal pathways and out to an integrated rear spoiler, effectively pulling heat and humidity away from the rider. The ventilation system is engineered to maximize comfort across various temperatures, with some vents featuring detents for partial opening and closing to control airflow. It's important to keep the vents clear of obstructions like dirt or insects to maintain proper airflow, which is vital for physical exertion, hot weather riding, and reducing fogging and condensation.
The AirFit® Liner Inflation System features integrated cheek pad air bladders that allow for personalized fit adjustment. The KwikWick® C Liner Fabric is removable and washable, made from a supple, hypo-allergenic, anti-microbial material with advanced moisture-wicking properties. The helmet also includes Speaker Pockets built into the EPS, accommodating speakers up to 50mm.
For safety, the helmet is equipped with an Emergency Release System. This system features 3D contoured, Kwikfit® cheek pads designed for EMT-friendly emergency release. In an emergency, medical personnel can locate the emergency labeling on the neck roll, reach under the neck roll, grab the release strap, and pull it at a 45-degree angle towards the front of the helmet. This action easily releases the cheek pads. This system is intended for use only by trained medical personnel. Riders should not attempt to adjust while riding or remove the helmet themselves in case of an accident.
The AirFit® Custom Adjustment System allows riders to inflate the cheek pad air bladders by pressing a pump located at the front of the chin bar until the desired fitment is achieved. To deflate, a small pressure release button next to the pump is pressed. It's crucial not to remove the helmet before deflating the air bladders. The AirFit® system should not be modified, punctured, or damaged; any issues should be reported to ScorpionEXO®.
The helmet is secured using a chinstrap. To wear the helmet, it should be rotated onto the head starting from the forehead, rolling it back until it fully contacts the inner lining and cheek pads. The chinstrap is then threaded through the eyelets of both rings, curled back, and threaded through the taller ring with a nylon pull-tab. The strap is securely tightened until comfortable and safe, and excess strap is managed with snap buttons. The chinstrap should be checked for tightness periodically as vibration or wind can loosen it.
The EXO-T520 is EXO-COM® Port / BlueTooth® Ready, featuring an integrated port specifically designed to accommodate the EXO-Com® Bluetooth® communication system. For helmets pre-installed with EXO-Com®, the mic/speakers are already in place.
The installation process involves several steps:
Most components of the ScorpionEXO® helmet are water-safe. Headliners and sweat-wicking cheek pads are machine washable with a mild detergent in warm water and air-dried. Hand washing is recommended, but the "delicate" cycle of machine washing is also permitted to prevent damage to the sweat-wicking material. Lining parts should never be placed in a dryer, as excess heat can damage the foam and coverings. The faceshield can be cleaned with plastic polish or mild soap and water. The helmet shell should be cleaned using only a mild detergent and water. Petroleum-based chemicals, solvents, gasoline, cleaning agents, or adhesives should never be used to clean the shell, liners, or faceshield, as these can seriously damage the helmet.
| Shell Material | Polycarbonate |
|---|---|
| Liner | Removable and washable |
| Ventilation | Aero-Tuned ventilation system |
| Chin Strap | Double D-ring |
| Speaker Pockets | Yes |
| Type | Full Face |
| Weight | Approx. 3.5 lbs (1.59 kg) |
| Standards | DOT, ECE |
| Liner Material | Moisture-wicking, anti-bacterial fabric |
| Visor | Drop-down sun visor |
| Face Shield | EverClear No-Fog face shield |
| Retention System | Quick-release system |