EasyManua.ls Logo

Scosche HD7000AB User Manual

Scosche HD7000AB
8 pages
To Next Page IconTo Next Page
Page #1 background imageLoading...
Page #1 background image
rJ
.SC:O.Sc=f
It:
HD7000AB
AFTERMARKET STEREO INSTALLATION
KIT
FOR SELECT HARLEY-DAVIDSON
2006-2013
FLHX STREET GLIDE,
1996-2013
FLHT
ELECTRA GLIDE
&
1998-UP FLTA ROAD GLIDE MODELS
(WITH FACTORY-EQUIPPED RADIO)
PARTS INCLUDED:
1. DASH
KIT
(1)
Mounting
Panel
(2)
Left
&
Right Mounting Brackets
(4)
Screws (bracket attachment)
(2)
Spacers (*Road
Glide models only)
2. NEOPRENE
GASKET STRIP
(not shown)
OPTIONAL
ACCESSORIES:
(Sold separately)
HDSWC 1
Handlebar Control
Interface w/plug
and
play
harness
HD01
B Power/Speaker harness
(For non-handlebar
control
cycles)
7424
LEFT
MOUNTING
BRACKET
7422
MOUNTING
PANEL
INTRODUCTION/PRELIMINARY
7501
SPACERS*
7423
RIGHT
MOUNTING
BRACKET
This premium
installation
kit is
for
select
Harley Davidson Road
Glide
&
Street Glide
motorcycles
Included
are
all
the parts you need
to
mount your car stereo
or
CD
player
into your bike's dash. Refer
to
the individual instructions in this manual
to
remove your factory radio and assemble
the kit.
CAUTION
DISCONNECT
THE
CYCLE
1
S NEGATIVE BATTERY .TERMINAL
BEFORE THE INSTALLATION TO
HELP PREVENT
ELECTRICAL DAMAGE. WE RECOMMEND THE
USE OF
A
VOLT/OHM METER
OVER
A
TEST LIGHT TO
CHECK
WIRING.
A
TEST LIGHT OR
GROUNDED
WIRE PROBE
CAN
CAUSE
DAMAGE
TO
THE CYCLE•s COMPUTER
AND/OR
DIAGNOSTIC SYSTEMS.
PREPARATION:
Work on a clear level
surface Place bike on kickstand with wheel tilted
toward the
leaning direction
Use
felt
or
soft cloths
to
cover and protect painted surfaces
TOOLS REQUIRED
(not
Included):
T-25/T-27
Torx
1/4''
or
6mm hex drive
3/16''
or
Smm hex drive
7/16''
socket
or
box
wrench (Road
Glide
models only)
LIABILITY
DISCLAIMER
This manual is
based
on
carefully documented research. Absolute accuracy is attempted, but not guaranteed.
Use the
manual
as a reference guide as your bike may differ.
Scosche Industries, Inc. cannot be
held responsible
for
Inconsistencies that may occur due to vehicle manufacturing changes or options,
or
damage that may occur
to
the
vehicle
during the
Installation
of
components
while
using this
booklet.
If you have any further questions,
call
our
toll
free technical
help line
at:
1·890·621-3695x3
@
2014
SCOSCHE
INDUSTRIES,
INC
..
51
HD7000AB
(3000597)
7/14
Question and Answer IconNeed help?

Do you have a question about the Scosche HD7000AB and is the answer not in the manual?

Scosche HD7000AB Specifications

General IconGeneral
Compatible Screen Size32" to 70"
Construction MaterialSteel
ColorBlack
Mount TypeWall
Maximum TV Size70 inches
Tilt Range+15° to -15°

Summary

Introduction and Preliminary Information

Important Safety Precautions

Crucial safety advice regarding battery disconnection and using a voltmeter to prevent electrical damage.

Installation Preparation Guidelines

Steps for preparing the workspace, including surface protection and bike positioning.

Required Tools for Installation

Lists the specific tools needed for the stereo installation process.

Liability Disclaimer and Support

States the company's limited responsibility and provides a technical support contact number.

Factory Stereo Removal for FLHX/FLHT Models

Prepare and Remove Windshield Components

Protect fender, remove windshield bolts, and carefully lift away the windshield.

Remove Fairing and Fork Tube Fasteners

Extract bolts from the outer fairing near mirrors and inside fork tubes.

Factory Stereo Removal for FLTR Road Glide Models

Prepare Fairing and Remove Turn Signals

Protect fender, extract fairing bolts, and remove turn signal nuts and straps.

Remove Upper Fairing and Headlight Components

Extract upper fairing bolts, release support hooks, and unplug headlights.

Remove Radio Housing and Connectors

Extract radio housing bolts, then unplug wiring and antenna to remove the radio.

Stereo Installation Kit Assembly

Prepare Aftermarket Stereo Sleeve

Locate and slide the locking mechanism on the DIN stereo sleeve to remove it.

ISO-DIN Mount Assembly

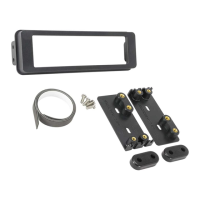
Attach side brackets to the front panel and mount the stereo using supplied hardware.

Optional Gasket Strip Usage

Use the neoprene gasket strip to seal any gaps around the faceplate perimeter.