OWNER MANUAL
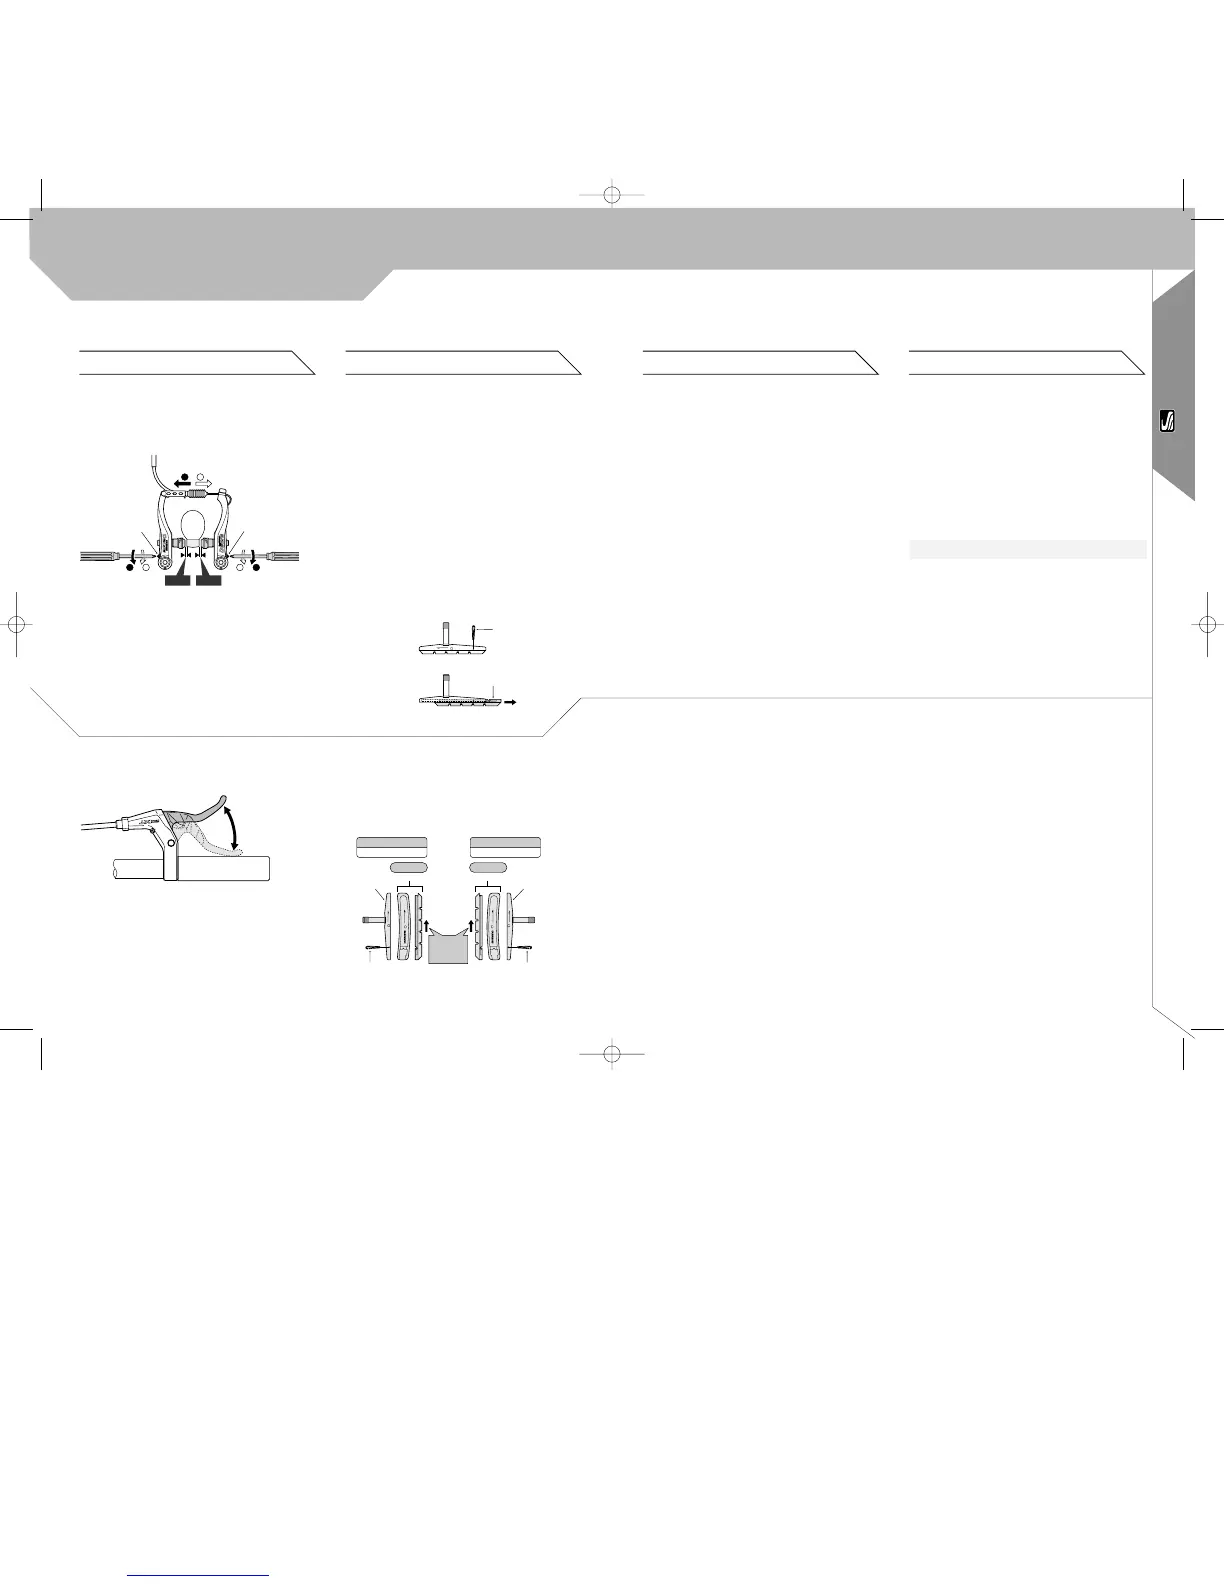
3. Adjust the balance with the spring tension
adjustment screws.
Remove the security pin on the brake shoe.
1. Remove the brake pad by sliding it along the groove of
the brake shoe bar.
2. Make sure to use the correct brake pad and brake
shoe for each side. Those for the left side are different
from those for the right side.
3. Slide the new pad into the shoe and make sure that
the direction is correct and that the security pin holes
concord.
4. The insertion of the security fixing pin is very impor-
tant. It keeps the shoe properly in place
4. Depress the brake lever about 10 times as far as the
grip and check that everything is operating
correctly and that the shoe clearance is correct
before using the brakes.
If your bike is equipped with disc brakes, please refer to
the enclosed instructions of the manufacturer.
Please keep in mind that disc brakes need up to 30-100
brakings to reach maximum brake power.
Reasons for the reduction of the braking effects
When sudden braking in bad weather conditions, there
are risks of skidding. Even if this situation can be avoi-
ded, sudden braking will always happen. In this case,
we recommend to apply the rear brake a little more than
the front one.
Tires should always be inflated within the manu-
facture’s recommendations.
They are rated from 40 to 80 lbs. (check your tires).
Higher pressure for smoother roads or heavy riders.
Lower pressure for more shock absorption on rou-
gher terrains.
Fix a flat tire
Bike tires are fitted with tubes.
Remove the wheel from the bike and deflate it.
Unhook the tire from one side of the rim, using tire
tools, not screwdrivers.
Remove the tube from the tire casing, repair or
replace it. Install the new or repaired tire. Fill the
tube lightly with air in order to let it take its shape.
Put the valve stem through the hole, and fit the insi-
de tire. Put the tire bead in the rim starting at the
valve and finishing at the opposite end, working on
both sides. Push the valve stem into the tire and
pull it back down to seat. Make sure the tube is not
pinched under the tire bead. Inflate with hand or
foot-pump.
OWNER MANUAL
14-15
V-Brake
Replacement of the brake pads/
cartridge shoe
Disc brakes Tires and Rims
Federeinstellschraube Federeinstellschraube
1 mm 1 mm
12
1 1
2 2
Bremshebel circa 10
mal anziehen
Remove the shoe fixing pin.
Remove the shoe by sliding it along the groove of the shoe holder.
shoe
shoe fixing pin
Insertion of shoe fixing pin is very critical to keep shoe properly fixed in place.
There are two different types of shoe and shoe holder to be used
in the left and right positions respectively. Slide the new shoes into the grooves
on the shoe holders while taking note of the correct directions and pin hole
positions.
Shoe
insertion
direction
for the left
for the right
same at front and rear
same at front and rear
front
front
shoe holder
shoe holder
shoe
shoe
shoe fixing pin
shoe fixing pin
Caution!
Whatever the weather is like, you will never exclusive-
ly need the front brake; in order to prevent from sliding,
you should always use both the front and the rear bra-
kes together.
By wet weather, the braking distance in approximately
60 % longer than by dry weather.
INFLATE TO MIN. 3.5 (50PSI) - MAX. 6.0 BAR (85PSI)
Spring tension
adjustment screw
Spring tension
adjustment screw
Depress lever about 10
times
manual2_ A5 _Engl. 26.09.2003 16:29 Uhr Seite 16
 Loading...