Do you have a question about the Scout Cart and is the answer not in the manual?
Attach rear wheels by inserting the pin into the receptor on the rear wheel arm. Use release button if needed.
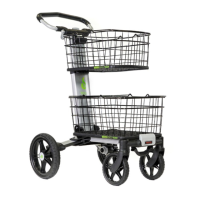
Attach front wheels by inserting the assembly into the receptor on the frame.
Release wheels by pressing the buttons near the attachment points on wheels and frame.
Lift handle base to unfold. Use telescoping frame release button to raise frame.
Place handle in preferred position and push thumb lever down to lock.
Attach top basket by hooking rim. Lock bottom basket using the front frame mechanism.
Press the foot brake down to engage lock. Press again to release.
Fold frame and pull telescoping section forward until hook locks into lower basket mechanism.
| Brand | Scout |
|---|---|
| Model | Cart |
| Category | Outdoor Cart |
| Language | English |