User Manual
Scrib3D P1
For the best user experience,
please read this manual completely
before usage.
www.Scrib3Dpen.com
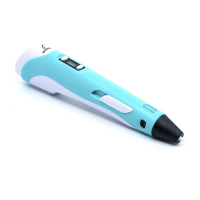
Features and Controls of
your Scrib3D P1 3D Pen
FILAMENT
LOADER
TEMPERATURE
ADJUSTER
+
SPEED
ADJUSTER
+
FORWARD
REVERSE
LCD
SCREEN
LED:
TEMPERATURE
INDICATOR
LED:
POWER
INDICATOR
POWER
W ARNI N G S
The Scrib3d P1 should only be used with
ABS, PLA filament approved by Scrib3d.
Misuse of your Scrib3d P1, setting your pen
to the wrong heating temperature, and/or
iuse of non-approved plastics or other
materials may result in damage to your pen
or injury to you, and will void your warranty.
Injuries to the user may include, but are not
limited to, harm sustained from inhaling
substances that are not suitable for heating;
or burns from flammable materials used in
the Scrib3d P1.
ADULT USE ONLY.
KEEP OUT OF REACH OF CHILDREN.
DO NOT use the Scrib3D P1 near
bathtubs, showers, basins or other
vessels containing water. This could
result in death due to electric shock.
Allow the Nozzle to cool completely before
storing.
Unplug and set the Control Switch to OFF
when not in use or before storing.
- The Nozzle of the Scrib3D P1 can
become hot. DO NOT touch the Nozzle, or
you may be burned!
- DO NOT allow the Nozzle near or in
contact with flammable materials.
- Inform others in the area that the Pen is
hot and should not be touched.
This 3D Printing Device - when used
with a styrene filament (ABS / HIPS /
or PC-ABS) - can expose you and
others in the same room to styrene,
which is a chemical known to the State
of California to cause cancer. For more
information, go to
www.P65Warnings.ca.gov.
ALWAYS OPERATE YOUR 3D
PRINTING DEVICE IN A
WELL-VENTILATED AREA.
Getting Started
Product Overview
1. Connect the AC Adapter to an outlet. Plug
the AC Adapter Plug into the Power Socket of
the pen. The power indicator light should
become yellow. (Note: this 3D pen can be
used with a 3rd party power bank with at least
2 Amps output)
2. “ABS” or “PLA” will show on the Display, you
can use the Temperature Up/Down Buttons to
select a mode. Choose a mode that
corresponds to the type of plastic you are
using. (Note: using the wrong mode with the
wrong plastic will make for a poor experience
and possibly damage your pen)
3. Press the Forward Button to activate the
selected mode. You can use the Temperature
Up/Down Buttons to ne tune the
temperature depending on need and desired
usage. The temperature ranges are ABS:
200~230°C and PLA: 160-210°C. The
Temperature Indicator Light will be red while
heating up and will turn green when the pen
is ready.
4. Once the Temperature Indicator Light has
turned to Green, you can double click or hold
down the ForwardButton (Note: best to have
the speed at max). Straighten the end of the
lament you wish to use and load it into the
Filament Loader while the pen is running.
Once plastic starts extruding you are ready to
start creating in 3D!
P1 3D pen Power Adapter
(5V 2A)
Filament
The Display will ash either
ABS or PLA until the Forward
Button is pressed to chose a
mode. Then the screen will
Show desired temperature and
current temperature. The temp
LED will remain red while the
pen is heating up. Once it has
reached temp it will change to
Green. Then you can draw. You
Can ajust the temperature at any
time but to change from ABS to
PLA un-plug the pen and plug
it back in.
Wall outlet
DC 5V/2A
Once the temperature
indicator Light has changed
from red to green you can
load lament into the 3D
pen. Straighten the lament
at the end. Press and hold
the Feed Button or double
click for continuous mode.
Push the lament into the
pen until you can feel it
pulling it into the pen.