Do you have a question about the Sea-doo 295100679 and is the answer not in the manual?
Instructions for preparing SPARK models of Type - B, including battery disconnection.
Preparation steps for GTI, GTS, GTR, WAKE 155, and RXT models (Type - B or C), focusing on battery access.
Preparation for GTX and RXT models with suspension (Type - A, 2015 and before), involving rear platform and tray removal.
Preparation for GTX, RXT, WAKE PRO models (Type - A) without suspension, requiring rear access panel removal.
Guidance on locating and preparing the area for depth finder support installation, including component removal.
Steps for installing the gel pad on the depth finder and preparing it for mounting on all models.
Specific installation steps for Type - A models under the battery (2015 and before), involving battery holder removal.
Instructions for installing the depth finder with a screwed bracket for Type - B models.
Steps for installing the depth finder with a glued base for Type - C models.
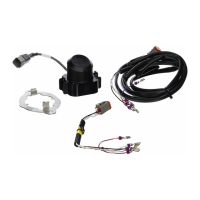
Procedure for preparing the accessory fuse box by disconnecting, removing covers, and removing bus bars.
Details on inserting wire terminals of the wiring harness into the fuse box contact coordinates.
Guidance on routing the depth finder wiring harness behind engine mounts in the bottom of the hull.
Instructions to disconnect BLACK (-) battery cable then the RED (+) cable for older models.
Steps for routing wiring harness from fuse box to depth finder, securing with locking ties.
Steps to perform a dry test using a container to check depth finder operation and display.
Guidance on correct gauge readings and troubleshooting air trapped between the depth finder and gel pad.
Steps to re-seat the depth finder and reapply gel pad if a bad reading indicates an air gap.
Possible causes and remedies for the depth finder displaying nothing in the information center.
Troubleshooting for dash display with blinking sensor, suggesting connection or water issues.
The SEA-DOO KIT - Depth Finder (Part number (SKU): 295100679) is an accessory designed for Sea-Doo watercraft to provide depth measurement functionality. This kit includes all necessary components for installation and operation, ensuring that users can monitor water depth during their rides.
The primary function of this device is to measure and display the water depth beneath the watercraft. It utilizes a depth finder (transducer) that sends and receives sonar signals to determine the distance to the bottom. The depth information is then displayed on the watercraft's multifunction gauge. This allows riders to navigate more safely, especially in unfamiliar or shallow waters, and to identify suitable areas for anchoring or watersports. The system is designed to provide a numerical depth indication when working properly, helping to prevent accidental grounding or damage to the watercraft.
The depth finder is designed for integration with the watercraft's existing display system. Once installed, users can access the depth reading by repeatedly pressing the MODE button on the multifunction gauge until "DEPTH" is displayed. The device provides a numerical reading in feet or meters, indicating the current water depth. It is crucial to note that the depth finder is intended as a navigation guide and should not be used as a warning device for riding in shallow water or for obtaining precise navigation data. Its primary role is to assist in general awareness of water depth.
| Brand | Sea-doo |
|---|---|
| Model | 295100679 |
| Category | Marine Equipment |
| Language | English |