EasyManua.ls Logo

Sealey RS1.V3 - User Manual

Sealey RS1.V3
3 pages
Print Icon
To Next Page IconTo Next Page
Loading...
Thank you for purchasing a Sealey product. Manufactured to a high standard this product will, if used according to these instructions
and properly maintained, give you years of trouble free performance.
IMPORTANT:
BEFORE USING THIS PRODUCT, PLEASE READ THE INSTRUCTIONS CAREFULLY. MAKE CAREFUL NOTE OF SAFETY INSTRUCTIONS,
WARNINGS AND CAUTIONS. THIS PRODUCT SHOULD ONLY BE USED FOR ITS INTENDED PURPOSE. FAILURE TO DO SO MAY CAUSE DAMAGE
AND/OR PERSONAL INJURY AND WILL INVALIDATE THE WARRANTY. RETAIN THESE INSTRUCTIONS FOR FUTURE USE.
2. SPECIFICATIONS
1. GENERAL FEATURES
IMPORTANT: To reduce risk of battery explosion, follow these instructions and those published by battery manufacturer and manufacturer of
any equipment you intend to use in vicinity of the battery. Remember to review warning marks on all products and on engines.
3.1. PERSONAL PRECAUTIONS
3 Ensure there is another person within hearing range of your voice, or close enough to come to your aid should a problem arise when
working near a lead-acid battery.
3 Have fresh water and soap nearby in case battery acid contacts skin, clothing or eyes.
3 Wear safety eye protection and protective clothing. Avoid touching eyes while working near battery.
3 Wash immediately with soap and water if battery acid contacts skin or clothing. If acid enters eye, flush eye immediately with cool, clean
running water for at least 15 minutes and seek immediate medical attention.
3 Remove personal metallic items such as rings, bracelets, necklaces and watches. A lead-acid battery can produce a short-circuit current
high enough to weld a ring or the like to metal, which may cause severe burns.
3.2. OTHER IMPORTANT SAFETY INSTRUCTIONS
3
Familiarise yourself with the application, limitations and potential hazards of the unit.
3 Keep the unit in good working order and condition. Take immediate action to repair or replace damaged parts.
3 Only use recommended attachments and parts. To use unapproved items may be dangerous and will invalidate your warranty.
3 The Roadstart must only be opened and checked by qualified service personnel. DO NOT disassemble for any reason.
3 Keep children and unauthorised persons away from the work area.
3 Keep work area clean and tidy and free from unrelated materials and ensure that there is adequate lighting.
3 If the unit receives a sharp knock or blow, it must be checked by a qualified service agent before being used.
3 When not in use re-charge every six (6) months.
7 DO NOT smoke or allow a spark or flame in the vicinity of the battery or engine.
7 DO NOT drop any metal tool onto the battery as it may spark or short circuit the battery, which could cause an explosion.
7 DO NOT use the unit to recharge dry cell batteries that are commonly used with home appliances. These batteries may burst and cause
injury to persons and damage to property.
7 DO NOT charge or boost a frozen battery.
7 DO NOT allow clamps to touch each other, or to contact the same piece of metal, as this will result in arcing.
7 DO NOT use attachments other than those recommended. To do so may risk damage to the unit, equipment and possible injury.
GENERAL FEATURES
3 Initial peak power RS1.V3 - 1000 amps, RS102.V2 - 1600 amps. More than enough to start
most vehicles. May also be used in DEEP CYCLE applications.
3 The Roadstart is also a portable power source for accessories equipped with a male cigarette
lighter plug. The DC outlet has automatic 12 amp overload protection.
3 Test switch and LED lights. Solid state circuitry.
SAFETY FEATURES
3 Safety storage holsters prevent accidental sparking of clamps.
3 The Roadstart contains the latest technology with its 12 volt sealed lead acid battery. This
means the Roadstart RS1 & RS102 may be stored in any position without fear of leakage.
IMPORTANT: READ SAFETY INSTRUCTIONS BEFORE ATTEMPTING TO USE THE ROADSTART.
Built-in battery . . . . . . . . . . . . . .Sealed lead acid, maintenance free, re-chargeable.
DC Output (volts) . . . . . . . . . . . .RS1.V3/RS102.V2 . . . . . . . .12
Peak Current (amps) . . . . . . . . .RS1.V3 . . . . . . . . . . . . . .1000
. . . . . . . . . . . . . . . . . . . . . . . . .RS102.V2 . . . . . . . . . . . .1600
Cold Cranking Current (amps) . .RS1.V3 . . . . . . . . . . . . . . .300
. . . . . . . . . . . . . . . . . . . . . . . . .RS102.V2 . . . . . . . . . . . . .600
Charging Time . . . . . . . . . . . . . .Up to 30 hours with AC charger.
Breaker . . . . . . . . . . . . . . . . . . .12 amp (for DC power port)
Weight . . . . . . . . . . . . . . . . . . . .RS1.V3 . . . . . . . . . . . . . .8.2kg
. . . . . . . . . . . . . . . . . . . . . . . . .RS102.V2 . . . . . . . . . . . . .9kg
Dimensions (mm) . . . . . . . . . . . .RS1.V3 . . . . . .335 x 260 x 90
. . . . . . . . . . . . . . . . . . . . . . . . .RS102.V2 . . .335 x 235 x 130
RS1.V3 & RS102.V2 - 1 - 191203
3. SAFETY INSTRUCTIONS
p
p
DANGER! - RISK OF EXPLOSIVE GASES.
WORKING IN VICINITY OF A LEAD-ACID BATTERY IS DANGEROUS. BATTERIES GENERATE EXPLOSIVE GASES DURING NORMAL OPERATION.
FOR THIS REASON, IT IS VERY IMPORTANT TO READ AND FOLLOW THESE INSTRUCTIONS EXACTLY EACH TIME YOU USE THE RS1, RS102 or RS2.
DC Charging
Cable
AC Charging
Adaptor
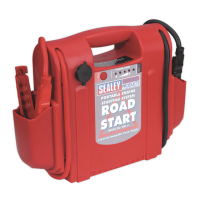
INSTRUCTION MANUAL FOR:
PORTABLE ROADSTART UNITS
RS1.V3
&
RS102.V2
1) Safety storage holsters
2) Charged Indicator light
3) Multiple LED power indicator
4) Heavy duty thermo-plastic case
5) TEST switch
6) 12V DC output / charging socket
7) Heavy duty clamps
8) Flexible heavy duty copper cables
9) Wall charger
10) DC charging / output cable
Question and Answer IconNeed help?

Do you have a question about the Sealey RS1.V3 and is the answer not in the manual?

Summary

General Features

Specifications

Safety Instructions

Personal Precautions

Personal safety measures for working near batteries, including protective gear and first aid.

Other Important Safety Instructions

General safety guidelines for unit operation, maintenance, and storage.

Charging Instructions

Reading the power level indicators

How to check the unit's charge status using the power level lights.

Recharging

Instructions for recharging the unit using provided adaptors and cables.

Operating Instructions

To use for jump starting

Step-by-step guide for jump starting a vehicle using the Roadstart unit.

Use as an alternative power supply

How to use the unit to power electrical components when the vehicle battery is disconnected.

Use as a multi-purpose power supply

Using the unit as a DC power source for accessories with cigarette lighter plugs.

Troubleshooting

Questions & Answers

Declaration of Conformity

Overview

This document describes the Sealey Portable Roadstart Units RS1.V3 & RS102.V2, which are portable power sources primarily designed for jump-starting vehicles and powering 12V DC accessories.

Function Description:

The Sealey Roadstart units serve as portable power sources for jump-starting most vehicles and powering 12V DC accessories. They are equipped with a sealed lead-acid battery, making them maintenance-free and rechargeable. The units are designed to be stored in any position without fear of leakage. They feature safety storage holsters to prevent accidental sparking of clamps and solid-state circuitry for reliable operation. The Roadstart can also be used to protect electrical components with built-in memory (such as radios, alarm systems, computers, phones) when the vehicle battery is disconnected. Additionally, they function as a multi-purpose power supply for various DC accessories equipped with a male cigarette lighter plug, such as portable lights, coffee makers, and portable TVs. The DC outlet includes an automatic 12 amp overload protection.

Important Technical Specifications:

  • Built-in battery: Sealed lead acid, maintenance-free, rechargeable.
  • DC Output (volts): 12V for both RS1.V3 and RS102.V2.
  • Peak Current (amps):
    • RS1.V3: 1000 amps
    • RS102.V2: 1600 amps
  • Cold Cranking Current (amps):
    • RS1.V3: 300 amps
    • RS102.V2: 600 amps
  • Charging Time: Up to 30 hours with the AC charger; 12 amps for DC power port.
  • Breaker: 12 amp (for DC power port).
  • Weight:
    • RS1.V3: 8.2 kg
    • RS102.V2: 9 kg
  • Dimensions (mm):
    • RS1.V3: 335 x 260 x 90
    • RS102.V2: 335 x 235 x 130
  • Components: Safety storage holsters, 'Charged' Indicator light, Multiple LED power indicator, Heavy duty thermo-plastic case, TEST switch, 12V DC output / charging socket, Heavy duty clamps, Flexible heavy duty copper cables, Wall charger, DC charging / output cable.

Usage Features:

  • Jump Starting:
    • Ensure vehicle hand brake is applied, and the vehicle is in neutral gear (or "Park" for automatic transmission). Turn ignition and electrical accessories off.
    • Attach the positive (RED +) clamp to the positive terminal on the vehicle battery. For vehicles with multiple batteries, connect to the positive battery terminal connected to the vehicle electrical system.
    • Attach the negative (BLACK -) clamp to the engine block or frame of the vehicle, ensuring cables are clear of moving parts.
    • Start the engine.
    • Once the vehicle has started, disconnect the negative (BLACK -) clamp first, then the positive (RED +) clamp. Store clamps in their holsters.
    • If the vehicle does not start within 6 seconds, wait 3 minutes for the Roadstart's internal battery to cool before attempting again.
  • Memory Saver Function:
    • Plug the DC charging cable into the unit's charge socket and the other end into the vehicle's cigarette lighter socket.
    • Switch off all vehicle electrical equipment, then switch ignition on.
    • Disconnect and remove the vehicle battery, covering the positive cable terminal to prevent contact with metalwork.
    • The unit will now maintain power to electronic memories.
    • Once the fully charged vehicle battery is replaced, the Roadstart can be disconnected.
  • Powering DC Accessories:
    • The unit can power 12V DC accessories via its cigarette lighter style outlet, which has automatic 12 amp overload protection.
  • Power Level Indication: Pressing the TEST button illuminates red power level lights. Three lights indicate full charge, two lights indicate 50% charge, and one light indicates low charge requiring recharge. A green 'Charged' light indicates full charge, and an amber 'Charging' light indicates the unit is charging.
  • Environmental Use: Can be used under various weather conditions including rain, snow, heat, and cold temperatures.

Maintenance Features:

  • Recharging with AC Charger (Preferred Method):
    • Ensure power clamps are in holsters.
    • Plug the AC charger cable into the unit's charge input socket and the charger into a 230V AC wall outlet.
    • The amber 'Charging' indicator will illuminate.
    • The unit charges automatically. When the green 'Charged' LED comes on, continue charging for another 3 to 6 hours for full capacity.
    • The unit can safely be left connected to the charger when not in use.
    • When new, charge for a minimum of 30 hours, potentially up to 72 hours for a full charge.
  • Recharging with DC Charging Cable (Vehicle Alternator):
    • This method is not automatic and requires user monitoring to prevent overcharging.
    • Ensure power clamps are in holsters.
    • With the vehicle engine running, plug the DC charging cable into the unit's charge input socket and the other end into the vehicle's cigarette lighter socket.
    • Press the TEST button hourly to monitor the charge level.
    • Once all red lights are illuminated and the green 'charged' light is on, continue charging for another 1 to 2 hours, then disconnect from the vehicle lighter socket.
    • If the battery is completely flat, a 72-hour charge with the AC charger is necessary.
  • General Maintenance:
    • Keep the unit in good working order and condition; repair or replace damaged parts immediately.
    • Only use recommended attachments and parts.
    • The Roadstart must only be opened and checked by qualified service personnel.
    • Keep children and unauthorized persons away from the work area.
    • Keep the work area clean, tidy, and well-lit.
    • If the unit receives a sharp knock or blow, it must be checked by a qualified service agent before use.
    • When not in use, recharge every six (6) months.
    • Do not leave the unit in a totally discharged state for an extended period to prevent permanent damage.
  • Safety Precautions:
    • Always work in a well-ventilated area.
    • Have fresh water and soap nearby in case of battery acid contact.
    • Wear safety eye protection and protective clothing.
    • Remove personal metallic items (rings, bracelets, etc.) before working near the battery.
    • DO NOT smoke or allow sparks/flames near the battery or engine.
    • DO NOT drop metal tools onto the battery.
    • DO NOT use to recharge dry cell batteries.
    • DO NOT charge or boost a frozen battery.
    • DO NOT allow clamps to touch each other or the same piece of metal.
    • DO NOT pull or carry the unit by its cables or wires.
    • DO NOT operate in the vicinity of flammable liquids or gases.
    • DO NOT recharge with damaged plugs, cables, or attachments.
    • DO NOT store in damp/wet locations or where temperatures exceed 50°C.
    • DO NOT submerge the unit in water.
    • DO NOT use while under the influence of drugs, alcohol, or intoxicating medication.
    • DO NOT cross-connect the power leads from the Roadstart to the battery (positive to positive, negative to negative).
    • Ensure the unit is fully charged before storage.
    • Electrical safety checks (PAT testing) are required for business premises. Regularly inspect power supply cables and plugs for wear or damage.

Sealey RS1.V3 Specifications

General IconGeneral
BrandSealey
ModelRS1.V3
CategoryReceiver
LanguageEnglish

Related product manuals