Do you have a question about the Seaward CROPICO DO7010 and is the answer not in the manual?
States the 1-year warranty and disclaimer on publication accuracy and product modifications.
Guidance on disposing of the product according to environmental regulations.
Clarifies that the operating instructions are meant for competent personnel.
Emphasizes safe usage by qualified personnel and with approved accessories.
Defines the various symbols used on the instrument for warnings and functions.
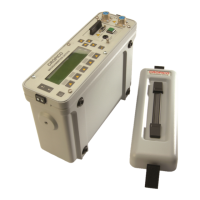
Description of the DO7010's physical build, portability, and key functionalities.
Details on the battery pack, charger, operating time, and power saving features.
Details the LCD screen, keyboard, indicator LEDs, and connectors on the front panel.
Lists the available resistance ranges, measurement currents, resolution, and accuracy.
Explains manual/auto triggering and methods for ensuring measurement quality.
Describes the functionality for storing up to 999 measurements within a sequence.
Details the specifications of the RS232 interface for PC connectivity.
Information on the removable NiMH battery pack and its charging.
Provides the physical dimensions and weight of the DO7010 instrument.
Details the RCU's construction, display, controls, and memory for data storage.
Specifies the size and weight of the Remote Control Unit.
Explains the process of transferring protocols and results between the RCU and PC.
Illustration of the RCU's front panel layout and controls.
Steps for transferring measurement protocols from a PC to the DO7010.
Steps for transferring stored measurement data from the DO7010 to a PC.
Illustrates wiring for connecting the PC, DO7010, and RCU using various cables.
Lists optional items including RCUs, cables, shunts, and adapters.
Details the types of leads and probes available for connecting to the instrument.
Explanation of the 4-wire Kelvin method for accurate low resistance measurements.
Visual representation of the Kelvin measurement circuit setup.
Step-by-step guide for charging the battery pack while it is installed in the unit.
Instructions for removing the battery and charging it separately.
Guidance on properly connecting accessories using JAEGER connectors.
How to enter the configuration menu and navigate its options using the unit controls.
Procedure to set the contrast level of the LCD display.
Options for setting the LCD backlight to ON, OFF, or AUTO.
Configuring the auto switch-off timer for battery conservation.
Setting the volume for audible feedback from key presses.
Setting the volume for alarm and error notifications.
Choosing between manual (MAN) and automatic (AUTO) measurement triggering.
Procedure to input and confirm the current date.
Procedure to input and confirm the current time.
Choosing the display language for the unit's interface.
Selecting the mains frequency for optimizing measurement stability.
How to enter a passcode to enable calibration features.
Initiating the built-in self-test for checking measurement accuracy.
Interpreting the results of the self-test, including LED indicator status.
Introduction to manual operation and accessing parameter settings.
Steps to modify parameters like range, current, zero, average, log, and limits.
Choosing a specific resistance range or using auto-ranging.
Choosing between high (HI) and low (LO) measurement current levels.
Explanation and use of Zero and Average methods to mitigate thermal EMF errors.
Enabling data logging, reviewing stored values, and deleting the log.
Adjusting min/max limits and understanding PASS/FAIL indicators.
How to trigger a measurement and interpret error messages.
Performing measurements with active limits and interpreting OK/LO/HI results.
Steps for managing measurements in log mode.
Creating measurement protocols using PC software for the DO7010.
Illustrates the structure of a measurement protocol file for download.
How to choose a specific measurement protocol or series from the available list.
Inputting operator details and aircraft information before starting a sequence.
Starting the first measurement in a sequence, considering trigger modes.
Behavior and display after a successful (PASS) measurement.
Enables direct navigation to any test point within a sequence.
Procedure for recording and proceeding after a failed (FAIL) measurement.
How to mark and proceed from points that cannot be measured.
Procedure for recording measurements exceeding unit range (OVER).
Indicates the end of a sequence and options for proceeding.
Details on warranty coverage and how to contact technical support.
Guidelines for returning instruments and basic troubleshooting steps.
Instructions for cleaning the unit and the importance of annual calibration.
Phone number for immediate technical support assistance.
Full contact information for service and calibration inquiries.
Lists other measurement instruments offered by Cropico.
Contact details for sales inquiries and catalog requests.
| Basic Accuracy (Resistance) | 0.03% |
|---|---|
| Data Logging | Yes |
| Interface | RS232, USB |
| Display | LCD |
| Resolution (Resistance) | 0.1 µΩ |
| Temperature Measurement | Yes |
| Power Supply | AC/DC adapter or rechargeable battery |
| Battery Life | 8 hours |