Do you have a question about the Security Labs SLM446 and is the answer not in the manual?
Remove all components from packaging and install cameras using provided hardware, noting weatherproof capabilities and outdoor mounting precautions.
Connect cameras to DVR via video/power cables, ensuring BNC connects to DVR video input and power jack to the supply.
Connect DVR to monitor using VIDEO OUT or VGA terminal and connect the DVR's power supply.
Configure the DVR's operation menu according to desired recording requirements.
The Security Labs SLM446 is a comprehensive surveillance system designed for both indoor and outdoor monitoring, providing users with a robust solution for security needs. This system is engineered to offer reliable video recording and monitoring capabilities, making it suitable for a variety of environments, from residential properties to small businesses. The core of the system is a Digital Video Recorder (DVR) that manages video input from multiple cameras and facilitates recording, storage, and playback.
The primary function of the SLM446 system is to capture, record, and allow for the viewing of surveillance footage. It is equipped to handle eight cameras simultaneously, providing extensive coverage for a designated area. The system's DVR acts as the central hub, receiving video feeds from all connected cameras. It processes these feeds, allowing users to view live footage, record it for later review, and manage stored data. The DVR can be connected to a monitor or TV via either a VIDEO OUT or VGA VIDEO OUT port, enabling real-time viewing of the camera feeds. This flexibility in output options ensures compatibility with a wide range of display devices.
Recording capabilities are a crucial aspect of the SLM446. The DVR is designed to record footage based on user-defined settings, which can be configured through its operation menu. This allows for customized recording schedules, motion-detection triggered recording, or continuous recording, depending on the specific security requirements. The recorded footage is stored internally, providing a historical record of events that can be accessed for investigation or review. The system is also capable of connecting to a broadband router, which suggests potential for remote viewing or network integration, although the quick start guide focuses on local setup.
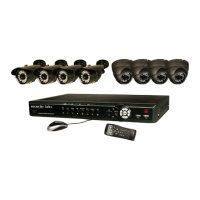
The cameras included with the SLM446 system are designed for versatility. The system comes with both SLC-1056 bullet cameras and SLC-1054 dome cameras, each serving different aesthetic and functional purposes. The bullet cameras are typically more visible and often used for overt surveillance, while dome cameras offer a more discreet profile. Both types of cameras are weatherproof, making them suitable for outdoor installation. This feature ensures that the system can withstand various environmental conditions, providing continuous surveillance regardless of weather. The cameras are powered via a 12VDC connection, with video signals transmitted through BNC connectors to the DVR.
Setting up the SLM446 system involves a straightforward process, beginning with the physical installation of the cameras. Users are advised to install cameras in desired locations, taking into account existing utility lines and placing outdoor cameras under protective eaves to enhance longevity. The system provides all necessary mounting hardware for this purpose. Once the cameras are physically installed, connecting them to the DVR is the next step. This involves connecting the supplied video/power cables to each camera, with the BNC end going to the DVR's video inputs and the DC plug providing power to the camera. The system is designed to be user-friendly, with clear labeling for connections on the DVR's back panel.
The DVR's operational menu is central to customizing the system's performance. Users can access this menu to configure various recording parameters, such as resolution, frame rate, and storage management. This allows for optimization of recording quality and duration based on available storage space and specific surveillance needs. The ability to connect the DVR to a standard monitor or TV simplifies the process of viewing live feeds and reviewing recorded footage. The quick start guide emphasizes that only one video output (either VIDEO OUT or VGA VIDEO OUT) should be used at a time for display, preventing potential conflicts.
Power management for the cameras is facilitated by power breakout adapters, which consolidate the power supply for multiple cameras. This simplifies wiring and reduces the number of individual power outlets required. The system is designed to power the included cameras specifically, and users are cautioned against using the provided power supplies for other accessories or equipment not included in the system. This ensures optimal performance and prevents potential damage to the system or external devices. The "any open video input" feature for cameras allows for flexible connection, meaning users are not restricted to specific input channels for particular cameras, enhancing ease of installation.
Maintenance of the SLM446 system primarily revolves around ensuring continuous operation and proper functioning of its components. Regular checks of camera placement and connections are recommended to ensure optimal video quality and uninterrupted surveillance. For outdoor cameras, periodic cleaning of lenses may be necessary to remove dirt, dust, or water spots that could obscure the view. While the cameras are weatherproof, placing them under protective eaves can further extend their lifespan by shielding them from direct exposure to harsh weather elements.
The DVR's internal storage will accumulate recorded footage over time. Users should periodically review their storage settings and manage recorded data to ensure sufficient space for new recordings. Depending on the configuration, older footage may be overwritten automatically, or manual management might be required. The DVR's operation menu provides tools for managing storage, including options for deleting old files or backing up important footage.
Power connections are critical for the system's operation. Ensuring that all power adapters are securely connected and functioning correctly is essential. The quick start guide explicitly warns against using the system's power supplies for non-system equipment, which is a key maintenance guideline to prevent electrical issues or damage. If any accessory items are added to the system, it is crucial to use the power adapters that came with those accessories, rather than attempting to power them from the SLM446's main power supplies.
The system's design emphasizes local control and monitoring, with the DVR acting as the central point for all operations. This simplifies troubleshooting, as most issues can be addressed by checking connections and settings directly at the DVR. In case of any operational difficulties, referring to the individual user's manual for the DVR is recommended for detailed troubleshooting steps and advanced configurations. The presence of a customer support hotline also indicates a resource for users to seek assistance with maintenance or operational queries, ensuring ongoing support for the product.
| Model | SLM446 |
|---|---|
| Manufacturer | Security Labs |
| Number of Channels | 4 |
| Power Supply | 12V DC |
| Camera Housing | Metal |
| Operating Temperature | -10°C to 50°C |
| Humidity | 10% - 90% |
| Weight | Varies by component |
| Compatibility | iOS, Android |