Do you have a question about the Seeed Mini Soldering iron and is the answer not in the manual?
Safety precautions including keeping out of reach of children, using certified power sources, avoiding wet conditions, and flammable materials.
Specifies temperature and humidity requirements for operation and idle states.
Advises turning off the power when not in use and warns about tip temperature range when ON.
Warns against shocks to electronic components and notes potential smoke on first use.
States user responsibility for damages caused by misuse or other reasons.
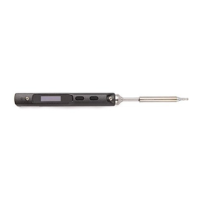
Identifies and labels the various components of the Mini Soldering Iron with numbered parts.
Details the technical specifications including screen, ports, dimensions, and weight.
Lists operational parameters like power, temperature range, stability, and tip resistance.
Step-by-step instructions for installing the solder tip and connecting the device.
Lists default values for temperature unit, default temperature, sleep mode temperature, and adjustable range.
Describes the sequence of images displayed on the screen during boot-up and standby.
Details the process of entering and performing automatic calibration via button presses.
Explains how to initiate heating and what the "Ready for soldering" state means.
Guides on how to increase or decrease the soldering iron temperature using buttons.
Explains how to put the soldering iron into sleep mode and how it returns to operating mode.
Instructions on how to correctly attach and secure the solder tip to the iron.
Provides guidance on selecting different types of soldering iron tips based on application.
Details methods for cleaning and maintaining the solder tip for longevity and performance.
Discusses factors affecting the lifespan of the soldering iron tip and refers to maintenance.
Addresses issues where the device screen does not show any display and provides checks.
Explains that temperature variation after changing the tip is normal due to auto-detect mode.
Provides solutions for the soldering iron restarting unexpectedly, checking power source and voltage.
Offers troubleshooting steps for intermittent heating, checking connections and temperature settings.
Explains the "Warning!" message, often related to temperature exceeding limits.
Explains the "High-Vt" error message indicating voltage may be too high.
Addresses the "Sen-err" error, suggesting improper tip installation or replacement.
Troubleshooting steps for when the tip does not accept solder, including temperature and flux issues.
Solves issues where the iron returns to standby mode, checking for low voltage.
Information on the one-year warranty, consumable parts, and contact for detailed warranty information.
Explains how to set default parameters by connecting the iron to a computer via USB.
Guides on how to update the device's firmware by visiting a URL and following steps.
Instructions on how to customize the boot screen logo by replacing a BMP file on the USB drive.
Instructions regarding proper disposal of the product, adhering to local regulations.
Confirms compliance with FCC regulations, including interference requirements.
Confirms compliance with CE standards and related European Union laws.
The device described in this manual is a Mini Soldering Iron, designed for precision soldering tasks. It is a compact and portable tool, as indicated by its "Mini" designation, and features an OLED screen for displaying information.
The Mini Soldering Iron is primarily used for soldering electronic components. It offers adjustable temperature settings, automatic calibration, and various operational modes to suit different soldering needs. The device is designed for ease of use with a simple button interface for control and temperature adjustments. It also supports firmware updates and boot screen customization, indicating a degree of user configurability.
General Specifications:
Working Conditions:
Default Settings:
System Parameters (Adjustable):
Power Adaptor Selection (Time for tip temperature rise from 30℃ to 300℃):
Installation:
Basic Control:
Default Parameter Setting:
config.txt in the USB drive to set default parameters. The default parameter will be updated automatically after saving.Firmware Update:
seeed.cc/mini-soldering-iron for firmware..hex firmware to the root category of the virtual drive. The file extension will change to .rdy.Boot Screen Customization:
LOGOIN.BMP is saved. Otherwise, the default logo will be shown.General Safety:
Cautions:
Soldering Iron Tip Maintenance:
Soldering Iron Tip Lifespan:
Troubleshooting Guide:
| Brand | Seeed |
|---|---|
| Model | Mini Soldering iron |
| Category | Power Tool |
| Language | English |