EasyManua.ls Logo

SEEK SHOT PRO - User Manual

SEEK SHOT PRO
11 pages
Print Icon
To Next Page IconTo Next Page
Loading...
THERMAL.COM
Download the user manual at
thermal.com/support
QUICK START GUIDE
WECHSELN SIE ZWISCHEN HDR- UND
PRÄZISIONSMODUS
Tippen Sie auf die Mitte der Bereichsanzeige, um zwischen
den beiden Anzeigemodi zu wechseln.
TRETEN SIE MIT UNS IN VERBINDUNG
seekthermal
seekthermal
SeekThermal
Seek Thermal
thermal.com/contact
TEMPERATURL EISTE
Im Präzisionsmodus können Sie mühelos einen benutzerdefinierten
Temperaturbereich einstellen, sichern und speichern. Sobald dieser
eingestellt ist, werden auf dem Kamerabildschirm nur Temperaturen
innerhalb des festgelegten Bereichs eingefärbt; Temperaturen
außerhalb des festgelegten Bereichs werden durch eine einheitliche
Farbe wiedergegeben. Die Temperaturleiste ist standardmäßig
aktiviert und wird auf dem Kamerabildschirm angezeigt. Der
Bereich der Temperaturleiste passt sich anhand der aktiven Szene
bezüglich HDR- und Präzisionsanzeigemodus automatisch an.
TEMPERATURWERTE SICHERN (nur im Präzisionsmodus)
Tippen Sie in der Temperaturleiste auf eine der folgenden
Optionen:
Um die Höchsttemperatur zu sichern, tippen Sie auf das
Schloss oben an der Temperaturleiste.
Um die Mindesttemperatur zu sichern, tippen Sie auf das
Schloss unten an der Temperaturleiste.
HILFE UND HILFSMITTEL
KUNDENSUPPORT
Benötigen Sie Hilfe? Finden Sie häufig gestellte Fragen und
kontaktieren Sie den Kundensupport unter support.thermal.com
5. Wählen Sie eine der folgenden Optionen:
• Als Kopie speichern: Tippen, um das bearbeitete Foto als
neues Bild zu speichern.
• Überschreiben: Tippen, um die Änderungen am vorhandenen
Foto zu speichern.
TEMPERATURWERTE EINSTELLEN (nur im Präzisionsmodus)
1. Tippen Sie in der Temperaturleiste auf eine der folgenden
Optionen:
• Um die Höchsttemperatur einzustellen, tippen Sie auf die
Nummer oben an der Temperaturleiste.
• Um die Tiefsttemperatur einzustellen, tippen Sie auf die
Nummer unten an der Temperaturleiste.
3. Optional: Um die ausgewählte Temperatur zur zukünftigen
Verwendung zu speichern, tippen Sie entweder auf das Plus
(+) Symbol oder auf einen bereits bestehenden Wert unter
Voreinstellungen.
4. Tippen Sie auf das Häkchen, um die Änderungen zu
speichern.
FARBPALETTEN
Wenden Sie mühelos eine Vielzahl an Farbschemas auf das Bild an.
1. Tippen Sie auf das Farbsymbol
2. Tippen Sie auf die gewünschte Farbpalette, um ein neues
Farbschema auf die aktive Szene anzuwenden.
BILDERGALERIE
Die Bildergalerie enthält alle Fotos der Kamera. Sie können
die Bilder in der Galerie ansehen, bearbeiten und löschen.
BILDERGALERIE AUFRUFEN
Tippen Sie auf die Bildvorschau auf dem Kamerabildschirm
(unten links), um die Bildergalerie zu önen.
INFORMATIONEN EINES FOTOS ANSEHEN
1.
Tippen Sie auf die Pfeile, um zum gewünschten Foto zu gelangen.
2. Tippen Sie auf Information, um die Informationen des
Fotos anzuzeigen.
EIN FOTO BEARBEITEN
1.
Tippen Sie auf die Pfeile, um zum gewünschten Foto zu gelangen.
2. Tippen Sie auf Bearbeiten
3. Tippen Sie auf das gewünschte Bearbeitungswerkzeug.
4. Tippen Sie auf „okay” , um die Bearbeitung zu speichern.
EIN FOTO LÖSCHEN
1.
Tippen Sie auf die Pfeile, um zum gewünschten Foto zu gelangen.
2. Tippen Sie auf Löschen
3. Bestätigen Sie, dass Sie das Foto löschen wollen.
2. Tippen Sie entweder auf das Plus (+) oder Minus (-) Symbol,
um die Temperatur auszuwählen, oder geben Sie sie über die
Tastatur ein.
5. Choisissez l'une des options suivantes:
Enregistrer en tant que copie : appuyez pour enregistrer
votre photo modifiée en tant que nouvelle image.
Écraser: appuyez pour enregistrer vos modifications sur la
photo existante.
ALTERNER ENTRE LES MODES HIGH
DYNAMIC RANGE ET PRÉCISION
Appuyez sur la zone centrale de la barre de plage d'achage
pour alterner entre les deux modes d'imagerie.
CONTACTEZ-NOUS
seekthermal
seekthermal
SeekThermal
SeekThermal
thermal.com/contact
B ARRE DE TEMPÉRATURE
En mode Précision, vous pouvez rapidement définir,
verrouiller et enregistrer une plage de température
personnalisée. Une fois définie, l'écran de l'appareil photo
ne colorisera que les températures au sein de la plage
spécifiée. Les températures en dehors de cette plage seront
représentées par une couleur unie. Par défaut, la barre de
température est activée et achée sur l'écran de votre
appareil photo. La plage de la barre de température s'ajustera
automatiquement en fonction de l'écran actif, en mode High
Dynamic Range comme en mode Précision.
VERROUILLER LES VALEURS DE TEMPÉRATURE (uniquement
en mode Précision)
Dans la barre de température, appuyez sur l'une des options
suivantes:
Pour verrouiller la température maximale, appuyez sur le
cadenas situé en haut de la barre de température.
Pour verrouiller la température minimale, appuyez sur le
cadenas situé en bas de la barre de température.
GALERIE D'IMAGES
La galerie d'images contient toutes les photos de votre
appareil. À partir de la galerie, vous pouvez voir, modifier ou
supprimer des images existantes.
ACCÉDER À LA GALERIE D'IMAGES
Appuyez sur la vignette d'image de l'écran de votre appareil
photo (en bas à gauche) afin d'accéder à la galerie d'images.
AFFICHER LES INFORMATIONS D'UNE PHOTO
1. Appuyez sur les flèches pour vous rendre sur la photo désirée.
2. Appuyez sur Informations pour visualiser les informations
de la photo.
MODIFIER UNE PHOTO
1. Appuyez sur les flèches pour vous rendre sur la photo désirée.
2. Appuyez sur Modifier
3. Appuyez sur l'outil d'édition que vous souhaitez utiliser.
4. Appuyez sur la coche pour enregistrer vos modifications.
SUPPRIMER UNE PHOTO
1. Appuyez sur les flèches pour vous rendre sur la photo désirée.
2. Appuyez sur Supprimer
3. Confirmez votre décision de supprimer la photo.
AIDE ET RESSOURCES
ASSISTANCE À LA CLIENTÈLE
Vous avez besoin d'aide? Trouvez les questions les plus
fréquemment posées et contactez l'assistance à la clientèle
sur support.thermal.com
PARAMÉTRER LES VALEURS DE TEMPÉRATURE (uniquement
en mode Précision)
1. Dans la barre de température, appuyez sur l'une des options
suivantes:
• Pour paramétrer la température maximale, appuyez sur le
nombre situé en haut de la barre de température.
• Pour paramétrer la température minimale, appuyez sur le
nombre situé en bas de la barre de température.
3. Facultatif: pour enregistrer la température sélectionnée
pour une utilisation ultérieure, appuyez sur le bouton plus (+)
ou sur une valeur existante sous Préréglages.
4. Appuyez sur le symbole de coche pour enregistrer vos
modifications.
PALETTES DE COULEURS
Appliquez rapidement diverses combinaisons de couleurs sur
votre image.
1. Appuyez sur l'icône Couleur
2. Appuyez sur la palette de couleurs désirée pour appliquer
une nouvelle combinaison de couleurs sur votre scène active.
2. Appuyez sur les icônes plus (+) ou moins (-) pour
sélectionner vos températures, ou appuyez sur le clavier pour
saisir une température.
5. Choose one of the following options:
• Save as Copy: Tap to save your edited photo as a new image.
• Overwrite: Tap to save your edits to the existing photo.
SWITCH BETWEEN HIGH DYNAMIC
RANGE AND PRECISION MODES
Tap the middle region of the range bar to switch between the
two imaging modes.
CONNECT WITH US
seekthermal
seekthermal
SeekThermal
Seek Thermal
thermal.com/contact
TEMPERATURE B AR
While in Precision mode, you can quickly set, lock, and save
a custom temperature range. Once set, the camera screen
will colorize only the temperatures within the specified
range; temperatures outside of the specified range will be
represented by a solid color. By default, the Temperature Bar
is enabled and displayed on your camera screen. The range
of the Temperature Bar will automatically adjust based on
the active scene in both High Dynamic Range and Precision
imaging modes.
SET TEMPERATURE VALUES (Precision mode only)
1. In the Temperature Bar, tap one of the following options:
• To set the maximum temperature, tap the number at the top
of the temperature bar.
• To set the minimum temperature, tap the number at the
bottom of the temperature bar.
3. Optional: To save your selected temperature for future
use, tap either the plus (+) button, or an existing value under
Presets.
4. Tap the check mark to save your changes.
LOCK TEMPERATURE VALUES (Precision mode only)
In the Temperature Bar, tap one of the following options:
• To lock the maximum temperature, tap the lock
at the top of the temperature bar.
• To lock the minimum temperature, tap the lock
at the bottom of the temperature bar.
COLOR PALETTES
Quickly apply a variety of color schemes to your image.
1. Tap Color Icon
2. Tap the desired color palette to apply a new color scheme
to your active scene.
IMAGE GALLERY
The Image gallery contains all of your camera’s photos. From
the gallery, you can view, edit, or delete existing images.
ACCESS THE IMAGE GALLERY
Tap the image thumbnail on your camera’s screen (lower left)
to access the image gallery.
VIEW A PHOTO’S INFORMATION
1. Tap the arrows to navigate to the desired photo.
2. Tap Information to view the photo’s information.
EDIT A PHOTO
1. Tap the arrows to navigate to the desired photo.
2. Tap Edit
3. Tap the editing tool you want use.
4. Tap okay to save your edits.
DELETE A PHOTO
1. Tap the arrows to navigate to the desired photo.
2. Tap Delete
3. Confirm your decision to delete the photo.
HELP AND RESOURCES
CUSTOMER SUPPORT
Need help? Find frequently asked questions and contact
customer support at support.thermal.com
2. Tap the plus (+) or minus (-) icons to select your temperature,
or tap the keyboard to enter a temperature.
Question and Answer IconNeed help?

Do you have a question about the SEEK SHOT PRO and is the answer not in the manual?

Summary

Adjusting Camera Settings

Advanced Settings

See the Advanced Settings section for a complete list of configurable features.

Emissivity

Define and adjust emissivity for accurate thermal reporting.

View Modes

Camera Tools

Center Temperature

Display temperature at the center using a cross-hair.

Spot Temperature

Add up to three repositionable temperature markers.

Region Temperature

Define up to three resizable Regions of Interest for temperature analysis.

Temperature Bar and Modes

Temperature Bar

Set, lock, and save custom temperature ranges.

Lock Temperature Values

Lock maximum and minimum temperature values in Precision mode.

Temperature Settings and Color Palettes

Set Temperature Values

Set and save custom temperature ranges in Precision mode.

Overview

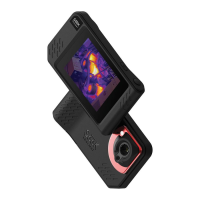
The Seek Shot Pro is a professional thermal imaging camera designed for capturing and analyzing thermal images and videos. It combines both thermal and visible light cameras to provide comprehensive imaging capabilities, making it a versatile tool for various applications where temperature analysis is crucial.

Function Description

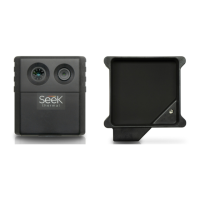
The primary function of the Seek Shot Pro is to detect and visualize heat signatures, allowing users to identify temperature differences and anomalies that are not visible to the naked eye. It achieves this through its integrated thermal camera, which captures infrared radiation emitted by objects. Alongside the thermal camera, a visible camera captures standard digital images, which can be combined with thermal data for enhanced context and detail. This dual-camera system enables the device to offer several viewing modes, including visible imaging, thermal imaging, and SeekFusion™ View, which overlays thermal and visible images in real-time.

The device is capable of capturing both still photos and videos. When capturing photos, a short press of the Capture button saves the thermal or combined image to the camera's gallery. For video recording, a long press initiates the recording, and a subsequent press stops it, with the video automatically saved to the gallery.

Beyond basic image capture, the Seek Shot Pro provides advanced temperature measurement and analysis tools. It can display the temperature at the center of the active scene (Center Temperature), create up to three repositionable temperature cross-hairs for specific spot measurements (Spot Temperature), and define up to three resizable and repositionable Regions of Interest (ROI) for temperature analysis within defined areas (Region Temperature). Additionally, it can quickly display both the highest and lowest temperatures within the active image (High/Low).

The camera also incorporates image processing modes to optimize viewing for different scenarios. High Dynamic Range (HDR) mode is ideal for scenes with extreme temperature differences, enhancing detail in both very hot and very cold areas. Precision Imaging Mode allows users to view and colorize an exact temperature range, highlighting specific temperature bands within the scene. This mode is particularly useful for detailed analysis where precise temperature differentiation is required.

Usage Features

The Seek Shot Pro is designed for ease of use with a touch screen interface and dedicated physical buttons.

Getting Started:

To begin, users simply remove the camera from its packaging and charge the battery using the included USB cable. Powering on the device involves pressing and holding the Power button, located at the top of the camera, for 2-3 seconds.

Capture and Recording:

The Capture button serves as the primary control for taking photos and recording videos. A quick press captures a photo, while a long press initiates video recording. Releasing the button continues the recording, and pressing it again stops and saves the video.

The device features a touch screen for intuitive navigation. Tapping the active display reveals the Quick Settings bar at the top of the screen, providing access to essential camera adjustments. These include:

  • Brightness: Manually adjusts the screen's brightness for optimal viewing in various lighting conditions.
  • WiFi: Configures the camera's WiFi settings, likely for data transfer or remote control.
  • Flash: Quickly activates the camera's flash to add visible light when taking photos, useful in low-light environments.
  • Flashlight: Turns on a dedicated flashlight for illuminating the scene, separate from the photo flash.
  • Help: Provides access to the Seek SHOT user guides for detailed instructions and troubleshooting.
  • Advanced Settings: Offers a comprehensive list of configurable features for more in-depth customization.

Measurement Units and Emissivity:

Users can quickly set their preferred measurement units for temperature, such as Celsius or Fahrenheit. Emissivity, a crucial setting for accurate temperature readings, can be manually adjusted. Emissivity defines how much infrared light is reflected from a surface, and correctly setting this value ensures that the reported temperatures are precise.

View Modes:

The camera offers three distinct view modes, easily switchable via dedicated icons:

  • Visible Imaging: Displays a standard digital camera view, providing visual context.
  • Thermal View: Shows the scene purely based on thermal data, highlighting temperature differences.
  • SeekFusion™ View: A real-time composite view that blends visible and thermal images. This mode enhances understanding by showing both the visual appearance and the thermal characteristics of objects simultaneously. In SeekFusion™ View, users can manually adjust the ratio of visible to thermal views using a left slider to control transparency. A right slider allows for manual alignment of images when the camera is within two meters of the subject, ensuring accurate overlay.

Camera Tools for Analysis:

Several on-screen tools aid in temperature analysis:

  • Center Temperature: Displays the temperature at the exact center of the screen.
  • Spot Temperature: Allows users to place up to three movable cross-hairs on the screen to measure temperatures at specific points.
  • Region Temperature: Enables the creation of up to three resizable and repositionable boxes (Regions of Interest) to analyze average, maximum, or minimum temperatures within those areas.
  • High/Low: Quickly shows the highest and lowest temperatures detected in the current image.

Image Processing Modes:

The camera supports two key image processing modes:

  • High Dynamic Range (HDR): Optimizes images for scenes with significant temperature variations, ensuring details are visible across the entire temperature spectrum.
  • Precision Imaging Mode: Focuses on a specific temperature range, colorizing only the temperatures within that range. This mode is indicated by lock icons next to the max and min values on the range bar. Users can switch between HDR and Precision modes by tapping the middle region of the temperature range bar.

Temperature Bar and Precision Mode:

In Precision mode, the Temperature Bar allows users to set, lock, and save custom temperature ranges. This means only temperatures within the specified range will be colorized, while temperatures outside it will appear as a solid color. The Temperature Bar automatically adjusts its range based on the active scene in both HDR and Precision modes. Users can lock the maximum or minimum temperature values by tapping the respective lock icons on the temperature bar. To set specific temperature values, users can tap the numbers at the top or bottom of the temperature bar, then use plus/minus icons or a keyboard to enter values. These custom settings can be saved as presets for future use.

Color Palettes:

The device offers a variety of color schemes (palettes) that can be applied to thermal images to enhance visualization. Users can tap the Color Icon and then select a desired palette to change the color representation of temperatures in the active scene.

The Image Gallery stores all captured photos and videos. Users can access it by tapping the image thumbnail on the camera's screen (lower left). Within the gallery, users can:

  • View Information: Tap the information icon to see details about a selected photo.
  • Edit Photos: Navigate to a desired photo, tap the Edit icon, use editing tools, and then save changes either as a new copy or by overwriting the original.
  • Delete Photos: Navigate to a photo, tap the Delete icon, and confirm the decision to remove it.

Maintenance Features

The manual primarily focuses on operational features, but certain aspects imply maintenance considerations:

Battery Charging: The device requires regular charging via the included USB cable, indicating that battery management is a routine maintenance task. The USB port also serves for data transfer, suggesting that regular data offloading might be part of maintenance to free up storage space.

Software Updates: While not explicitly detailed as a maintenance feature, the presence of WiFi settings and "Advanced Settings" often implies the possibility of firmware or software updates, which are common maintenance activities for electronic devices to improve performance or add features.

User Guides and Support: The "Help" section provides access to user guides, and the "Customer Support" information (FAQs, contact details) indicates resources for troubleshooting and resolving issues, which are integral to maintaining device functionality.

In summary, the Seek Shot Pro is a robust thermal imaging camera designed for professional use, offering a comprehensive suite of features for capturing, analyzing, and managing thermal data with a user-friendly interface.

SEEK SHOT PRO Specifications

General IconGeneral
Resolution320 x 240
Display Resolution640 x 480
Battery Life4 hours
Temperature Range-20°C to 330°C
EmissivityAdjustable
Spectral Range7.5 - 14 μm
Battery TypeLithium Ion
ConnectivityUSB-C
CompatibilityiOS, Android
Dimensions1" x 1.85" x 1.06" (26mm x 47mm x 27mm)
Detection RangeUp to 1, 900 Feet (579 meters)

Related product manuals