EasyManua.ls Logo

SEI CHELMSFORD - User Manual

SEI CHELMSFORD
7 pages
Print Icon
To Next Page IconTo Next Page
Loading...
For assistance with assembly contact:
Southern Enterprises, Inc.
Customer Service 1-800-633-5096
service@seidal.com
www.seidal.com
ITEM NO. HE4009R
0TX
“CHELMSFORD” STORAGE CONSOLE
ESPRESSO FINISHING
Assembly Instructions
Question and Answer IconNeed help?

Do you have a question about the SEI CHELMSFORD and is the answer not in the manual?

Summary

Storage Console Parts Identification

Hardware Identification and Quantities

Assemble Base and Frame Components

Attach Feet to Bottom Panel

Securing the four feet (N) into the designated holes on the bottom panel (B).

Connect Side and Cross Panels

Connecting facing panels (C/D) and cross panels (E/F) using cam-bolts (3) and cam-locks (4).

Construct Main Body and Attach Doors

Install Top Panel and Supports

Attaching the top panel (A), magnets, and various support pieces to the cabinet structure.

Attach Doors and Hardware

Mounting doors (I/J) with knobs (7), female magnets (10), and hinges (8) using screws.

Complete Unit Assembly with Back Panels and Wicker

Secure Back Panels

Fastening the back panels (K/L/M) to the rear of the assembled unit using screws.

Install Wicker Components

Attaching the wicker bottom (P) to the frame (O) and inserting wicker baskets.

Product Support and Replacement Information

Requesting Replacement Parts

Instructions for submitting a form to request missing or damaged parts.

Customer Service Contact Information

Contact details for customer service, including phone, email, and address.

Overview

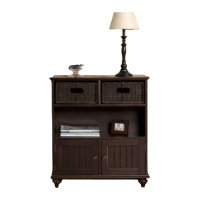
The "CHELMSFORD" STORAGE CONSOLE, identified by item number HE4009R0TX, is a piece of furniture designed for storage, featuring an espresso finish. This manual provides detailed assembly instructions and a comprehensive parts list to guide users through the setup process.

Function Description:

The Chelmsford Storage Console serves as a versatile storage unit, ideal for organizing various items in a living space. It incorporates a combination of open shelving, concealed compartments with doors, and wicker baskets, offering diverse storage options. The console's design aims to provide both functional storage and an aesthetic appeal with its espresso finish. It is suitable for use in living rooms, entryways, or other areas where additional storage and a decorative touch are desired.

Important Technical Specifications:

The console's construction involves several panels, including a top panel (A), bottom panel (B), left and right facing panels (C and D), upper and bottom cross panels (E and F), bottom and upper stand panels (G and H), and various back panels (K, L, M). The unit is supported by four feet (N).

Key hardware components include:

  • Screws (1): Quantity 40, used for general assembly.
  • Small Magnets (2): Quantity 2, likely used for door closures.
  • Cam-bolts (3): Quantity 24, crucial for connecting panels.
  • Cam-locks (4): Quantity 24, used in conjunction with cam-bolts to secure connections.
  • Cam-tool (5): Quantity 1, provided for tightening cam-locks.
  • Screws (6): Quantity 2, used for attaching knobs.
  • Knobs (7): Quantity 2, for the doors.
  • Hinges (8): Quantity 4, for the doors.
  • Screws (9): Quantity 26, used for attaching hinges and female magnets.
  • Female Magnets (10): Quantity 2, for door closures.
  • Screws (11): Quantity 8, specifically for attaching wicker bottoms to frames.
  • Cotton Mats (12): Quantity 12, used to cover cam-locks for a finished look.
  • Screws (13): Quantity 7, used for attaching support pieces.

The console also includes two doors (I and J), a long support (Q), left and right short supports (R and S), two wicker frames (O), and two wicker bottoms (P).

Usage Features:

The Chelmsford Storage Console is designed for self-assembly, with detailed instructions provided to guide the user.

  • Assembly Process: The assembly begins by attaching the feet to the bottom panel. Subsequently, cam-bolts and cam-locks are used to connect the various cross and facing panels, forming the main structure. The top panel is then secured using cam-bolts and cam-locks.
  • Door Installation: The doors are installed using hinges, and knobs are attached for easy opening. Small magnets and female magnets are used to ensure the doors close securely.
  • Support Structures: Long and short support pieces are integrated into the console's structure to enhance stability.
  • Wicker Baskets: The console features dedicated compartments for wicker baskets. The wicker bottoms are attached to the wicker frames, and these completed baskets are then inserted into their designated slots, providing an additional layer of organized storage.
  • Finishing Touches: Cotton mats are provided to cover exposed cam-locks, contributing to a clean and finished appearance.

Maintenance Features:

The manual provides specific care and cleaning instructions to ensure the longevity and appearance of the console:

  • Initial Cleaning: Before initial use, it is recommended to wipe the furniture with a clean, dry cloth.
  • Regular Maintenance: Periodically, furniture wax should be applied to renew the finish. This helps to maintain the console's luster and protect the surface.
  • Surface Protection: Users are advised to avoid rubbing or scratching the surface with rough or abrasive objects to prevent damage to the espresso finish.

Important Assembly Notes:

  • Hardware Check: Before assembly, users are instructed to review all parts and hardware to ensure nothing is missing. In case of missing hardware, customer service should be contacted.
  • Screw Length: A critical warning is issued regarding screw length: "Using a screw that is too long will cause damage." Users are advised to separate each type of screw and carefully study the screw diagrams.
  • Over-tightening: A prominent instruction states, "PLEASE DO NOT OVER-TIGHTEN CAMBOLTS. PLEASE STOP WHEN YOU FEEL TIGHT." This prevents damage to the cam-bolts and panels.
  • Surface Protection during Assembly: To prevent scratching, users are advised to unpack and lay parts on a clean, padded surface, such as carpet or a blanket, during assembly.
  • Tool Requirement: A No.2 Phillips Screwdriver (Not Included) is required for assembly.

Customer Support:

For assistance with assembly, replacement parts, or any questions, customers can contact Southern Enterprises, Inc. Customer Service at 1-800-633-5096 or via email at service@seidal.com. The manual emphasizes that products should not be returned to the store/retailer for missing hardware or parts issues, but rather the manufacturer should be contacted directly. Missing or damaged hardware/parts will be replaced free of charge, and the company does not sell parts or recommend modifying the product. The warranty for parts replacement is limited to products purchased within 9 months from retail affiliates.

SEI CHELMSFORD Specifications

General IconGeneral
BrandSEI
ModelCHELMSFORD
CategoryIndoor Furnishing
LanguageEnglish

Related product manuals