EasyManua.ls Logo

SELWOOD A25195 - User Manual

Default Icon
28 pages
Print Icon
To Next Page IconTo Next Page
Loading...
Rev Oct.24-2013
Table of Contents
Warnings and Safe Play Instructions. . . . . . . . . . . . . . . pg. 2
Protective Surfacing Guidelines. . . . . . . . . . . . . . . . . . . pg. 3
Instructions for Proper Maintenance ...............pg. 4
About Our Wood – Limited Warranty ..............pg. 5
Keys to Assembly Success ......................pg. 6
Metric Conversion Sheets ..................... pg. 7,8
Part ID .......................................pg. 9
9405195
1 - 2 Hrs
Two person
assembly
FR: Pour obtenir la notice de montage dans votre langue, cliquez sur www.selwoodproducts.com
DE: Gehen Sie auf www.selwoodproducts.com um die Bauanleitung in thre Sprache zu bekommen.
www.selwoodproducts.com
Europe
The Granary, Weathercock Hill
Chevington, Bury St
Edmunds, Suffolk IP29 5RG
North America
375 Sligo Road West.
P.O. Box 10 Mount Forest
Ontario, Canada N0G 2L1
Australia
Unit 6/168 - 180 Victoria Road
Marrickville, Sydney NSW 2204
ASSEMBLY INSTRUCTIONS
2 POSITION MONKEY LADDER SWING – A25195
To reduce the risk of serious injury or death, you must read and
follow these instructions. Keep and refer to these instructions often
and give them to any future owner of this play system. Manufacturer contact information provided below.
OBSTACLE FREE SAFETY ZONE - 4.1 m x 7.92 m area requires Protective Surfacing. See page 3.
MAXIMUM VERTICAL FALL HEIGHT - 1.8 M
CAPACITY - 2 Users Maximum, Ages 3 to 10; Weight Limit 110 lbs. (49.9 kg) per child.
RESIDENTIAL HOME USE ONLY. Not intended for public areas such as schools, churches, nurseries, day cares or parks.
WARNING
7.92M
2.3M
4.1M
2.4M
2 Pos. Monkey Ladder Swing
Question and Answer IconNeed help?

Do you have a question about the SELWOOD A25195 and is the answer not in the manual?

Summary

Warnings and Safe Play Instructions

Serious Head Injury Hazard

Risk of injury from falls onto hard surfaces; requires shock-absorbing material.

Collision Hazard

Place play-set on level ground away from obstructions for safety.

Choking Hazard;Sharp Edges & Points

Product contains small parts and sharp edges; keep away from children.

Strangulation Hazard

Never allow ropes, cords, or loose clothing near the play-set.

Tip Over Hazard

Ensure level location and proper anchoring to prevent tipping.

Safe Play Guidelines

Follow safe play practices like proper footwear, supervision, and seat usage.

Protective Surfacing Guidelines

Loose-Fill Materials

Guidelines for depth, maintenance, and containment of loose-fill surfacing.

Alternative Surfacing Types

Information on poured-in-place or rubber tiles, requiring professional installation.

Surfacing Placement and Area

Proper placement and required area for protective surfacing around equipment.

Proper Maintenance Instructions

Hardware and Fastener Checks

Inspect and tighten all hardware; check for rust and sharp edges regularly.

Swing Hanger and Swing Checks

Ensure swing hangers are secure, oriented correctly, and check swings for wear.

Surfacing and Anchor Checks

Maintain surfacing depth and check ground stakes for security and integrity.

Wood Component Inspection

Examine wood for deterioration, splinters, or damage; perform necessary sanding or replacement.

About Our Wood

Understanding Wood Weathering

Explains checking, warping, and fading as natural wood changes.

Reducing Wood Weathering

Advice on applying water repellent and storing the play system properly.

Limited Warranty Information

Warranty Coverage and Exclusions

Details what the limited warranty covers and common exclusions.

Part Replacement Schedule

Outlines the schedule for replacing parts under warranty.

Keys to Assembly Success

Part Identification and Symbols

Guide to identifying parts using keys and understanding assembly symbols.

Protrusion Hazard Warning

Warning about exposed bolt threads and how to prevent them with washers.

Proper Hardware Assembly Techniques

Instructions for correct assembly of lag screws and bolts with hardware.

Hardware Identification and Measurements

Hardware Length Chart

Chart comparing hardware lengths in inches and millimeters.

Diameter Conversion Guide

Table for converting screw and bolt diameters from inches to millimeters.

Wood Profile Dimensions

Wood Component Sizes

Lists nominal and actual sizes for various wood profiles used in assembly.

Length Conversion for Wood

Formula and example for converting board lengths from inches to millimeters.

Hardware Part Identification

Wood Screws and T-Nuts

Identification of wood screws and different types of T-nuts with quantities.

Hex Bolts and Associated Hardware

Identification of various hex bolts, lock washers, flat washers, and T-nuts.

Wood and Accessory Part Identification

Wood Components and Profiles

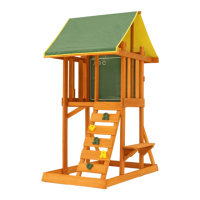
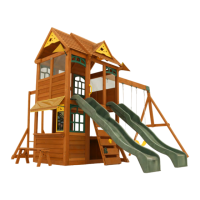
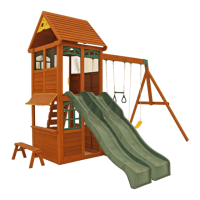
Identification of various wood beams, rails, posts, stakes, blocks, and dowels.

Swing Components and Accessories

Identification of swings, hanger covers, plates, hole plugs, and hanger bolts.

Step 1: Monkey Swing Rail Assembly

Pre-drilling and Dowel Insertion

Instructions for pre-drilling holes and inserting dowels into swing beams.

Attaching Dowels with Screws

Securing dowels to swing beams using wood screws.

Step 2: Monkey End Ladder Assembly (Part 1)

Dowel Insertion into End Posts

Inserting dowels into end posts and pre-drilling pilot holes.

Securing Dowels to End Posts

Attaching dowels to end posts using wood screws as per instructions.

Step 2: Monkey End Ladder Assembly (Part 2)

Attaching Ground Rail

Connecting the ground rail to the end posts using hex bolts.

Attaching End Diagonals

Securing end diagonals to the ground rail and end posts.

Final Bolt Tightening

Final tightening of all bolts for the end ladder assembly.

Step 3: Attach Swing Hangers

Installing and Orienting Swing Hangers

Installing bolt-thru swing hangers onto the SW beam in the correct orientation.

Step 4: Attach Triangle Plates (Part 1)

Attaching Triangle Plates to SW Beam

Securing triangle plates to the SW beam using hex bolts and t-nuts.

Installing End Bolts for Wood Stability

Installing hex bolts at the ends of SW beams to prevent wood splitting.

Step 4: Attach Triangle Plates (Part 2)

Attaching Fort Side Triangle Plates

Securing triangle plates to the fort side of the SW beam.

Installing End Bolts for Wood Stability

Installing hex bolts at the ends of SW beams to prevent wood splitting.

Step 5: Attach End Ladder to Swing Rail

Connecting Ladder Assembly to Swing Rail

Attaching the end ladder assembly to the swing rail using hex bolts.

Step 6: Attach Spacer

Securing Spacer to Post

Attaching the spacer to the post using wood screws for stability.

Step 7: Attach SW Block to Fort (Part 1)

Removing Hole Plugs Based on Deck Height

Removing specific hole plugs depending on the deck height purchased.

Removing Roof;Wall Support Bolts

Removing hex bolts attaching roof/wall support to the post.

Step 7: Attach SW Block to Fort (Part 2)

Attaching SW Block to Post

Securing the SW block to the post using hex bolts and t-nuts.

Step 8: Connect Monkey Ladder Assembly to Fort

Connecting Ladder to SW Block (1.2 M Deck)

Attaching ladder assembly to SW block using specified bolts for 1.2M deck.

Connecting Ladder to SW Mount (1.5 M Deck)

Attaching ladder assembly to SW mount using specified bolts for 1.5M deck.

Step 8 M: Connect Ladder to Fort (Meadowside)

Removing Hole Plugs for Meadowside

Removing hole plugs from SW mounts for Meadowside fort installation.

Attaching Ladder to Meadowside Mounts

Securing ladder assembly to Meadowside SW mounts using hex bolts.

Step 9: Attach Swing Ground Stakes

Driving and Securing Ground Stakes

Driving ground stakes into the ground and securing them with wood screws.

Step 10: Attach Belt Swings

Installing Swing Hanger Covers

Inserting and sliding swing hanger covers over the hooks.

Hooking Swings onto Hangers

Attaching the belt swings to the installed swing hangers.

Checking Bolt Protrusion

Ensuring no bolt threads protrude to prevent sharp edges.

Important Instructions Prior to Play

Play Area Safety Precautions

Remove swings before using monkey bars; keep fall zone clear of hazards.

SELWOOD A25195 Specifications

General IconGeneral
BrandSELWOOD
ModelA25195
CategoryPlay Sets & Playground Equipment
LanguageEnglish

Related product manuals