EasyManua.ls Logo

SereneLife SLCASN18 User Manual

SereneLife SLCASN18
8 pages
To Next Page IconTo Next Page
Page #1 background imageLoading...
Page #1 background image
1. 180ml. water will be pumped out
continuously by one step.
2. 19L fresh water tank, 3L liquid
soap tank.
3. More than 100 washes by a single
ll-up.
4. lmlliquid soap dispenser included.
5. Equipped with multipurpose
towel rack.
6. Equipped with wheels for
moving.
7. Equipped with exible hose for
draining.
1. Please always assemble according to the instruction.
2. Base tank can be xed on ground through four holes
at the comer if necessary.
3. Insert faucet into transparent tube and x it on the washbasin,
then x the tube with base tank and stand column.
Stand Column
Screw into the
lock point
Base tank
2. Assemble the washbasin on the top of the stand column.1. Screw the stand column in the base tank.
Washbin
Make sure two parts are well blocked.
Stand
Column
Faucet
Faucet
6. Fill fresh water into base tank and step foot pump for
handwash.
5. Screw the exible drain hose on the washbasin.4. Fill the liquid soap into the tank and assemble the dispenser.
Liquid Soap
3L
Dispenser
Flexible Drain
Hose
*Demonstration only,water tank and portable toilet are not included.
19L
Equipped with multipurpose towel rack
Base tank can be xed on ground through four holes at the
corner if necessary. Pegs are sold separately,not included.
Question and Answer IconNeed help?

Do you have a question about the SereneLife SLCASN18 and is the answer not in the manual?

SereneLife SLCASN18 Specifications

General IconGeneral
BrandSereneLife
ModelSLCASN18
CategoryWater System
LanguageEnglish

Summary

Serene Life Portable Handwash Stand Overview

Key Product Features

Highlights include 180ml continuous water pump, 19L fresh water tank, 3L soap tank, and over 100 washes per fill.

Important Safety and Assembly Notes

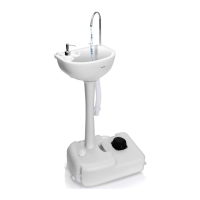
Emphasizes following assembly instructions and the option to fix the base tank to the ground.

Assembly Instructions

Step 1: Screw Stand Column into Base Tank

Securely attach the stand column to the designated lock point on the base tank.

Step 2: Assemble Washbasin on Stand Column

Mount the washbasin onto the top of the assembled stand column, ensuring it is well-blocked.

Step 3: Install Faucet and Tube Assembly

Insert the faucet into the transparent tube and fix it to the washbasin and base tank.

Step 4: Fill and Mount Soap Dispenser

Add liquid soap to the tank and assemble the dispenser onto the washbasin.

Step 5: Attach Flexible Drain Hose

Connect the flexible drain hose to the washbasin outlet for water drainage.

Step 6: Fill Water and Operate Foot Pump

Fill the fresh water tank and use the foot pump to dispense water for handwashing.

Base Tank Installation and Support

Ground Fixing for Base Tank

Instructions on how to fix the base tank to the ground using four corner holes.

Online Support and Contact

Information on visiting the website for questions, service, repair, or feedback.