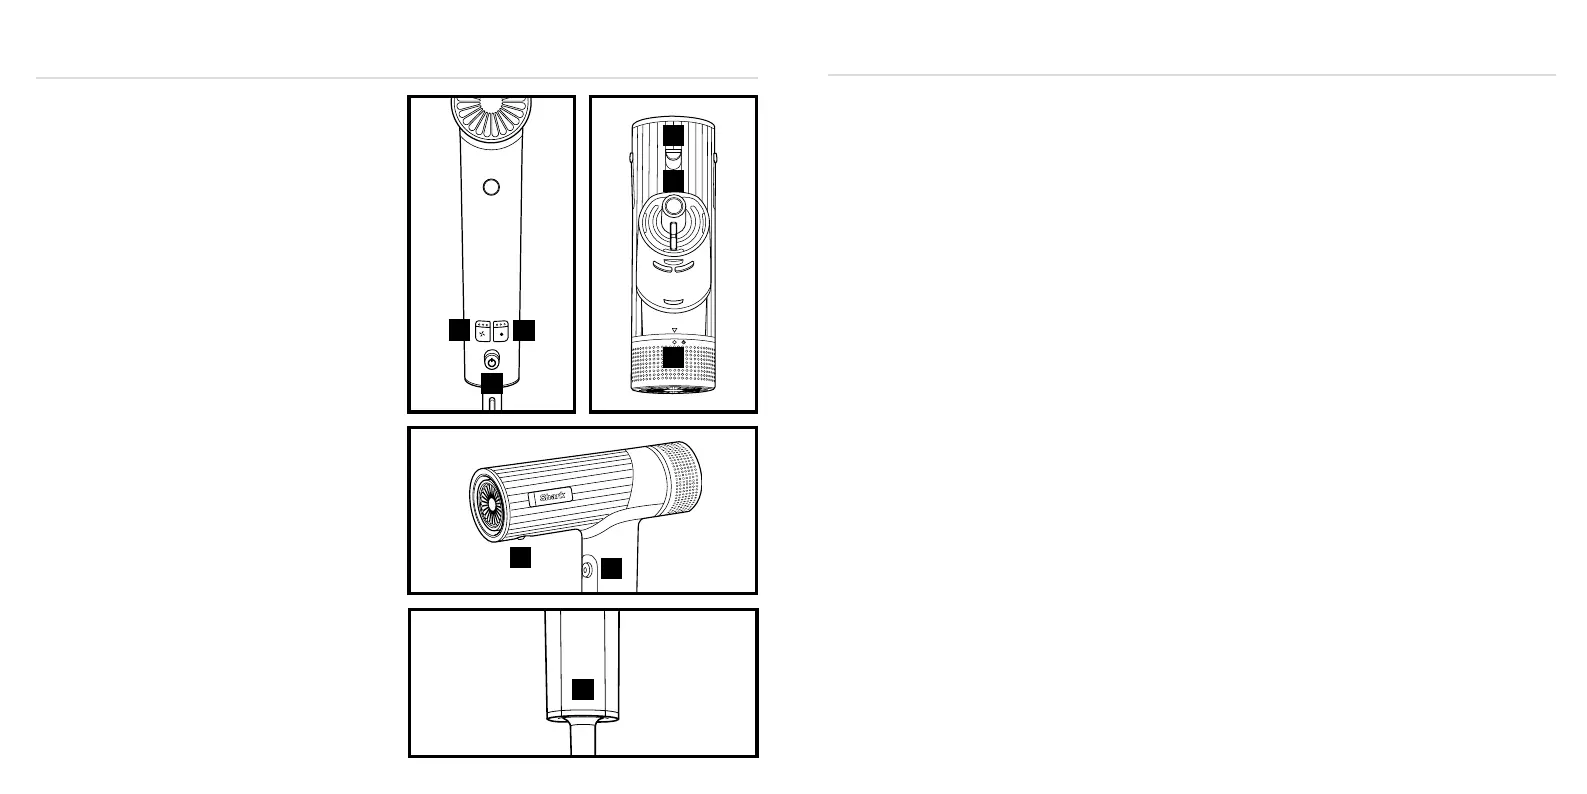
1. Slide the power button to turn the dryer on and o.
2. Press the airflow button to choose a low, medium,
or high airflow.
3. Press the temperature button to choose no heat, or low,
medium, or high temperature.
4. Press and hold the Cool Shot button for a cool burst
of air to set your style.
5. To attach any accessories included with your model,
press them into the nozzle outlet. You will know they are
properly attached when they click in place.
6. To remove an accessory, slide the lock down and lift
the accessory o the nozzle by holding onto the
touchpoints identified in your Styling Guide.
7. To remove the filter cover, twist it o the back of the
unit counterclockwise. To attach the filter cover, twist
it back onto the back of the unit clockwise.
8. Rating label location.
For further operating instructions, please
consult the Styling Guide.
Storage, Cord Safety, and Maintenance/Cleaning:
• Ensure the cord is not knotted, twisted, or wrapped
around any nearby objects when in use.
• Store the unit in a dry location away from water and
other heat sources. Store brush accessories so the
bristles are not touching any surfaces to help prevent
bristle damage
• Clean the filter on the back of the unit monthly. To clean
the filter, first twist the filter cover counterclockwise
o the back of the unit, then use a new toothbrush to
brush o any dust or debris on the filter. Once the filter
is clean, twist the filter and filter cover clockwise back
onto the back of the unit.
• Remove any hair on the brush accessories after every
use to help maintain performance.
OPERATING INSTRUCTIONS
4
5
1
2
3
6
7
9
8
TWO (2) YEAR LIMITED GUARANTEE
The warranty commences on the date of purchase
and expires at the end of the two-year period. In the
unlikely event of a defect due to faulty materials or
workmanship within the guarantee period we will
replace the defective/faulty part with a new product,
free of charge, or if the unit is deemed defective/faulty
we replace the unit with an equivalent or upgraded
model, at our discretion.
For warranty claims, you will need to submit a proof of
purchase in the form of a valid receipt that displays date
and place of purchase.
Your warranty is subject to the following conditions
• DO NOT operate the appliance with a damaged plug
or cord, or if the unit has been dropped, damaged or
dropped in water.
• To avoid the risk of electric shock, do not disassemble or
attempt to repair the appliance on your own. If the supply
cord is damaged, it must be replaced by a qualified
electrician to avoid a hazard. Incorrect re-assembly
or repair can cause a risk of electric shock or injury to
persons when the appliance is used.
• The item has not been misused, abused, neglected,
altered, modified or repaired by anyone.
• The item has been subjected to fair wear and tear.
• The item has not been used for trade, professional or hire
purposes.
• The item has not sustained damage through foreign
objects, substances or accident
Customer costs within warranty
The customer is responsible for any inwards freight
charge to return a product for warranty if requested,
and outward freight charge for warranty parts and or
replacement unit.
Who is covered?
This warranty applies only to the original purchaser, who
bought the product from an authorised retailer and may
not be transferred. Proof of purchase is required.
What is not covered?
• Filters and brush rolls
• Accessories supplied with the item.
• Components that are subject to natural wear and tear
caused by normal use in accordance with operating
instructions.
• Unauthorised/improper maintenance/handling or
overload is excluded from this warranty.
• Accidental damage
• Damage as a result of use not in accordance with the
rating plate
• Removal of blockages. If a blockage does occur please
refer to the trouble shooting guide within your Shark
Operating manual
• Use of parts and accessories that are not genuine Shark
components
 Loading...