Do you have a question about the Shaw HDDSR 800 and is the answer not in the manual?
This manual provides comprehensive instructions for installing, activating, and programming your new Shaw Direct set-top box and remote, ensuring a seamless transition to your new entertainment system. It also offers guidance on recycling old equipment and accessing further support.
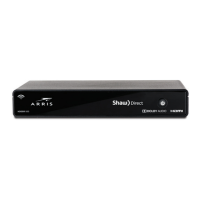
The Shaw Direct set-top box serves as the central hub for your television entertainment, receiving satellite signals and converting them into viewable content on your TV. It allows you to access a wide range of channels, including high-definition programming, and provides features like Video On Demand and Pay-Per-View titles when connected to the internet. The accompanying Shaw Direct remote control is designed to navigate the set-top box's interface, change channels, adjust volume, and control various other functions of both the set-top box and your television. The system is designed for ease of use, with a straightforward setup process that guides you through connecting the necessary cables and activating the service. Once installed, the set-top box processes the satellite signal, delivering a clear picture and sound to your television. The remote control, with its intuitive button layout, allows for quick access to essential functions like the program guide, channel up/down, and volume control, enhancing your viewing experience. The integration with internet connectivity further expands its capabilities, offering on-demand content and interactive features.
The installation process begins by identifying the components included in the box: the set-top box (HDDSR 800 model is referenced), a power adapter, an HDMI cable, and the Shaw Direct remote. The first step involves connecting the coax cable from your wall outlet to the "Sat 1" port on the back of the set-top box, ensuring a secure connection. This cable is crucial for receiving the satellite signal. Next, connect the HDMI cable from the HDMI Out port on the set-top box to an available HDMI In port on your television. For standard definition TVs, RCA cables (not included) can be used as an alternative. After connecting the video cable, turn on your TV and select the corresponding HDMI input to which the set-top box is connected. Finally, connect the power cord to the set-top box and then to an electrical outlet. The set-top box will begin to power on, which typically takes about one minute.
Once the set-top box is powered on, you will be prompted to use your new Shaw Direct remote to complete a short initial setup process. This includes connecting the set-top box to your WiFi network if you have internet access, which enables features like Video On Demand and Pay-Per-View. Continue following the on-screen prompts until the screen displays 'Signal Found!', indicating that the set-top box has successfully acquired the satellite signal. This step usually takes approximately 5 minutes to complete.
After the physical installation, the set-top box needs to be activated. You can do this by visiting shawdirect.ca/myaccount, logging in, selecting "Activate your set-top box," and clicking "Submit." Alternatively, you can call the activation line at 1-855-874-6953 and follow the prompts provided by the customer service representative. Within a few moments of activation, the 'Trip Count' value on your screen will start to increase from zero. You will be notified once your set-top box is fully activated, which can take up to 10 minutes. It's important to note that while the set-top box may be activated, it might take up to one hour for all guide and channel information to load completely.
To enhance convenience, you can program your Shaw Direct remote to control your TV's power and volume functions. Begin by reviewing the Shaw Direct remote control manual, which is included in the box or available online at shawdirect.ca/remote. In the manual, locate the corresponding 5-digit codes for your TV brand. Ensure your TV is powered on. On the Shaw Direct remote, press and hold the "TV" button at the top until the other buttons (AUX, SAT) flash three to four times. Then, enter the 5-digit code you noted for your TV brand. After entering the code, press the "POWER" button on the remote. If your TV turns off, the remote has been successfully programmed. Press the "POWER" button again to turn the TV back on. If the TV does not power on, repeat the process from step 3, trying different codes for your TV brand until you find the correct one. This may require a few attempts.
Once activated and programmed, the set-top box allows you to browse channels using the remote's channel up/down buttons or by entering channel numbers directly. The "GUIDE" button provides access to the electronic program guide, where you can view upcoming shows and schedule recordings if your model supports DVR functionality. The "VOL" buttons control the volume, and the "MUTE" button silences the audio. Internet connectivity enables access to Video On Demand and Pay-Per-View, offering a wider selection of movies and shows.
The manual implicitly guides users through basic troubleshooting steps. For instance, if the TV doesn't power on after remote programming, it suggests trying different codes. If the 'Signal Found!' message doesn't appear, it implies checking cable connections. For more complex issues, the manual directs users to online resources and customer support.
If you are replacing an older set-top box, the manual provides guidance on recycling. It specifies that models such as HDDSR 600, HDDSR 605, or HDPVR 630, along with their accessories like remotes and cables, can be recycled. To find a local drop-off location for electronic waste, you are directed to visit epra.ca. This feature promotes environmentally responsible disposal of old electronics.
For additional tips, tricks, and assistance, including transferring existing settings to your new set-top box, the manual recommends visiting shawdirect.ca/DSR. For a broader range of online guides, articles, and videos, users can visit shawdirect.ca/support. These online resources serve as a comprehensive knowledge base for users seeking to optimize their experience or resolve issues beyond the scope of the initial setup.
While not explicitly detailed as "maintenance features," the installation instructions imply general care practices. Ensuring secure cable connections prevents signal loss and potential damage. Keeping the set-top box in a well-ventilated area, as suggested by the general design of such devices, helps prevent overheating and ensures longevity. The absence of specific cleaning instructions suggests that standard electronic device cleaning practices (e.g., dusting with a soft, dry cloth) are appropriate. The manual's focus on a smooth setup and readily available support aims to minimize user-initiated maintenance, relying instead on robust design and accessible help resources.
| Category | TV |
|---|---|
| Hard Drive Capacity | 500 GB |
| Video Output | HDMI, Component, Composite |
| Connectivity | Ethernet, USB |
| USB Port | Yes |
| Remote Control | Yes |
| Audio Output | Optical, RCA |
| Storage | Internal HDD |
| Features | HD Recording, Pause Live TV |
| Output Resolution | 1080i |