EasyManua.ls Logo

SHELCO FILTERS CSF Series - User Manual

SHELCO FILTERS CSF Series
2 pages
Print Icon
To Next Page IconTo Next Page
Loading...
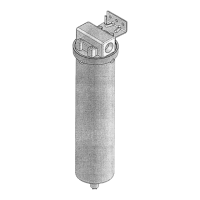
SHELCO FILTERS - MODEL CSF
INSTALLATION, OPERATION, MAINTENANCE MANUAL
Models CSF-78, CSF-80, & CSF-90
WARNING:
The lter must he protected from freezing to prevent crackinq
which would result in leakage.
MAXIMUM OPERATING PRESSURE
300 PSI (20.7 BAR) @ 200T (93X)
INSTALLATION
A recommended installation is shown below with inlet, outlet, and bypass
valves to isolate the housing for ease of changing cartridges. Also
recommended is the installation of union couplings on either side of the
lter to facilitate installation and removal of the housing. Ensure that the
direction of ow indicated on the head is consistent with your process.
DO NOT INSTALL BACKWARDS. It is recommended that pressure
gauges be Installed in the inlet and outlet piping as an indicator of
remaining cartridge life.
PRESSURE UNION
GAUGE
UNION
FLOW IN
P R E S S U R E G A U G E
FLOW OUT
CARTRIDGE INSTALLATION OR REPLACEMENT (See exploded view on other side)
5.
6.
7.
Close inlet and outlet valves and open the bypass valve. Open drain and allow sump to drain.
Loosen the ring nut and slide it down the sump. Remove the sump from the head.
Check the shell gasket for damage. Replace if necessary.
Remove old cartridge and clean the inside of the sump. Insert the new cartridge, making sure it seats
properiy in the cup in the head. If a 226 type of cartridge is in use, ensure that the tabs are fully
engaged in th slots provided in the head.
Lubricate the gasket to prevent binding or pinching during installation.
Reassemble the sump to the head. Slide the ring nut up to the head and tighten until it is snug, then
another 1/8 to 1/4 turn. Do not overtighten. Close the drain at the bottom of the sump.
Open inlet and outlet valves and close the bypass valve. If a leak appears, close the inlet and outlet
and open the drain to relieve the pressure. Loosen the ring nut and repeat steps 5, 6, and 7 above to
adjust alignment and gasket seating. If the leak persists, check the gasket for damage and replace as
necessary.
Question and Answer IconNeed help?

Do you have a question about the SHELCO FILTERS CSF Series and is the answer not in the manual?

Summary

Filter Installation

Cartridge Installation or Replacement

Filter Maintenance

Overview

This document provides installation, operation, and maintenance instructions for Shelco Filters Model CSF, including models CSF-78, CSF-80, and CSF-90.

Function Description

The Shelco Filters Model CSF are designed for filtering liquids. They are typically installed in a system with inlet, outlet, and bypass valves to facilitate isolation for cartridge changes. The system also recommends the installation of union couplings on either side of the filter housing for easy installation and removal. Pressure gauges are recommended on both the inlet and outlet piping to monitor cartridge life by indicating pressure drop. The filter operates by allowing liquid to flow through a cartridge, which traps impurities.

Important Technical Specifications

  • Maximum Operating Pressure: 300 PSI (20.7 BAR) at 200°F (93°C).
  • Models Covered: CSF-78, CSF-80, and CSF-90 series, with various configurations for cartridge types (222 or 226) and lengths (6 or 8 inches).
  • Key Components:
    • Ring Nut (Item 1): Secures the sump to the head. Part number 3033-P.
    • Head (Item 2): The top part of the filter assembly where the inlet/outlet connections are made and the cartridge is seated. Part numbers include 3042-6-222, 3042-8-222, 3042-6-226, 3042-8-226 depending on the model.
    • Gasket (Item 3): Provides a seal between the head and the sump. Part number 3001-*.
    • Bracket Kit (Item 4): Optional mounting bracket. Part number 2501-K.
    • Cartridge (Item 5): The replaceable filter element. Available in 222/FIN OR FLAT and 226/FIN OR FLAT configurations. Specific cartridge configuration should be determined by consulting a Shelco representative.
    • 222 Spring (Item 6): Used with 222 type cartridges to ensure proper seating. Not applicable (N/A) for 226 type cartridges.
    • Sump (Item 7): The lower housing that contains the filter cartridge. Part numbers include CSF-78-316, CSF-80-316, CSF-90-316.
    • Drain Plug (Item 8): Located at the bottom of the sump for draining. Part number 2103-S-316.
  • Flow Direction: The direction of flow indicated on the head must be consistent with the process. The filter should NOT be installed backwards.
  • Materials Compatibility: It is the purchaser's responsibility to ensure the filter is compatible with all materials procured. Stainless steel is not 100% non-corrosive. A comprehensive water analysis (including Chlorides, TDS, and pH) is recommended to determine material suitability. The seller should be informed if TDS levels or chlorides exceed 1,000 ppm.
  • Warranty Exclusions: Filter housings used for filtering brackish water, seawater, or where analysis shows TDS or Chlorides in excess of 1,000 ppm are excluded. Gaskets and O-rings once used, altered products, and products without the seller's identification label are also excluded.

Usage Features

  • Installation Recommendations:
    • Protect the filter from freezing to prevent cracking and leakage.
    • Install inlet, outlet, and bypass valves for easy isolation during cartridge changes.
    • Install union couplings on both sides of the filter for easy installation and removal.
    • Ensure the flow direction indicated on the head matches the process flow.
    • Install pressure gauges on the inlet and outlet piping to monitor cartridge life.
  • Cartridge Installation/Replacement Procedure:
    1. Close inlet and outlet valves, open the bypass valve, and open the drain to empty the sump.
    2. Loosen the ring nut and slide it down the sump, then remove the sump from the head.
    3. Inspect the shell gasket for damage and replace if necessary.
    4. Remove the old cartridge and clean the sump interior. Insert the new cartridge, ensuring it seats properly in the head's cup. For 226 type cartridges, ensure tabs are fully engaged in the head's slots.
    5. Lubricate the gasket to prevent binding or pinching during reassembly.
    6. Reassemble the sump to the head, slide the ring nut up, and tighten until snug, then an additional 1/8 to 1/4 turn. Avoid overtightening. Close the drain.
    7. Open inlet and outlet valves, and close the bypass valve. If a leak occurs, close inlet/outlet, open drain to relieve pressure, loosen the ring nut, and repeat steps 5-7 to adjust alignment and gasket seating. If leaks persist, check the gasket for damage and replace.

Maintenance Features

  • Cartridge Replacement: The filter element should be replaced when the pressure drop across the filter reaches a maximum of 20 PSI. User experience may dictate more frequent replacement.
  • Gasket Inspection: The gasket should be inspected and replaced if necessary during cartridge changes.
  • Cleaning: The inside of the sump should be cleaned during cartridge replacement.
  • Warranty: A limited warranty covers defects in materials or workmanship for one year from the date of shipment, under normal use and service, and subject to user compliance with operating instructions. The seller's liability is limited to repairing or replacing defective products FOB seller's plant in Middletown, CT. Purchaser must provide timely written notice of defects, obtain authorization for return, and prepay shipping costs. The warranty is void if defects are due to dirt, rust, foreign material not attributable to the seller, improper usage, over-tightening, abuse, incorrect reassembly, or other causes not due to seller's manufacture.
  • Disclaimer: The warranty is in lieu of all other warranties, expressed or implied, including fitness or merchantability. The seller is not liable for special, incidental, or consequential damages. No representative or seller has authority to make representations or warranties beyond what is stated.

SHELCO FILTERS CSF Series Specifications

General IconGeneral
BrandSHELCO FILTERS
ModelCSF Series
CategoryWater Filtration Systems
LanguageEnglish