Priming the Sprayer
Close the main drain valve and the secondary ball valve.
See
Fig
2.
Plug
in
the sprayer. Don't install the spray tip
in
the gun yet1
-
-.
Place the suction tube into the paint container. Turn the
..
lower the pressure setting. See Fig
3.
Disengage the
pressure control knob all the way counterclockwise to
gun
safety
latch.
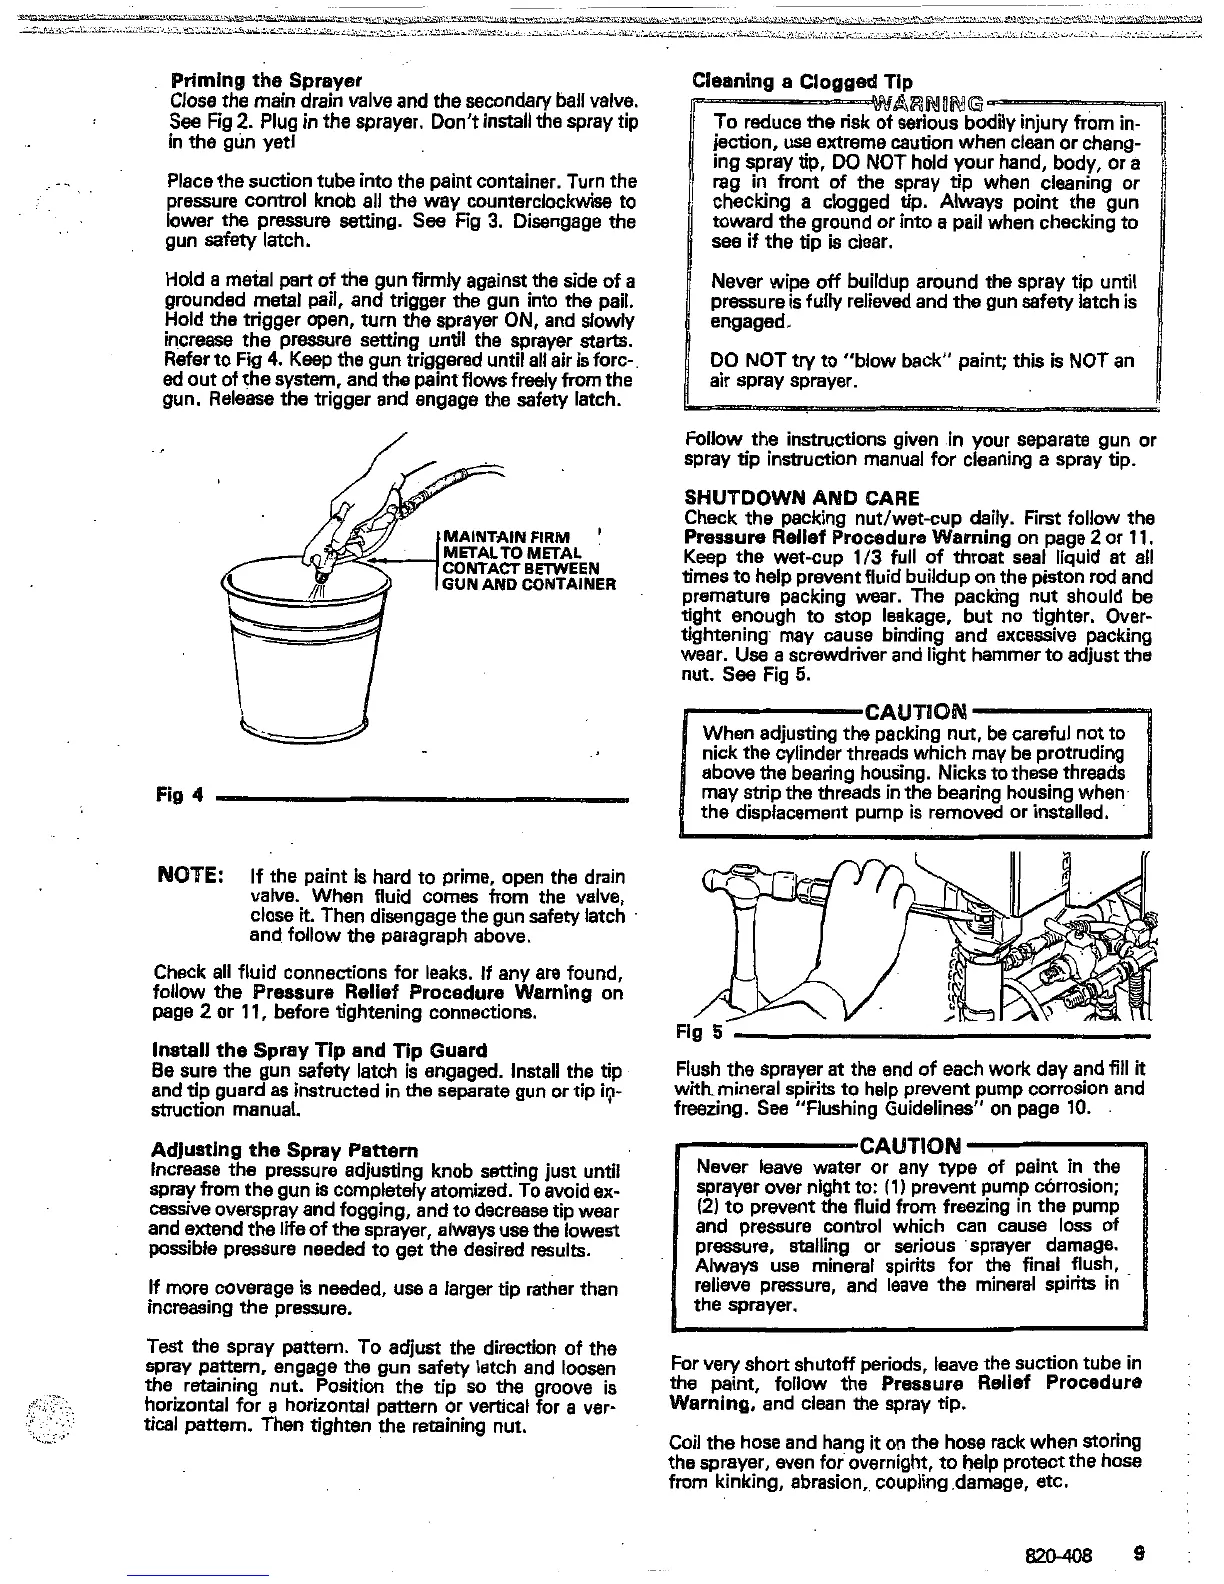
grounded metal pail, and trigger the gun into the pail.
Hold
a
metal part of the gun firmly against the side of
a
increase the pressure setting until the sprayer
starts.
Hold the trigger open, turn
the
sprayer
ON,
and slowly
ed
out of the system, and the paint
ROWS
freely from the
Refer
to
Fig
4.
Keep the gun triggered until
all
air is forc-
gun. Release the trigger
and
engage the safety latch.
/
....
...
~
.
.
..._
.
..
.._.
METALTO
METL
CONTACT BETWEEN
GUN AND CONTAINER
Fig
4
MOTE:
If
the paint is hard to prime, open the drain
valve. When fluid comes from the valve,
close
it.
Then disengage the gun safety latch
and follow the paragraph above.
Check
all
fluid connections for leaks. If any are found,
follow
the
Pressure Relief Procedure Warnlng on
page
2
or
11,
before tightening connections,
Be
sure the gun safety latch
is
engaged. Install the tip
Install
the
Spray Tlp and Tip Guard
and tip guard as instructed in the separate gun or tip
iv-
struction manual.
Adjusting
the Spray Pattern
spray
from
the gun is completely atomized. To avoid
ex-
Increase the pressure adjusting knob setting just until
and extend the
lie
of the sprayer, always use the lowest
cessive overspray and fogging, and to decrease tip wear
possible pressure needed to get the desired
results.
If
more coverage is needed,
use
a
larger tip rather than
increasing the pressure.
Test the spray pattern. To adjust the direction of the
spray pattern, engage the gun safety latch and loosen
horizontal for
a
horizontal pattern or vertical for
a
ver-
tical pattern. Then tighten the retaining nut.
.~
the retaining nut. Position the tip
so
the groove is
I
.:;
,,
. .~
',?
..,
..
:.
. . .
,.
. ...
:
..i.
.
..
'L..s
____
._....
~,,~..~.
,..,
~~
,,...
~,,,
...*i,~~,"~-,.L.
.....
._.
.ll.,..,)
...~~-~~~~!~,~~"~
".LX&&
......................................................
~
'.~.
..~~
.-.-
1_..L
~~~~~ ~ ~
,_","-mid
-..,,
Cleaning a Clogged Tip
DO NOT
try
to "blow back" paint; this
is
NOT
an
Follow the instructions given
in
your separate gun or
spray tip instruction manual for cleaning a spray tip.
SHUTDOWN
AND
CARE
Check the packing nut/wet-cup
daily.
First
follow the
Pressure
Rellef
Procedure Warning on page
2
or
11.
times to help prevent fluid buildup on the piston rod and
Keep the wet-cup
113
full
of throat seal liquid
at
all
premature packing wear. The packing nut should be
tight enough
to
stop leakage, but no tighter. Over-
tightening may cause binding and excessive packing
wear.
Use
a screwdriver and
light
hammer to adjust
the
nut.
See
Fig
5.
en adjusting the packing nut, be careful not
to
nick the cylinder threads which may be protruding
above the bearing housing. Nicks to these threads
may strip the threads in the bearing housing when
the displacement pump is removed
or
installed.
Fig
5
Flush the sprayer
at
the end of each work day and
fill
it
freezing.
See
"Flushing Guidelines" on page
10.
withmineral spirits
to
help prevent pump corrosion and
ious 'sprayer damage.
pints for
the
final
flush,
ave the mineral spirits in
For very short shutoff periods, leave the suction tube in
the paint, follow the Pressure
Relief
Procedure
:
Warning, and clean the spray
tip.
Coil the hose and hang
it
on the hose rack when storing
the sprayer, even for overnight,
to
help
protect the hose
from kinking, abrasion, coupling.darnage, etc.
 Loading...