EasyManua.ls Logo

Shire Garden Store - User Manual

Shire Garden Store
2 pages
Print Icon
To Next Page IconTo Next Page
Loading...
Garden Store 4 x 2 Instructions
Thank you and congratulations on the purchase of your Shire Garden Building. We
believe that this product will give you many years of excellent service. This is a natural
product manufactured to a high standard therefore if you have any queries or experience
any difficulties then please contact our customer service hotline 01945 46 89 10 or
01945 46 89 11 or 01945 46 89 12.
Preparation of Base
We recommend that the base onto which your building will stand should be at least 75mm
larger in each direction than the total floor size of the building.
Actual floor area of the building: 1190 x 590mm
Total height clearance: 1520mm
The chosen position in your garden for the siting of the building should be excavated to
a depth of 75mm to allow a base of sand, on to which paving slabs can be evenly laid - THEY
MUST BE LEVEL AND FIRM.
Treatment/Care of your Garden Building
Treat with a suitable decorative wood finish immediately. We recommend that all timber
pieces be treated again prior to assembly and again within 3 months of assembly. We
further recommend that all pieces are treated again at least annually or as frequently as
the instructions on the product used recommends.
We would suggest that all wall panels be treated in an upside-down position to allow the
finish/treatment to ingress into the tongue and groove jointing.
We would also remind you that you would rarely (if ever) be able to re-treat the
underside of the floor following assembly. We strongly recommend that the underside
of the floor is treated an absolute minimum of twice (not including pre-treatment).
Completed Garden Store
Tools Required
Posidrive screwdriver (electric is best)
Drill, 6mm drill bit and 8mm drill bit
Hammer
Sandpaper (to smooth any rough edges)
Cutting knife
Tape measure
Step ladder
Ruler
Pencil
Saw
IMPORTANT!
PLEASE READ PRIOR TO ASSEMBLY OF
THE BUILDING
EVERY PRECAUTION IS TAKEN TO
ENSURE THAT YOUR BUILDING HAS NO
ELEMENT INCORRECTLY PLACED OR
POSSIBLY HAZARDOUS, HOWEVER
PRIOR TO USE PLEASE CHECK ALL
SURFACES FOR THE FOLLOWING:
1 RAISED GRAIN, SPLINTERS: sand
down timber to smooth finish
2 NAIL/SCREW/PIN HEADS PROUD: tap
home to be flush with surface of timber
3 DAMAGED SCREW HEADS
RESULTING IN SHARP SPLINTERS OF
METAL: replace
4 SHARP ENDS OF NAILS/ SCREWS/
PINS PROTRUDING THROUGH THE
PANEL: remove and reposition.
5 ENSURE ALL PARTS ARE SECURED
AGAINST REASONABLE FORCE:
remove and refit
6 ENSURE THERE ARE NO LOOSE
PARTS: remove and refit/discard
WE RECOMMEND THAT PROTECTIVE
GLOVES BE WORN THROUGHOUT
QTY DESCRIPTION
Building
1 Floor A
2 Back Panels B
2 Side Panels C
2 Framework 34x34x1120mm D
2 Doors D1
1 Door Coverstrip 46x12 D2
1 OSB Roof (1220mm x 640mm) E
1 Piece Felt F
6 Roof fixing blocks G
5 Cover strips 46x12 H
2 Door (weather) strips 28x12 I
PLEASE LAY OUT PARTS AND CHECK OFF AGAINST CHECK LIST BELOW:
Wood is a natural product and is therefore
prone to changes in appearance, including
some warping, movement and splitting,
particularly during unusual climatic conditions
(long hot or wet spells of weather). As a natural
occurrence this is not covered by a guarantee.
PLEASE NOTE
BUI T AROUND OUR REPUTATION
F
E
G
G
C
H
I
I
A
B
B
D
D2
D
D1
C
QTY DESCRIPTION
Accessories
6 Door Hinges
1 Pad-Bolt & Housing
2 Bolts
4 L-Shaped Brackets
16 60mm Screws
28 40mm Nails
70 25mm Screws
50 13mm Felt Nails
8 10mm Screws
6 40mm Screws
Parts List
01/08
Question and Answer IconNeed help?

Do you have a question about the Shire Garden Store and is the answer not in the manual?

Summary

Garden Building Base Preparation

Garden Building Treatment and Care

Pre-Assembly Safety and Checks

Safety Checks Before Use

Crucial checks for raised grain, proud fasteners, damaged parts, protruding items, secure assembly, and loose parts.

Protective Gear Recommendation

Advisory to wear protective gloves during the entire assembly process.

Assembly Tools and Parts Identification

Required Tools for Assembly

List of essential tools for constructing the garden building.

Parts Identification

Inventory of all building components and accessories provided.

Floor and Wall Assembly

Fixing Floor and Wall Panels

Step-by-step guide for connecting floor and wall panels together before attaching to the floor.

Attaching Frameworks

Securing the vertical framework pieces to the wall panels.

Roof Assembly and Felting

Fitting the Roof Panel

Instructions for placing and marking the roof panel's position.

Attaching Roof Fixing Blocks

Securing blocks to the roof panel for subsequent assembly steps.

Applying Roof Felt

Guide for laying and securing the felt to the roof for weather protection.

Door Installation and Finishing Touches

Door Hinge and Padbolt Fitting

Detailed steps for attaching hinges and the padbolt mechanism to the doors.

Attaching Door Cover Strips

Fitting cover strips to the top and bottom of the doors and securing door stops.

Fitting Weather Strips

Securing weather strips to the inside edges of the door aperture.

Final Assembly Checks

Securing Walls to Floor

Ensuring all wall panels are firmly attached to the building's floor.

General Assembly Verification

Final checks for smooth surfaces, proper fastener seating, secure parts, and absence of loose components.

Wood Finish Application Advice

Guidance on applying decorative finishes to dry timber and following manufacturer instructions.

Overview

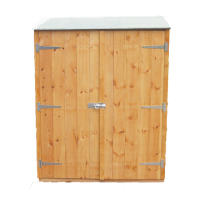
This document provides instructions for the assembly, care, and maintenance of a Shire Garden Store, a 4x2 garden building.

Function Description:

The Shire Garden Store is a compact outdoor storage solution designed to house garden tools, equipment, or other items, protecting them from the elements. It is a natural wood product intended for self-assembly.

Important Technical Specifications:

  • Floor Area: 1190mm x 590mm
  • Total Height Clearance: 1520mm
  • Base Requirement: The building requires a level and firm base, excavated to a depth of 75mm, allowing for sand and paving slabs. The base should be at least 75mm larger in each direction than the total floor size.
  • Materials: Constructed from natural wood, including OSB (Oriented Strand Board) for the roof.
  • Components (Building):
    • 1 Floor
    • 2 Back Panels
    • 2 Side Panels
    • 2 Framework pieces (34x34x1120mm)
    • 2 Doors
    • 1 Door Coverstrip (46x12)
    • 1 OSB Roof (1220mm x 640mm)
    • 1 Piece Felt
    • 6 Roof fixing blocks
    • 5 Cover strips (46x12)
    • 2 Door (weather) strips (28x12)
  • Components (Accessories):
    • 6 Door Hinges
    • 1 Pad-Bolt & Housing
    • 2 Bolts
    • 4 L-Shaped Brackets
    • 16 60mm Screws
    • 28 40mm Nails
    • 70 25mm Screws
    • 50 13mm Felt Nails
    • 8 10mm Screws
    • 6 40mm Screws

Usage Features:

  • Self-Assembly: The garden store is designed for self-assembly, with detailed instructions provided.
  • Door Mechanism: Features two doors secured by hinges, a pad-bolt, and internal bolts for enhanced security. Weather strips are included to protect against the elements.
  • Storage Capacity: Provides a dedicated space for garden storage, helping to keep outdoor areas tidy.
  • Natural Aesthetic: Being a natural wood product, it offers a traditional and aesthetic addition to a garden.

Maintenance Features:

  • Immediate Treatment: It is crucial to treat the building with a suitable decorative wood finish immediately after purchase.
  • Pre-Assembly Treatment: All timber pieces should be treated again prior to assembly and within 3 months of assembly.
  • Annual Treatment: Further treatment is recommended at least annually or as frequently as the product instructions advise.
  • Underside Treatment: The underside of the floor should be treated a minimum of twice (excluding pre-treatment) as it will be inaccessible after assembly.
  • Panel Treatment Tip: Wall panels can be treated upside-down to allow the finish/treatment to penetrate the tongue and groove jointing effectively.
  • Pre-Use Inspection: Before use, all surfaces must be checked for:
    • Raised Grain, Splinters: Sand down timber to a smooth finish.
    • Proud Nail/Screw/Pin Heads: Tap them flush with the timber surface.
    • Damaged Screw Heads: Replace any resulting in sharp metal splinters.
    • Protruding Nails/Screws/Pins: Remove and reposition any sharp ends protruding through panels.
    • Secure Parts: Ensure all parts are secured against reasonable force; remove and refit if loose.
    • Loose Parts: Remove and refit/discard any loose parts.
  • Protective Gear: Protective gloves are recommended throughout the assembly process.
  • Wood Characteristics: Users should be aware that wood is a natural product and may undergo changes in appearance, including warping, movement, and splitting, especially during unusual climatic conditions. Such natural occurrences are not covered by the guarantee.
  • Treatment Application: Do not apply decorative wood finish/treatment to wet or damp timber. Always observe the instructions of the wood finish/treatment manufacturer.

Assembly Tools Required:

  • Posidrive screwdriver (electric is best)
  • Drill (6mm drill bit and 8mm drill bit)
  • Hammer
  • Sandpaper (for smoothing rough edges)
  • Cutting knife
  • Tape measure
  • Step ladder
  • Ruler
  • Pencil
  • Saw

Assembly Steps Overview:

  1. Floor & Walls: Place the floor on a level surface. Assemble back and side panels, ensuring correct orientation and overhang. Secure panels together with screws, but do not fix to the floor until all walls are in position.
  2. Door Assembly: Lay door panels flat, shiplap facing up. Position hinges on the diagonal bracing, ensuring the pointed part of the hinges overhangs the edge. Fix hinges with screws.
  3. Fit Roof & Felt: Place the OSB roof panel, ensuring it sits flush at the back and sides, with a slight overhang at the front. Mark the inside line. Remove the roof, place fixing blocks centrally within the marked lines, and drill through the roof panel to secure blocks with screws. Felt the roof, folding felt over and fixing with felt nails. Place the roof into position and fix through the blocks with screws.
  4. Coverstrips: Fix cover strips where panels meet using nails.
  5. Hang Doors: Space doors from the top of the door panel framework. Fix the moveable part of each hinge to the side panels with screws. Fit the bottom bolt flush with the bottom edge of the door. Position the padbolt on the outside of the right-hand door over the central horizontal brace, ensuring the edge is flush with the upright edge, and secure with screws. Position the padbolt housing to accommodate the padbolt and secure with screws. Mark and cut out a section for the padbolt. Attach door stop strips above and below the padbolt, ensuring they overhang both doors when closed.
  6. Finishing Touches: Fit two bolts to the inside, inner edge of the left door, positioning the top bolt flush with the top of the door. Secure with screws. Hold the door tightly closed, mark where the bolt meets the door frame, and drill a small hole. Fix weather strips flush to the inside edge of the door aperture with nails.
  7. Secure Walls to Floor: Screw all side panels to the floor on the inside of the building with screws.

Shire Garden Store Specifications

General IconGeneral
BrandShire
ModelGarden Store
CategoryGarden Houses
LanguageEnglish

Related product manuals