Do you have a question about the Showlight W-DMX54 and is the answer not in the manual?
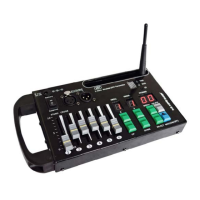
Describes the insert button functionality for scene creation and modification.
Describes the select button functionality for choosing devices or modes.
Describes the functionality of Button A, often used for programming modes.
Describes the functionality of Button B, used for device selection or manual control.
Describes the UP button used for navigating or increasing values.
Describes the DOWN button used for navigating or decreasing values.
Describes the delete button functionality for removing scenes or programs.
This display indicates the number of the selected scene.
This display indicates the number of the selected program.
This display shows the number of the selected DMX device.
Used for adjusting different DMX channels of projectors.
Switch to enable or disable the wireless DMX function.
Shows the selected wireless DMX channel number.
Antenna for extending the range of wireless DMX.
Describes the DMX output ports.
Details the battery compartment and power options.
Describes the external power connector socket.
Describes the three-position power switch for console operation.
This document describes the W-DMX54 DMX Controller, a device designed for controlling lighting fixtures.
The W-DMX54 is a DMX controller capable of managing up to 9 smart lights, each with 6 DMX channels, for a total of 54 controllable channels. It supports standard DMX512 protocol and features a DMX Wireless 2.4 G ISM 126 system for wireless control. The console is equipped with 6 faders for direct control of individual DMX channels. It includes DMX inputs and outputs via 3-pin XLR connectors.
The W-DMX54 offers several operational modes and features:
Wireless DMX Transmission: The device can transmit DMX signals wirelessly. To activate, press the WIFI selector button (its LED will light up). The DMX channel display will also illuminate. The transmission channel (from 0 to 9, then A to F, totaling 16 channels) can be selected using the small ID button located to the right of the wireless DMX channel display. The TXD LED indicates active DMX signal transmission. For optimal performance, the DMX wireless antenna should be maximally extended. The console is compatible with wireless DMX receivers such as W100DMX, W500DMX, PARLED-W3, and PARLED-W12 LED projectors. When the console and a compatible receiver are working together, the TXD LED will blink quickly. To disable wireless transmission, press the WIFI button again (the LED will turn off).
Powering the Console: The console can be powered either by an external 9V DC power adapter (supplied) or by a 9V battery. If using a battery, ensure correct polarity when inserting it into the battery compartment and move the 3-position switch (18) to the battery position. The central position of this switch is "off," while the other two positions turn the console on (either via transformer or battery).
Synchronization Mode: Upon power-on, the controller performs a self-test to reset all functions. After the test, specific information will appear on the displays. This mode allows synchronization of multiple DMX devices, useful for creating effects like scanning in a cascade setup. To enable internal synchronization, hold down the "SELECT" button for 2 seconds until the "PROJ." display flashes. Use the "UP" and "DOWN" buttons to select projectors (1 to 9) and the "B" button to assign (On) or unassign (Of) them for synchronization. To exit, press "SELECT" again for 2 seconds.
Manual Mode: This mode allows direct manual control of projectors using the 6 faders. To enter manual mode, press the "B" button. The DMX controller will display the number of the controlled device (1 to 9). Use the "UP" and "DOWN" buttons to select the desired device, then use the faders to control its channels.
Scene Creation: To access programming mode, press button "A" for 3 seconds. The "PROG." display will flash and show a number. Use "UP" or "DOWN" to select the program to modify (each program can contain up to 50 scenes). The "Scene" display shows the last scene of the selected program ("00" if no scene has been saved). After selecting the program, press "B" to choose the device (1 to 9) for which to set the scene; the "PROJ." display will show a blinking dot. Select the device using "UP" or "DOWN." Adjust the 6 faders to create the desired scene. Once adjusted, double-click the "Insert" button to record the scene; the "scenes" display will change to "01." This process can be repeated for up to 50 scenes per program. To exit programming mode, press button "A" for 3 seconds.
Scene Modification: To modify a scene, enter programming mode (press "A" for 3 seconds). Select the program using "UP" or "DOWN," then press "INSERT." Use "UP" and "DOWN" to select the scene number. To delete a scene, press "DELETE" twice. To add a scene, adjust the faders and press "INSERT" twice. Exit programming mode by pressing "A" for 3 seconds.
Program Deletion: To delete an entire program (all scenes), enter programming mode (press "A" for 3 seconds) and select the program using "UP" or "DOWN." Press the "DELETE" button (the display flashes), then press "A" (AL will be displayed). Press "DELETE" again to delete all scenes in the program. Exit programming mode by pressing "A" for 3 seconds.
Program Playback: To play a program, press button "A." Use "UP" or "DOWN" to select the desired program. The program will run automatically and cyclically from the first to the last scene. To stop a running program, press button "A." During playback, the program speed can be adjusted using CROSS fader 2, and the transition duration between scenes using booth fader 1. Manual control of spotlights is possible even during program execution; press "B" and select the projector with "UP" or "DOWN." To select another program, press "B." To disable manual control, press "B" twice. If "-" is shown in the "PROJ." display, use "UP" or "DOWN" to check for multiple projectors still under manual control.
| Brand | Showlight |
|---|---|
| Model | W-DMX54 |
| Category | Controller |
| Language | English |