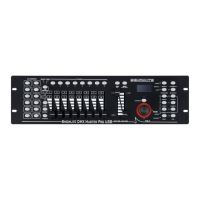
This document describes the Showlite DMX Master Pro USB, a DMX512 controller designed for managing lighting fixtures.
Function Description:
The DMX Master Pro USB is a 192-channel DMX512 controller capable of managing up to 12 lights, each with 16 channels. It features 30 banks of 8 programmable scenes, totaling 240 programmable scenes. Additionally, it supports 6 chases, each capable of storing up to 240 programmed scenes from the banks, with each program opening up to 20 times. The device includes an LCD for data display and allows for adjustable voice sensitivity. DMX channels can be reversed, and DMX data can be displayed in both percentage and numerical modes. Control over scanners is facilitated by Pan and Tilt jog wheels, and sliding channels can be set to X/Y mode or all-channel mode. MIDI control is available for banks, chases, and Blackout functions. The unit supports DMX polarity selection and features power failure memory. It also incorporates RDM (Remote Device Management) for controlling DMX addresses remotely. All data can be copied to a USB disk, which also supports software promotion. The device is compatible with FAT16/32 file systems.
Important Technical Specifications:
- DMX Channels: 192 DMX512 channels, standard DMX512 signal output.
- Controlled Lights: 12 lights, each with 16 channels.
- Scenes: 30 banks of 8 programmable scenes (total 240 scenes).
- Chases: 6 chases of 240 programmed scenes from banks (up to 20 times per program).
- Display: LCD.
- Voice Sensitivity: Adjustable.
- Channel Modes: 8 channels or 16 channels per light.
- DMX Data Display: Percentage and numerical modes.
- Control: Pan and Tilt jog wheels, sliding channels (X/Y or all-channel mode).
- MIDI Control: Banks, chases, Blackout.
- DMX Polarity: Selectable.
- Memory: Power failure memory.
- RDM: Remote control DMX address.
- USB Functionality: Data copy to U disk, software promotion.
- File System Support: FAT16/32.
- Power Input: DC 9V, 300mA min.
- DMX Output: 3-pin male XLR.
- USB: USB-A port.
- MIDI Signal: 5-pin standard interface.
- Audio Input: Built-in microphone or line-in.
- Dimensions: 482x134x73mm.
- Weight (approx.): 2.0 kg.
Usage Features:
Programming Scenes:
- Program Enable: Press and hold the Program button for three seconds.
- Scanner Control: Press scanner buttons (1-12) to activate fader control for specific scanners.
- Adjust Intensity/Movement: Use faders for dimmer intensity and jog wheels for Pan/Tilt movement.
- Page Selection: Use the Page button to switch between DMX channels 1-8 (Page A) and 9-16 (Page B).
- Store Scene: Tap the MIDI/Rec button to store the current scene.
- Bank Selection: Use Bank Up/Down buttons to select the desired bank.
- Scene Storage: Tap scene buttons (1-8) to store the scene.
- Exit Program Mode: Press and hold the Program button for three seconds.
Scene Editing:
- Enable Program mode.
- Select the bank containing the scene using Bank Up/Down.
- Tap the Scene button to select the scene.
- Make adjustments using faders or jog wheels.
- Tap MIDI/Rec.
- Tap the corresponding Scene button to overwrite the scene.
Scene Copy:
- Enable Program mode.
- Select the source bank using Bank Up/Down.
- Select the scene to copy.
- Select the destination bank using Bank Up/Down.
- Tap MIDI/Rec.
- Tap the SCENE button to complete the copy.
Deleting Scenes:
- Enable Program mode.
- Select the bank containing the scene to delete.
- Press and hold Auto/Del, then tap the Chase button corresponding to the scene.
- To delete all scenes: Turn off power, then press and hold Auto/Del and Bank Down while turning on power. All LEDs will flicker, then stop, indicating deletion.
Lamps Copy:
- Press the SCANNER button to copy its manual effect.
- Tap the SCANNER button again to apply the effect to another lamp.
Editing Programs (Chases):
- Enable Program mode.
- Select a chase button (1-6).
- Select a scene from a bank.
- Tap MIDI/Rec (LEDs flicker, indicating entry into program mode).
- Repeat steps 3-4 to add up to 240 steps.
- Hold PROGRAM for 3 seconds to exit.
Adding a Step to a Program:
- Enable Program mode.
- Select the program.
- Press TAP (LED switches to program display).
- Use Bank Up/Down to select the desired insertion point.
- Tap MIDI/Rec to add the step.
- Press TAP (LED switches to Bank and Scene display).
- Use Bank Up/Down to select the scene to add.
- Tap MIDI/Rec to add the scene to the program.
Deleting a Program Step:
- Enable Program mode.
- Select the program.
- Tap TAP (LCD displays current step).
- Use Bank Up/Down to select the step to delete.
- Tap Auto/Del (LEDs flicker, indicating success).
Deleting a Program:
- Enable Program mode.
- Open the program to delete.
- Press and hold Auto/Del, then tap the deleted program again (LEDs flicker, indicating deletion).
Deleting All Programs:
- Turn off power.
- Press and hold Auto/Del and Bank Down while turning on power (LEDs flicker for 2 seconds).
- All LEDs stop flickering, indicating all programs are deleted.
Channel Assign and Reverse:
- Enable Mode: Press and hold Mode and Fine simultaneously. Reverse LED lights up for reverse mode; press again for assign mode (Assign LED lights up).
- Select Pan/Tilt Assign: Tap Bank Up/Down to select Pan or Tilt assign.
- Select Scanner: Tap the SCANNER button for the lamp to assign.
- Set Channel Mode: Tap TAP to select 8-channel or 16-channel mode.
- Page Select: Select the channel page (A/B).
- Assign Channels: Press and hold Mode, then tap the relevant SCENE BUTTON (1-8). LEDs flicker, indicating successful assignment. (Scene 1 corresponds to DMX channel 1, Scene 2 to DMX channel 2, etc.). Repeat for other scanners.
- Reverse Channels: In reverse mode, select Pan or Tilt reverse using Bank Up/Down. Select the scanner and set channel mode (8 or 16). Select the channel page.
Glide Mode Select:
- Turn off power.
- Press and hold MODE and TAP while turning on power (2 seconds) to enable slide mode.
- Tap TAP to switch between "ALL CH FD TIME" (all DMX channels slide) and "ONLY X/Y FD TIME" (only X/Y channels slide).
- Press and hold MODE and TAP again to save and reset.
Delete Channel Assign and Reverse:
- Enable Program mode.
- Press MODE and FINE simultaneously to select assign and reverse.
- Tap SCANNER 1-12 to select lamps.
- Press AUTO/DEL, then tap MODE to delete channel assign and reverse.
Delete All Channel Assign and Reverse:
- Turn off power.
- Press and hold AUTO and MODE.
- LEDs stop flickering, controller auto resets, and all assign/reverse data is deleted.
Examine Assign and Reverse:
- Press and hold MODE and FINE to enter reverse examine mode; press again for assign examine mode.
- Tap SCANNER 1-12 to select a light; LCD displays assign and reverse information.
- Turn off power.
- Press and hold SCANNER 6 and 12 while turning on power (2 seconds). LEDs indicate setup condition.
- Tap SCANNER 6 and 12 to adjust LCD cursor.
- Select characters using Bank Up/Down.
- Repeat steps 3-4 to set up information.
- Press SCANNER 6 and 12 simultaneously to save and reset.
Operating Scenes:
- Manual Mode: Controller starts in Manual mode. Use Bank Up/Down to select a bank, then tap Scene 1-8 to open a scene.
- Auto Mode: Tap Auto/Del to enter Auto mode. Use Bank Up/Down to switch banks. Adjust Wait Time and Fade Time sliders. Tap Auto/Del again to exit.
- Music Mode: Tap Music/Bank Copy to enter Music mode. Adjust voice sensitivity by pressing and holding Music/Bank Copy. Use Fade Time slider. Tap Music/Bank Copy again to exit.
Working Procedure (Chases):
- Manual Mode: Controller starts in Manual mode. Open a program (chase). Adjust Fade Time. Use Bank Up/Down to select previous/next step.
- Auto Mode: Tap Auto/Del to enter Auto mode. Open a program. Adjust Wait Time and Fade Time. LEDs flicker at the current program step; adjust cycling times (up to 20) using Bank Up/Down. Tap Auto/Del to exit.
- Voice Mode: Tap Music/Bank Copy to enter Voice mode. Adjust voice sensitivity by pressing and holding Music/Bank Copy. Use Fade Time slider. Open programs. Tap Music/Bank Copy to exit.
MIDI Channel Setting:
- Press and hold MIDI/Rec for 3 seconds (LCD displays last MIDI channel).
- Set MIDI address using Bank Up/Down.
- Press and hold MIDI/Rec to save and exit.
- MIDI Form: Receives Note On signals to run 15 banks (01-15) and 6 chases. Blackout can also be activated by MIDI signal.
USB Function (Save/Read Data, Software Update):
- Write Data to USB-Stick: Press and hold Auto/Del, then tap Bank Up. LCD displays selected file. Tap the button for the file to save. LCD displays "FILE SAVE OK" or "WRITE FAIL".
- Read Data from USB-Stick: Press and hold Auto/Del, then tap Bank Down. LCD displays selected file. Tap the button for the file to read. LCD displays "FILE SAVE OK" or "WRITE FAIL".
- Software Update: Obtain update file from website/supplier and copy to USB. Insert USB. Press and hold Scanner 1, Scanner 2, and Scene 3 while turning on power. LCD displays "ANY KEY UPDATE". Press any button to update. LCD displays "UPDATE OK". Turn off power.
RDM Operation:
- Scan for Equipment: In no program condition, press and hold Auto/Del, then tap Program. LCD displays "DISCOVER".
- Display Quantity: After scanning, the quantity of equipment (up to 100) is displayed (e.g., "Count001").
- Scan Failed: If scan fails, "NO FOND, FIXTTURE" is displayed, and AUTO exits RDM.
- Select Equipment: After scanning, controller auto-selects equipment. LCD displays DMX address (e.g., "ADD: 001").
- Set DMX Address: Move joystick or rotate wheels to select fixture. Adjust new DMX address using Bank Up/Down, or tap Scanner buttons (1-12) and Page button to auto-join DMX address.
- Save Address: Tap MIDI/Rec (LEDs flicker, indicating success).
- Repeat: Repeat steps 5-7 for other DMX addresses.
- Exit RDM: Press and hold Auto/Del, then tap Program.
Turn Off Operation Condition:
- Press and hold AUTO SCENE 8 button, then turn on power. LCD displays "RUN SAVE".
- Tap TAP to select YES or NO.
- Press and hold BLACK OUT to exit without saving.
- Press and hold AUTO SCENE 8 to save and exit.
Maintenance Features:
- General Safety: Do not expose to inflammable liquids, water, or metal objects. Disconnect power if liquid spills. Stop use if serious operation problems occur and contact dealer. Do not open or attempt to repair the unit.
- Environmental Conditions: Avoid excessive humidity, vibrations, bumps, and extreme temperatures (outside 2°C/35.6°F to 45°C/113°F). Maintain humidity between 35% and 80%.
- Physical Integrity: Do not dismantle or modify the unit.
- Packaging: Keep packaging materials away from children.
- User Age: Only adults should operate the unit.