S3VA57TD
Switchboard / P5 Powerpanel
Strap Mounting Kit for a
1,200A 3VA57 or 3VA67
Breaker in Unit Space
Installation
Instructions
11-B-1101-01 Rev. 00
-4-
These instructions do not purport to cover all details or variations in equipment, or to provide for every possible contingency to be met in connection
with installation, operation or maintenance. Should further information be desired or should particular problems arise, which are not covered sufficiently for
the purchaser’s purposes, the matter should be referred to the local Siemens sales office. The contents of this instruction manual shall not become part of
or modify any prior or existing agreement, commitment or relationship. The sales contract contains the entire obligation of Siemens. The warranty
contained in the contract between the parties is the sole warranty of Siemens.
Any statements contained herein do not create new warranties or modify the
existing warranty.
Trademarks - Unless otherwise noted, all names identified by ® are registered trademarks of Siemens AG or Siemens Industry, Inc. The remaining
trademarks in this publication may be trademarks whose use by third parties for their own purposes could violate the rights of the owner.
27.
Secure the Provision Filler Plate (Item 10) to the
Cover Plate (Item 11) with a pair of round head screws
and locknuts (part of Item 10), one set at each corner.
INSTALLING FILLER PLATE TO COVER PLATE:
26. Orient the Provision Filler Plate (Item 10) to the
Cover Plate (Item 11) as shown. (The Filler Plate
comes with a pre-applied label. That label should
face the exterior, and be oriented such that it can be
read when this assembly is installed onto the
deadfront supports.)
S
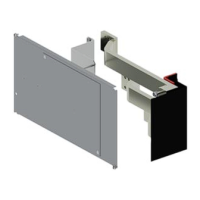
(Refer to Figure 10)
INSTALLING THE COVER PLATE:
28. Install the Cover Plate (Item 11) by aligning it over
the breaker mounting provision and loosely secure
it to the deadfront support rails with the pair of
1/4”-20 x 3/8” screws (Item 18).
29. Once all the covers are in place, tighten all the
fasteners
to the torque specified on the rear of the
deadfront or noted in the table on page 2.
31. Ensure that any bus or breaker hardware is
torqued as specified on the rear of the deadfront.
Then replace all the cover plates and gutter
covers. Finally, ensure any fillers are in place
BEFORE re-energizing the equipment.
COMPLETING THE INSTALLATION:
30. Follow the
instructions
provided with the
Handle Extension
Holder Assembly
(Item 14) to locate
and install it.
HANDLE EXTENSION:
HANDLE
EXTENSION
HANDLE
HOLDER
3VA BREAKER
ON / OFF
HANDLE
14
Figure 9
(Refer to Figure 9)
24. Install the lug terminal shield on the “OFF”-side by
sliding it into the grooves, per lug kit instructions.
22. Insert and loosely secure the cables to the lugs on
the neutral lugs and the “OFF”-side of the breaker.
INSTALLING THE CABLES:
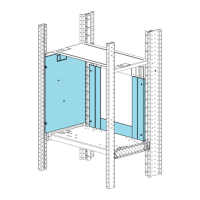
20. The Neutral is located at the bottom of the Z-rails, or
mirrored at the top of the Z-rails depending upon the
feed cable location. For Panelboard applications,
use the Panelboard Neutral Lug Assemblies (Item 8);
for Switchboard applications, use the Switchboard
Neutral Lug Assemblies (Item 9). Mount as shown
or mount to any other available hole on either side
of the Neutral and oriented to best fit the cable feed
direction.
(Refer to Fig. 6 for Panelboard, Fig. 7 for Switchboard)
INSTALLING THE NEUTRALS:
21. Tighten the screws
to the torque specified on the rear
of the deadfront or noted in the table on page 2.
23. Tighten to the torque noted in the lug instruction
sheet, on the device or specified on the torque label
on the rear of the deadfront.
(Skip this section for provisions)
(Skip this section for installed breaker)
Figure 7
NEUTRAL
9
Figure 8
18
11
CARRIAGE BOLT
LOCKNUT
10
12
13
Figure 6
8
NEUTRAL
25. Re-install the “OFF”-side and “ON”-side shield covers
by placing them over the proper ends, inserting the
shield cover screws and tightening to 11 lb-in.