The Sienna Expresso, Elite, and Empressa Steam Presses are household appliances designed to provide professional-quality garment pressing at home, offering an affordable and time-saving alternative to dry cleaning. These steam presses are intended for indoor domestic use only; commercial use will void the warranty. They are specifically designed for pressing garments and should not be used for any other purpose.
Function Description
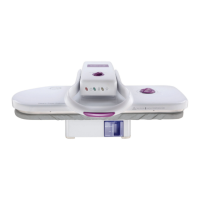
The primary function of these steam presses is to efficiently remove wrinkles and create sharp, long-lasting creases in various fabrics. They achieve this by combining heat and pressure, with a pressing surface significantly larger than traditional hand-held irons. The presses apply substantial, even pressure (over 100 lbs) across the garment, ensuring uniform results. A non-stick coating on the pressing plate helps prevent starch buildup, making cleaning easier. The units feature a locking handle for portability and upright storage.
Usage Features
General Operation:
To begin, the press should be placed on a flat, level surface. The locking knob is turned to "unlock," and the pressing handle is lifted to open the press, which will automatically stay in the lifted position. Before plugging in, the water tank is filled using the provided water container by sliding the tank forward, pouring water into its holes, and then sliding it back into place. Distilled water is preferred but not mandatory. The water tank is not removable and is designed to store leftover water; forcing it free should be avoided.
After filling the water tank (if steam is desired), the unit is plugged in, and the Power On/Off Button/Switch is pressed. A Power Light (red, or yellow for Expresso) will illuminate. It's crucial that the pressing plate is in the open position when the unit is initially turned on. The desired temperature is then selected using either the Temperature Control Dial (Expresso) or the Fabric Temperature Selection arrows (Empressa and Elite). The press needs a few minutes to heat up; a Ready Light (green) will indicate when the desired temperature is reached. It takes approximately 4 minutes to reach the Linen temperature (410 °F / 210 °C).
Once ready, the garment is placed on the ironing board. For gathered areas like sleeves, darts, and yokes, the provided pressing cushion can be used to flatten them. If needed, a spray bottle can be used to dampen fabric before pressing. The pressing handle is pulled down to bring the pressing plate and ironing board together. The press should be held down for a few seconds, then lifted to separate the plates. It is important not to hold the press down for longer than 5 seconds to avoid over-heating and wrinkling the garment. If a garment becomes wrinkled due to excessive heat, it should be sprayed with water and re-pressed.
Steam Functionality:
To use steam, the Fabric Temperature Selection must be set to Wool, Cotton, or Linen. A Steam Ready Light (yellow) will appear, indicating that steam is available. The Steam Burst Button is then pressed to release steam. When using steam, the pressing handle should be pulled down directly above the garment, about 1 to 2 inches above the fabric, and the Steam Burst Button pressed. It is crucial not to activate the Steam Burst Button with the unit completely closed, as this can damage the press. Steam bursts should be short (no longer than 3 seconds) to prevent a dramatic temperature drop in the pressing plate, which would require waiting for the unit to reheat. Using short bursts helps maintain temperature and allows for quicker, more efficient pressing.
During initial use or after a long period of inactivity, the Steam Burst Button should be pressed continuously for several seconds to clear any residual water or calcium buildup from the pressing plate and system.
Safety Features:
The steam presses include an auto shut-off feature. For the Empressa model, an E1 warning beep (and digital display message) will sound if the pressing plate is left in a closed position against the ironing board for more than 10 seconds. The press will stop heating, and the auto shut-off will engage. To restore operation, the pressing plate must be returned to the lifted position, or in some cases, the unit may need to be turned off and on again or unplugged and re-plugged. It is important not to lock the pressing plate and ironing board together while the unit is hot, as this will trigger the E1 warning.
An E2 warning beep (and digital display message for Empressa) will sound if the pressing plate is left in the lifted position without use for approximately 10 minutes. The press will stop heating, and the auto shut-off will engage. To restore use, the On/Off Switch or Temperature Control buttons can be pressed to reset. If the pressing plate is forgotten in the raised position or if there is no activity for about 10 minutes, the machine will beep, and the automatic shut-off (E2) will completely power down the steam press.
Fabric-Specific Pressing:
Users should always check garment labels before selecting a fabric setting. If the fabric type is unknown, it's best to start with the lowest temperature setting and gradually increase it as needed, always pressing the most delicate fabrics first to prevent damage.
- Tablecloths: Fold the fabric in half or thirds, place it on the ironing board, accordion pleat the length, and move the pleated item into the open space behind the ironing board. Press by moving the tablecloth towards you until the entire item is pressed. For storage, fold, place on the ironing board, and close the press with mini-pressure.
- Pants:
- Waistband: Place the top of the pants on the press. If using the pressing cushion, place the waistband around the board on top of the cushion, arrange pleats, and rotate to press the entire waistband.
- Side Pockets: Slide pockets over the pressing cushion on the pressing board and press.
- Crotch Area: Place the inside of the crotch area on the board facing up, aligning with the slanted left side of the board, and press.
- Legs: Place the top half of the pant leg on the ironing board and press the front crease. Then, place the bottom half, allowing the hem or cuff to hang off the end. Repeat for the back crease. Hems can also be pressed by placing both on the ironing board and applying light pressure.
- Shirts and Blouses:
- Yoke: Arrange the shoulders around the slanted left side of the board, letting the collar hang off the edge, and press.
- Cuffs: Place cuffs and plackets around the edges of the ironing cushion, arranging any pleats, and press.
- Sleeves: Place the garment to the left side of the press with the collar facing you. Place the first sleeve on the ironing board, fitting the curve of the garment to the slanted left side (the second sleeve will lay off the board), and press. Remove the first sleeve and place the second sleeve on the board to press.
- Body: Fold the shirt in half with sleeves together. Place it at the back of the ironing board, extending the sleeves behind the board on the right. Bring the shirt front with buttons forward. Hold the collar so the curved edge of the neck opening is flat against the ironing board, and do not release until the pressing plate is lowered. Press, then keep pulling the shirt forward until the entire shirt is pressed.
- T-shirts: Place flat on the ironing board. Depending on shape, start with the sleeves. If the t-shirt has rhinestones or applications, press with the decorated side face down or turn it inside out.
- Pleated Skirts: Place the pressing cushion under the waistband and press. Rotate the skirt until the entire waistband is pressed. Slip the skirt over the board, arrange the pleats (pinning to the ironing board cover if necessary, avoiding plastic head pins), and press. Rotate until all pleats are pressed.
- Jackets:
- Sleeves (without creases): Fold the sleeve on the seam line, place it flat on the board, allowing the top edge to hang off the edge, and press.
- Lapels: Place lapels flat, diagonally on the ironing board, and press. Use the ironing cushion if needed.
- Ties and Ribbons: Place lengthwise on the board and press. Alternatively, place horizontally, close the press, and pull the tie or ribbon through it.
Maintenance Features
Storage:
Before storing or performing maintenance, the unit must be isolated by removing the cord from the power socket. Immersion in water should be avoided. While water can be left in the tank, it is recommended to drain any leftover water if the machine will be stored for a long period. This is done by pressing the Steam Burst Button until the tank is empty. The press should be allowed to cool for approximately 30 minutes before storage. Once cooled, the pressing plate is lowered onto the ironing board, the pressing handle is pulled down completely, and the locking knob is turned to the locked position. The electrical cord should be loosely wrapped and placed in the cord storage compartment located at the left of the water tank on the base of the ironing board. The steamer can be wiped with a soft cloth if necessary. Store the unit in a cool, dry place.
Cleaning:
To clean the pressing plate, fill the water tank using the provided water container. Place the pressing cushion in the center of the ironing board, then place a clean towel over both. Set the fabric temperature selection control to the highest setting (linen). Once the Steam Ready Light illuminates, gently lower the pressing plate onto the pressing cushion. Press the Steam Burst Button 6 to 7 times. Care should be taken to avoid touching hot metal surfaces and keeping hands away from the pressing area during this process.
Once the pressing plate has cooled down, its surface can be cleaned with a damp cloth. Abrasives should not be used on the non-stick pressing plate. The ironing board cover is removable and can be rinsed with mild detergent and warm water. Replacement covers can be purchased from the manufacturer's website.