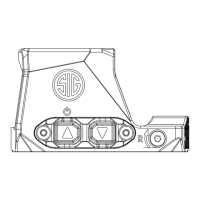
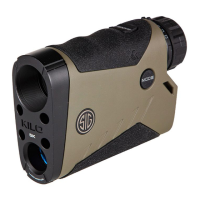
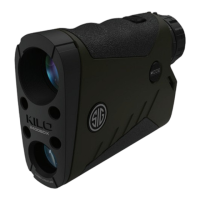
The ROMEO-X is a series of open reflex sights designed, developed, tested, and assembled in the USA by SIG SAUER. These rugged pistol optics are available in two models: the COMPACT, which fits Shield RMS-c footprints, and the PRO, which fits Delta Point PRO footprints.
Function Description:
The ROMEO-X sights are designed for rapid target engagement with both eyes open, enhancing situational awareness. They feature a high-efficiency point source LED emitter and an aspherical glass lens with a high-performance red notch reflector coating, ensuring excellent brightness, light transmission, and zero distortion. Users can choose between a 2 MOA dot/32 MOA circle reticle (circle/dot models) or a 6 MOA dot reticle. The sights offer 15 brightness settings, including 12 for daylight and 3 for night vision, making them compatible with GEN3+ night vision devices thanks to D.A.R.C. (Dark Adaptive Reticles & Coatings) technology, which provides ideal reticle brightness and target clarity.
A key feature is MOTAC (Motion Activated Illumination), which automatically powers off the optic after 2 minutes of inactivity and powers it back on when motion is detected, returning to the previous brightness and reticle setting. The side-mounted CR1632 battery compartment with a threaded cap allows for easy battery changes without removing the optic from the firearm.
Important Technical Specifications:
- Models: ROMEO-X COMPACT and PRO Open Reflex Sights
- Housing Material: 7075 Aluminum
- Reticle Options: 2 MOA red dot / 32 MOA red circle (circle/dot) or 6 MOA red dot
- Brightness Settings: 15 settings (12 Daylight / 3 NV)
- Night Vision Compatibility: GEN3+ Night Vision compatible
- Battery Type: CR1632 coin cell battery
- Battery Runtime: Up to 20,000 hours (continuous at medium setting, dot only)
- Illumination Technology: MOTAC (Motion Activated Illumination)
- Optic Lens: Aspherical glass lens with high-performance red notch reflector coating
- Water Resistance: IPX-7 rated (complete water submersion up to 1 meter)
- Mounting Footprints:
- COMPACT: Shield RMS-c
- PRO: Delta Point PRO
- Dimensions:
- Overall Length: COMPACT: 1.61" (41mm) / PRO: 1.83" (46.5mm)
- Overall Height: 0.94" (23.9mm)
- Overall Width: 1.22" (31mm)
- Weight with Battery: COMPACT: 1.0 oz (28.3g) / PRO: 1.15 oz (42.5g)
- Magnification: 1x
- Clear Aperture Diameter: 24mm
- Elevation Adjustment Travel: 80 MOA
- Windage Adjustment Travel: 80 MOA
- Windage/Elevation Adjustment (Per click): 1.5 MOA
Usage Features:
- Power ON/OFF: Press and hold the (UP) brightness adjustment button for over 1 second to turn ON or OFF.
- Brightness Adjustment: While the sight is ON, press and release the (UP) button to increase brightness or the (DOWN) button to decrease brightness. The reticle blinks 5 times at the highest or lowest setting.
- Reticle Change (Circle/Dot Models Only): Press and hold the (DOWN) brightness button for over 1 second to cycle through reticle options (dot, circle, and circle/dot combination). Release the button when the desired reticle is displayed.
- Mounting:
- Ensure the firearm is unloaded and cleared before mounting.
- Remove any pistol optic cover plate from the slide.
- Clean threaded mounting holes on the mounting surface.
- Align recoil bosses on the mounting surface with recoil lug witness holes on the optic.
- Thread mounting screws through optic holes into threaded holes on the mounting surface, applying forward pressure (toward the muzzle) on the optic housing.
- Torque mounting screws to specific values:
- M3x0.5-11.75mm (SIG P365 optic-ready pistol slide only): 24 inch-pounds (2.71 N·m)
- M4x0.7-9.75mm into a steel pistol slide: 28 inch-pounds (3.16 N·m)
- M4x0.7-9.75mm into aluminum mount or adapter plate: Refer to mount/plate manufacturer's specification.
- Zeroing:
- Perform initial sight-in at 5-7 yards with a paper target.
- Shoot a precise group (minimum 5 rounds).
- Compare Point of Aim (POA) with Point of Impact (POI).
- Elevation Adjustment: The screw is on top of the rear deck. Turn counterclockwise to raise POI, clockwise to lower POI. Each click is 1.5 MOA.
- Windage Adjustment: The screw is on the left side, behind brightness buttons. Turn clockwise to move POI right, counterclockwise to move POI left. Each click is 1.5 MOA.
- Directional arrows near adjustment screws indicate bullet impact movement, not reticle movement.
Maintenance Features:
- Battery Installation/Replacement:
- The battery cap is on the right side of the optic.
- Use a flat blade tool to turn the cap counterclockwise to remove.
- Install a fresh CR1632 battery with the positive (+) side facing out.
- Thread the cap clockwise until tight against the housing. Periodically check for tightness.
- Cleaning Lenses:
- Always blow dust or debris from lenses before using a cloth or lens pen to prevent scratching.
- Use a clean, soft lens cloth.
- Remove brass particles, dirt, dust, or carbon buildup before wiping.
- Use compressed air to blow away debris.
- For carbon removal, use a cotton swab lightly soaked in Isopropyl Alcohol.
Troubleshooting:
- POI Changes Between Groups:
- Verify mounting screws are torqued to the correct specification.
- Check for variations in ammunition brand, bullet weight, and velocity.
- Clean the firearm.
- Reticle Not Illuminated:
- Press and hold the (UP) brightness adjustment button for over 1 second to turn on.
- Continue pressing and releasing the (UP) button to ensure the reticle is not set to one of the lowest illumination levels, which can be hard to see in bright environments.
- Ensure the battery is installed correctly (+ facing out).
- Make sure the battery cap is fully tightened.
- Replace the battery.
- SIG SAUER Electro-Optics Infinite Guarantee/Limited Lifetime Warranty: Covers damage or defects, with repair or replacement at no charge. Excludes intentional damage, misuse, cosmetic damage not affecting performance, loss, theft, or unauthorized repair/modification. Excludes electronic and Tritium components.
- SIG SAUER Electronic Component Limited 5-Year Warranty: Covers defects in workmanship, material, and mechanical function of electronic and tritium components for five years from the date of manufacture. Repair, adjustment, or replacement at SIG SAUER's option. Void if misused, damaged, not properly maintained, or unauthorized repair/alteration. Does not apply to normal cosmetic wear.
Note: For product service, call (603) 610-3000. SIG SAUER is located at 12100 SW Tualatin Rd, Tualatin, OR 97062 USA.