Do you have a question about the Sigma Metalytics Precious Metal Verifier INVESTOR 3012 and is the answer not in the manual?
| Brand | Sigma Metalytics |
|---|---|
| Model | Precious Metal Verifier INVESTOR 3012 |
| Category | Measuring Instruments |
| Language | English |
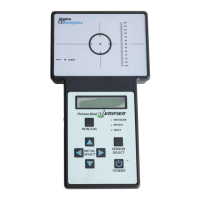
Explains the function of arrow and number keys for navigation and data entry.
Measures sample resistivity under the surface to detect surface contaminants or foreign metals.
Measures bulk resistivity using sensors in the arm and base to check the entire sample.
Electronically measures sample thickness using the average thickness of the face.
Performs a specific gravity test to ensure correct sample density by entering measured weight.
Ensure the device calibrates properly during power-on, with no samples present.
Select the correct alloy and enter the accurate weight of the sample for testing.
Perform resistivity and dimension tests, then interpret the results for sample authenticity.
Details on configuring Weight Mode, Display, Backlight, and Timeout settings.
Guide to selecting gold alloys from the database, including specific types like Pure Gold and American Eagle.
Guide to selecting silver alloys, such as Pure Silver, Sterling, and specific coin types.
Choose between English (Ozt) or Metric (grams) units for weight entry.
Detailed steps for manually entering the precise weight of the sample using the keypad.
Explains the meaning of green, yellow, and red indicators for sample consistency.
Explains the meaning of blue, red, and sideways arrows for reading reliability and scale deviation.
Choose the correct alloy from the menu before performing the resistivity test.
Position the sample on the onboard sensor or wand for accurate resistivity measurement.
Refer to interpretation guide for understanding green, yellow, and red results.
Explains results indicating a reliable reading consistent with the selected metal.
Explains results indicating a reliable reading but outside expected range or inconsistent with alloy.
Explains results in caution range, requiring density confirmation for a good sample.
Explains red arrow results indicating an unreliable reading, requiring check of testing conditions.
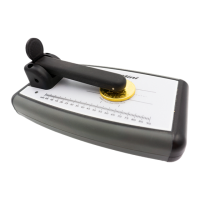
Explains the mode used for small samples fitting on the display, comparing edges to screen lines.
Details on numerical dimension verification, including sample measurements and density checks.
Step-by-step guide for aligning round and rectangular samples on the screen for verification.
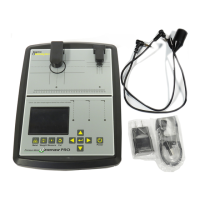
Steps for plugging in and self-calibrating the wand attachment.
Explains wand measurement, displaying basic verification mode, yellow icon, and reading screen.
Detailed instructions for downloading, installing, and connecting the PMV INVESTOR to a PC.
Emphasizes selecting the correct alloy before testing to ensure accurate results.
Advices weighing the sample accurately before dimension testing for correct input.
Warns against re-testing on different alloy settings if a sample fails its expected setting.
Recommends performing other non-destructive checks like markings and provenance.
Advises testing samples in their protective cases to preserve value and avoid damage.
Suggests double-checking device settings if a sample fails a test to ensure accuracy.
Explains why .999 silver may register in the yellow caution range for user awareness.
Clarifies that left indicates less resistivity, right indicates more than expected.
Explains modern coinage resistivity matches older 90% silver and notes weight difference.
Explains the device must be actively measuring for the dimension screen to activate.
Recommends re-calibrating every 25-30 minutes for consistent measurements.
Explains PMV measures average face thickness, differing from rim caliper measurements.
Details the device's 4-hour battery life and safe overnight charging.