AFTER SALES SUPPORT
1300 777 137
service@unclebills.com.au
MODEL: EA0403 PRODUCT CODE: 46486 08/2017
13
Setting the Correct Time
When the Jukebox enters standby mode the LCD display panel will illuminate and the time
“00:00” will appear on the LCD display panel.
To set the time, simply press the PROG button on the control panel or remote control (No.
10 on the Control panel diagram or No. 5 on the remote control diagram) and hold this
button down for 3 -5 seconds, until “24-H” is displayed on the screen (“24-H” indicates
that the time will be set in 24 hour format). Once “24-H” is displayed on the screen press
the PROG button again. The display will revert to “00:00” on the display, however, with
the “00” ashing. Use the UP and/or DOWN buttons on the control panel or the PREV/
F. B and/or NEXT/F.F buttons on the remote control (No. 20 and 21 on the control panel
diagram or No. 6 and No. 15 on the remote control diagram), to select the correct hour
(keep in mind it will be set it 24 hour time), then press the PROG button to conrm. The
second “00” will now be ashing. Use the UP and/or DOWN buttons or the PREV/F.B
and/or NEXT/F.F buttons to select the correct minutes, then press the PROG button to
lock this gure in.
NOTE: The time will only be saved in the Jukebox when it is powered ON. If you wish
to save the set time into your Jukebox, do not press the POWER button (No. 2 on the
control panel diagram) to turn the unit o, simply press the ON/OFF button (No. 3 on
the control panel diagram) to set the Jukebox to standby. If the POWER button (No.
2 on the control panel diagram) is used to turn the Jukebox o, it will erase the time
setting and the above process will need to be repeated in order to reset the correct time
the next time it is turned on.
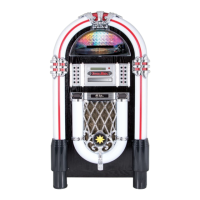
Turning on the Lighting Effects
The Jukebox features 2 colour changing LED light tubes that are displayed on the
Jukebox parts diagram as items 14 and 15. There are also several other multicoloured
LED lighting eects that are featured in the CD player and USB/SD compartment and at
the bottom of the speaker panel.
To turn on the LED lighting eects simply press the LIGHT button (No. 18 on the control
panel diagram). All the LED lighting eects will illuminate.
NOTE: The lighting eects operate independently of the POWER button (No. 2 on the
control panel diagram). The LIGHT button controls power to the lighting eects and the
POWER button controls power to the audio functions and display of the Jukebox.
Instructions