Do you have a question about the Silver Cross nostalgia and is the answer not in the manual?
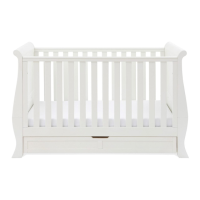
Lists all components required for assembling the Nostalgia Sleigh Cot Bed.
Details all hardware and tools provided for the cot bed assembly.
Connect the side panels (A, E) to the base using fittings (G, L).
Attach the second side panel (A) and secure with fittings (G1, G2, J, L).
Reinforce the connection of side panels (A) with fittings (G1, G2, J, L).
Fit the mattress base to the desired height using fitting (H).
Place and secure the mattress base (C) onto the cot frame (A) using fitting (I, L).
Assemble the base support structure (F, F1, F4) using fittings (G, J, L).
Insert the base support panels (F3) into the assembled structure.
Secure the base support assembly (F2) using fittings (G, K, L, M).
Final securing of components in the cot bed configuration.
Details on adjusting the base or drawer mechanism.
Final check of the assembled cot.
Begin conversion to day bed by attaching support (D) with fittings (G1, G2, J, L).
Complete day bed conversion by attaching support (D) with fitting (H).
Place and secure the mattress base (C) in the day bed configuration with fitting (I, L).
Final securing of the base support in the day bed mode.
Final check and adjustment for the day bed mode.
Review of the assembled day bed.
Start toddler bed conversion by securing panel (E) to frame (A) with fittings (G, L).
Remove the bottom panel from the cot structure.
Attach toddler bed side supports (D) using fittings (G1, J, L).
Secure the toddler bed side supports (D) with fittings (G1, J, L).
Adjust the mattress base height for the toddler bed using fitting (H).
Place and secure mattress base (C) in toddler bed with fittings (D, A, L, I).
Final securing of components in the toddler bed configuration.
Final adjustment and check of the toddler bed base.
Final inspection of the completed toddler bed.
Alerts regarding fire risks, suffocation hazards, and entrapment.
Do not use if damaged; use only approved Silver Cross spare parts.
Specifies mattress thickness, size, and fit to prevent gaps.
Ensure all fittings are tight and checked regularly for safety.
Advice on base height, stopping use when child climbs, and placement.
Clean with a damp cloth; avoid abrasives or bleach.
Suitable for ages birth to 4 years, conforms to BS 8509.
| Brand | Silver Cross |
|---|---|
| Model | nostalgia |
| Category | Indoor Furnishing |
| Language | English |