SHSS 18 B1■ 8
│
GB
│
IE
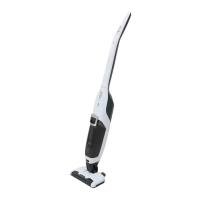
Connecting/removing the hand
element to/from the handle rod
Fig. 2 Fig. 3
1) To connect the hand element
3 to the handle
rod 0, push the tip of the hand element 3
into the opening in the hand element recess
e.
2) Then press the grip 1 of the hand element 3
into the handle rod 0 until the hand element
3 clicks firmly into place (Fig. 2).
3) To remove the hand element 3 from the
handle rod
0, press both release buttons w.
4) Then pull the hand element
3 upwards and
forwards out of the hand element recess e
(Fig. 3).
Operation
ATTENTION!
► The suction opening must always be open and
may not be blocked. Blockages lead to over-
heating and damage to the motor.
► Do not vacuum shag pile carpet with the floor
nozzle. The rotary brush
r can get caught in
the carpet and jam!
NOTE
► Make sure that the EPA filter
5 and the coarse
filter
6 are always inserted before using the
appliance.
► As soon as the suction power of the appliance
begins to diminish noticeably and the charge
indicator lamp
2 flashes blue, connect the
appliance to the mains adapter
u.
Using the hand element with the
handle rod
1) Insert the hand element 3 into the hand
element recess e as described in the section
Assembly/disassembly.
2) Switch on the appliance using the On/Off
switch 8. The charge indicator lamp 2
lights up blue, the LED light t on the floor
nozzle lights up and the rotary brush r
starts rotating.
NOTE
► Press the ECO button
9 to switch to the ener-
gy-saving ECO mode. The appliance now uses
a lower suction power but can run for longer.
Press the ECO button
9 again to work with full
suction power.
3) Guide the floor nozzle over the area to be
vacuumed. Hold the handle rod
0 so that the
floor nozzle moves smoothly over the floor.
4) Press the On/Off switch
8 when you have
finished vacuuming. The rotary brush
r stops
and the charge indicator lamp
2 as well as
the LED light
t switch off.
 Loading...