- 28 -
Notices regarding usage
• Utilise the appliance exclusively for the purposes
and usages described in these operating
instructions. If you do, it may result in physical
injury and/or appliance damage!
• To avoid an overheating of the appliance, do
not use it for more than 20 minutes continuously.
Before re-using it, allow the appliance to cool
down for approx. 15 minutes.
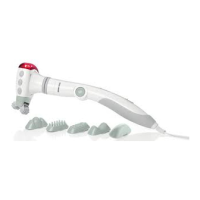
• Use the appliance exclusively with the supplied
accessories. If you do, it may result in physical
injury and/or appliance damage!
• Do not use the appliance on animals.
Risk of physical injury!
• Do not use the appliance to fall asleep in bed.
There is a risk of suffering burns or causing a
fire.
ATTENTION!
The upper surface of the infra red lamp becomes
warm when in use. Heat non-sensitive people must
therefore handle the appliance with particular
caution.
Utilisation
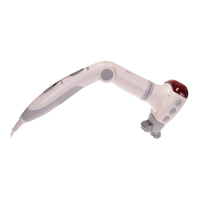
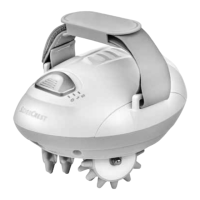
In use, the infra red lamp 9 creates warmth and it
penetrates into the deeper layers of skin. This has a
stimulating effect and is thus effective against
tiredness and tensions.
With vibration switched on in the massage head 1,
a relaxing and pain relieving effect can be achie-
ved for tired muscles through gentle massage.
Taking into use
Unpacking
• Take the Infra Red Massage Appliance and the
accessories from the packaging.
• Remove all packaging material.
Attention:
Do not permit small children to play with plastic
packaging. There is a risk of suffocation!
Adjusting the rotatable parts of the
massage appliance
• With the revolvable ring 3 the massage head
1 can be turned through a radius of 270°.
Thus either the infra red lamp 9 or the massage
head 1 is directed at the body part to be treated.
The grip 7 can be turned in five levels over a
radius of 90°.
• For this, press the locking button on the swing
arm 8 down and move the grip 7.
• Release the locking button 8 and turn the grip
7 until it engages.
IB_76619_SIM13A1_LB5 23.05.2012 10:26 Uhr Seite 28