1
ENGLISH
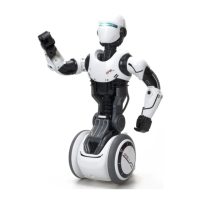
3. Part Identification
4. General Feature
2. Battery Installation
1. Delivery Contents
1. LED Eyes (Robot)
2. Demo Button
3. Microphone
4. Power Switch / Auto mode / Manual mode
5. Wheels Direction Control Lever
6. Tracking (pre-programming)
7. Execute (enter / playback)
8. Left Shoulder + Elbow Control Pad
9. Demo Button
10. Head Direction Control Pad
11. Press to Talk Button (for Live Broadcast)
12. Repeat Button (for Live Broadcast)
13. Right Shoulder + Elbow Control Pad
14. Save Slot Selection (for Tracking Function)
15. Voice Changing Effect Selector
16. Monitoring ON/OFF button
- Robot x 1 - Controller x 1 - Instruction Manual x 1
Make sure the power switch is on “OFF” position.
Controller
- Open the battery compartment: loosen the screw by turning counter clockwise
with a Philips screwdriver. (Fig.1)
- Insert 3 AA batteries in the battery compartment with correct polarity. (Fig.2)
- Close the battery compartment: tighten the screw by turning clockwise with a
Philips screwdriver.
Robot
- Open the battery compartment: loosen the screw by turning counter clockwise
with a Philips screwdriver. (Fig.3)
- Insert 6 AA batteries in the battery compartment with correct polarity. (Fig.4)
- Close the battery compartment: tighten the screw by turning clockwise with a
Philips screwdriver.
- Lively motions – motorized head, shoulder & Elbows
- All Directional control – motorized wheels
- Dance – Performs 5 demo dances
- Spy Feature – listen Robot’s surrounding sound on the controller's speaker
- Live Broadcast – Talk to the controller and broadcast via the Robot
- Voice Change – broadcast your voices in 5 preset voice changed effects
- Code Tracking – records & playback the customize movements in 3 sets of memories
4
5
6
7
14
8
15 16
10
9
3
11
12
13
Fig.1 Fig.2
Fig.4
1
3 x AA
6 x AA
2
Fig.3