Insight on seaside.
6 PICO display and control overview
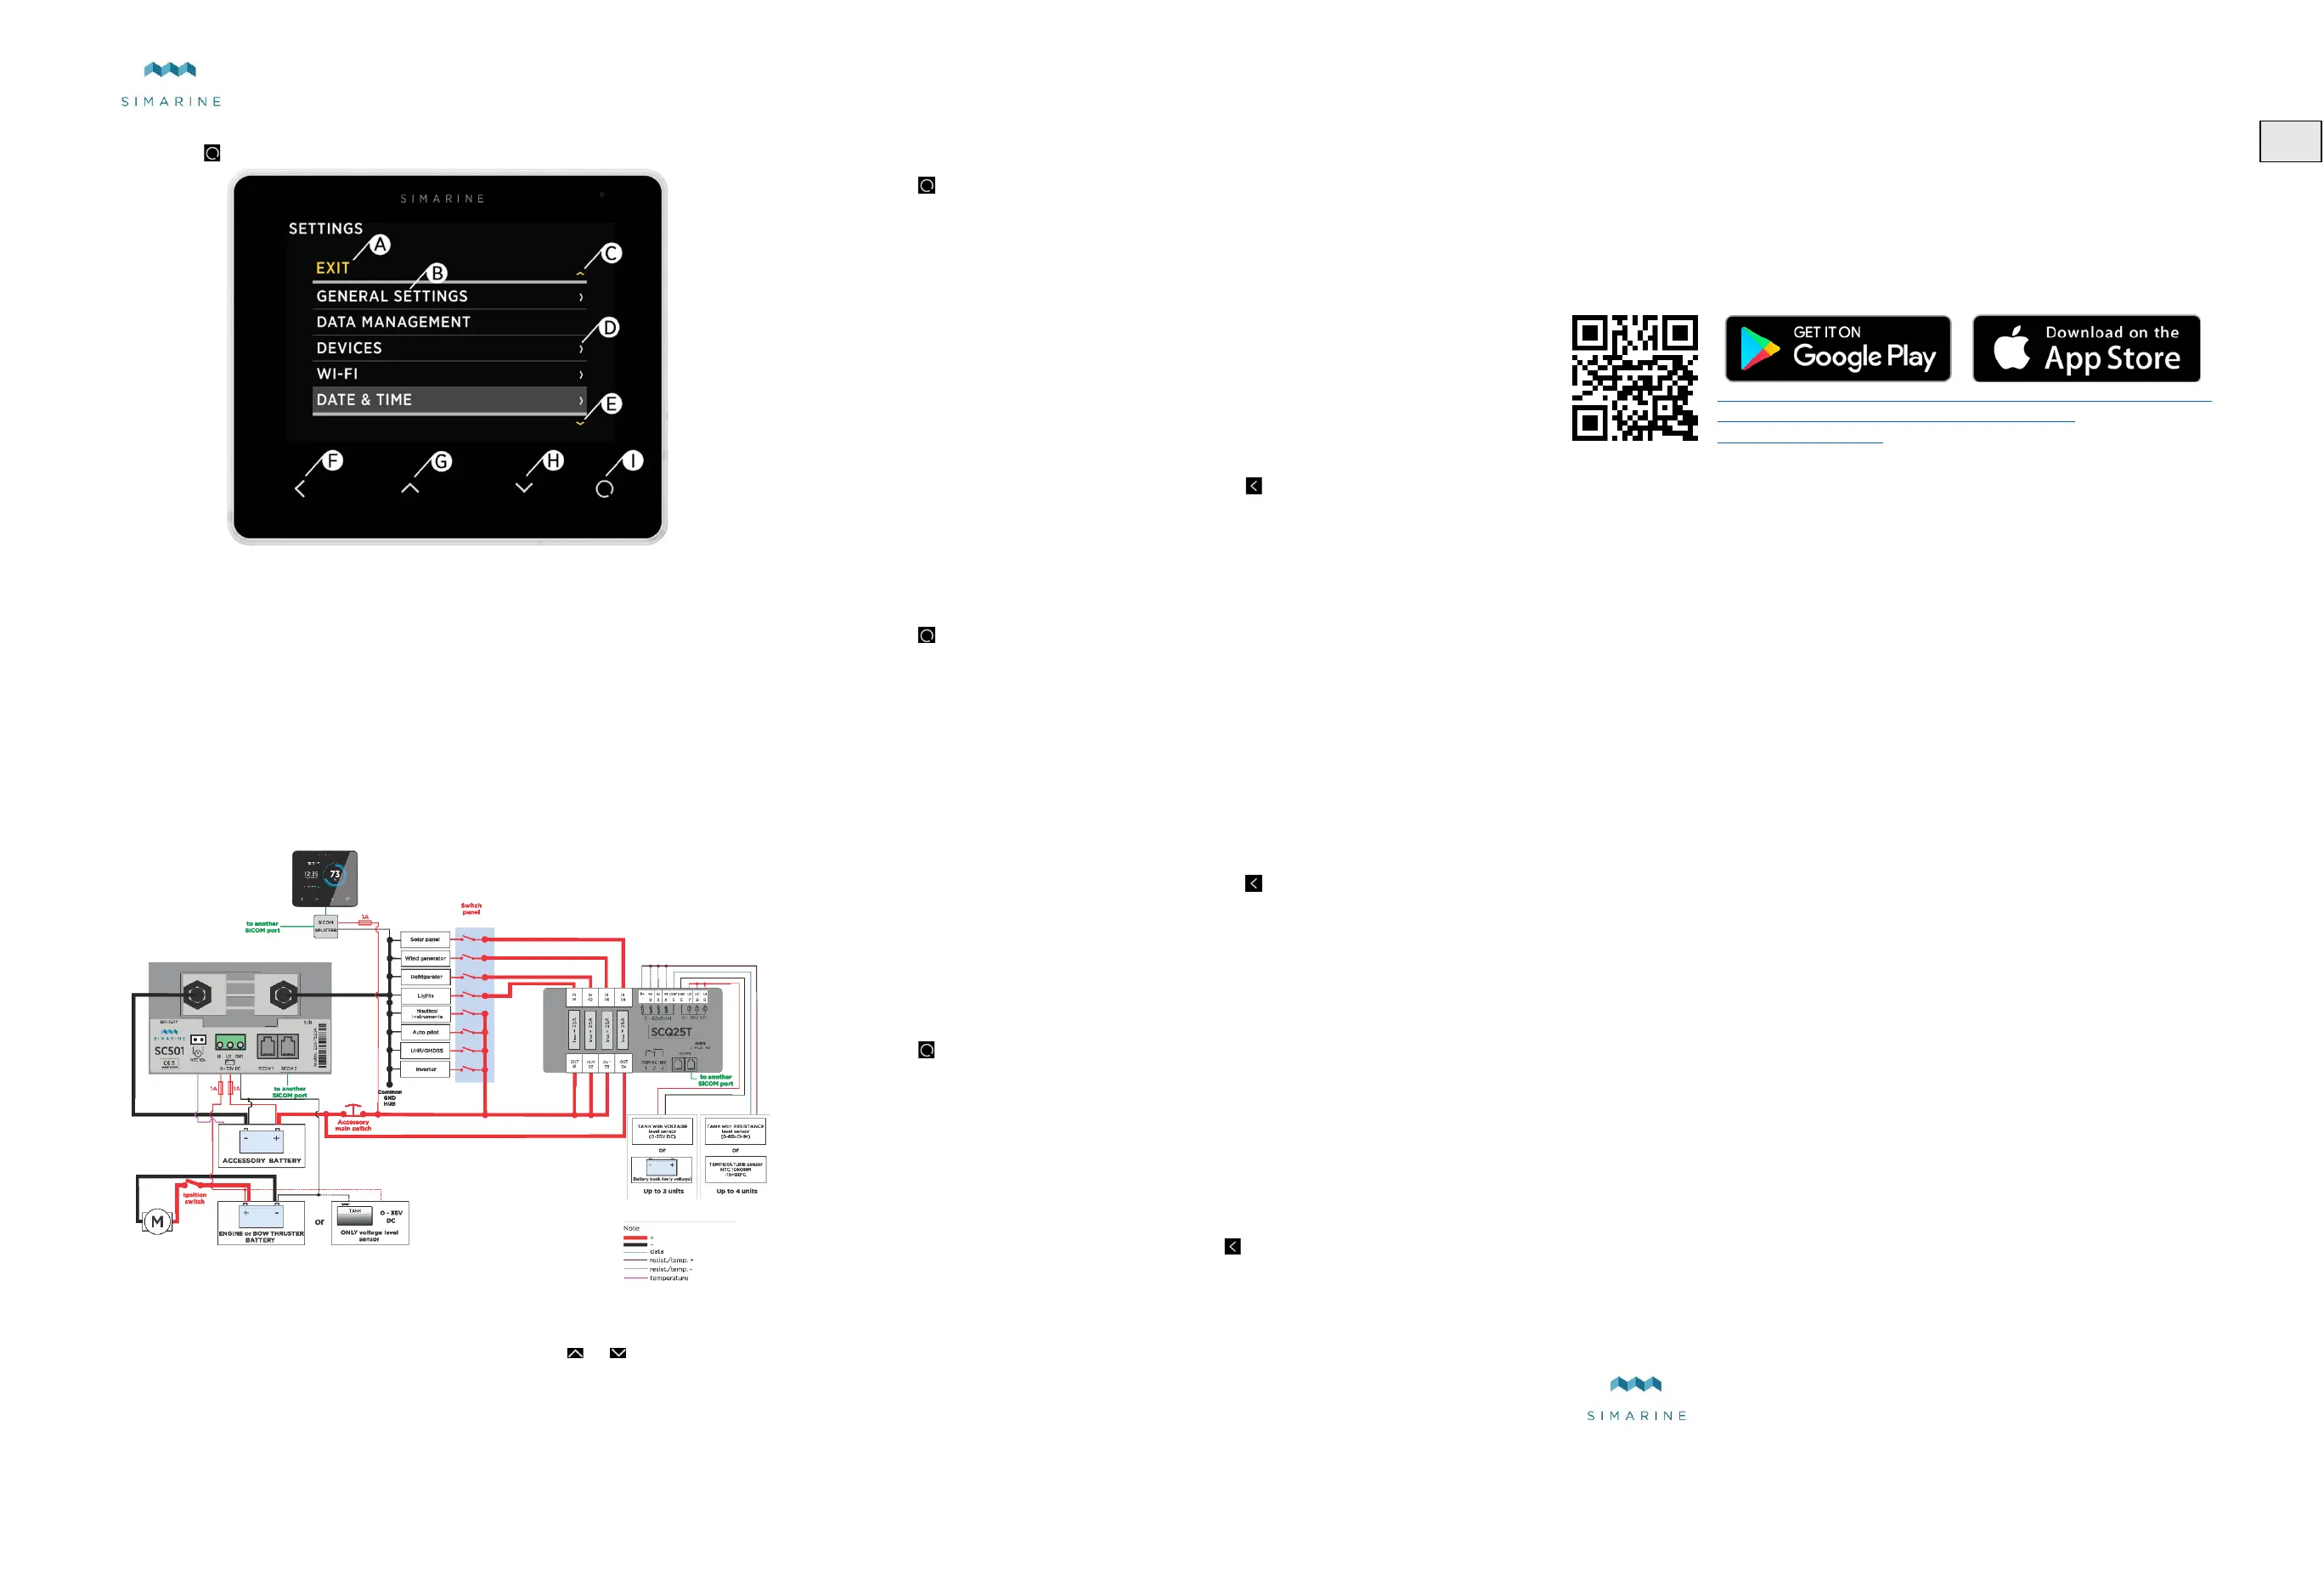
Long press button to enter the settings menu.
A – Label indicates current position in the menu
B – Currently selected item
C – Arrow indicates there is at least one more menu item in arrow direction
D – Arrow indicates there is a sub menu
E – Arrow indicates there is at least one more menu item in arrow direction
F – BACK BUTTON, is used to navigate one level back or leave the settings menu.
G – UP BUTTON is used to navigate up in menu, changing value or switching screens in live
view.
H – DOWN BUTTON is used to navigate down in menu, changing value or switching screens
in live view.
I – ENTER BUTTON, long press activates settings, short press commits changes or enters
selected submenu
7 SC501 and SCQ25T installed on the minus terminal of the
battery/battery bank
8 Basic configuration
PICO displays all properly configured batteries. Each correctly configured battery will show
up on PICO. You can switch between the battery banks with or button. To properly
configure a battery on PICO, you need to specify one voltmeter sensor, or one current sensor
and other battery parameters which are explained below.
All below described configurations require properly installed appropriate SIMARINE
shunt/module. The shunt/module installation is described in the corresponding
shunt/module manual.
8.1 Configure a battery using a digital shunt
The following steps are equal for SC300, SC302T and SC500 digital shunt. You can
configure the battery by following the below procedure.
Long press button to enter the settings menu.
Navigate to DEVICES BATTERIES.
Select “Add new” and fill in the requested data.
• Name the battery/battery bank accordingly (STARTER, SERVICE, MAIN, etc.)
• Select the battery type (WET STD., WET FREE, AGM, DEEP CYCLE, GEL, …)
• Fill in the battery capacity for the next C ratings: C/20, C/10 and C/5. If you don’t
know all the ratings, fill in just those ratings that you know. It is highly recommended
to fill at least two C ratings (one is not enough for precise calculations).
A “C” rating is simply a battery’s capacity (or Ah/amp hour rating) when discharged
over a specific period. The “C” rating is usually specified on the battery label.
• Select the voltmeter on the installed SC300/SC302T/SC500 digital shunt. You can
select only voltmeters that are not already used by an existing battery
configuration.
• Select the current sensor on the installed SC300/ SC302T/SC500 digital shunt. You
can select only current sensors that are not already used by an existing battery
configuration.
• Select a temperature sensor if you have one installed.
• Confirm and save the battery configuration with button.
The newly added battery should now be visible on one of the PICO’s screens once you exit
the settings menu.
8.2 Configure a battery using SCQ25T or ST107 module
The following steps are equal for SCQ25T and ST107 module. It is required to properly install
it. The installation is described in the corresponding module manual. After successfully
installing the module, you can configure the battery by following the below procedure.
Long press button to enter the settings menu.
Navigate to DEVICES BATTERIES.
Select “Add new” and fill in the requested data.
• Name the battery/battery bank accordingly (STARTER, SERVICE, MAIN, etc.)
• Select the battery type (WET STD., WET FREE, AGM, DEEP CYCLE, GEL, …)
• Fill in the battery capacity for the next C ratings: C/20, C/10 and C/5. If you don’t
know all the ratings, fill in just those ratings that you know. It is highly recommended
to fill at least two C ratings (one is not enough for precise calculations).
A “C” rating is simply a battery’s capacity (or Ah/amp hour rating) when discharged
over a specific period. The “C” rating should be described on the battery label.
• Select the voltmeter on the installed module. You can select only voltmeters that
are not already used by an existing battery configuration.
• Leave the current sensor empty.
• Select a temperature sensor if you have one installed.
• Confirm and save the battery configuration with button.
The newly added battery should now be visible on one of the PICO’s screens once you exit
the settings menu.
8.3 Configure a tank using SCQ25T or ST107 module
The following steps are equal for SCQ25T and ST107 module. It is required to properly install
your module of choice. The installation is described in the corresponding module manual.
After successfully installing the module, you can configure the tank by following the below
procedure.
Long press button to enter the settings menu.
Navigate to DEVICES TANKS.
Select “Add new” and fill in the requested data.
• NAME - Name the tank accordingly (FRESH WATER, WASTE WATER, FUEL 1 etc.)
• TYPE - Select the tank type (WATER, FUEL, WASTE)
• SENSOR TYPE - Select the used sensor type (RESISTANCE or VOLTAGE)
• DEVICE - Select the used sensor from the list.
• CAPACITY – Write the tank full capacity.
• CALIBRATION POINTS – Add calibration points for different tank levels. At least
two calibration points are required for proper configuration. More added calibration
points will enable PICO to show a more accurate tank level.
• Confirm and save the tank configuration with button.
9 Wi-Fi Network
The SSID and Password of the PICO’s Wi-Fi Network are generated from its serial number.
You can find the serial number on the back of the PICO, on the side of the retail box and in
PICO SETTINGS > SYSTEM > System Info.
EXAMPLE: (If your Pico serial number would be 12345678)
SSID: Pico<last four digits of serial number>
Example: Pico5678
Default password: pico<first four digits of serial number>
Example: pico1234
10 Mobile app
PICO can be remotely controlled by your smart phone via WiFi connection. Find your PICO
– Battery Monitor app in your mobile store by scanning the QR code below or visiting below
link for your app store.
When connected to PICO’s WiFi Network, you can monitor live data for batteries, tanks,
temperatures and barograph using the App as well as manage PICO’s setting on your smart
phone.
https://play.google.com/store/apps/details?id=net.simarine.pico
https://itunes.apple.com/us/app/pico-battery-
monitor/id1217159039
11 Firmware upgrade
To ensure the best PICO experience it is recommended to upgrade PICO’s firmware to the
latest version. This is done via
PICO – Battery Monitor smartphone application available on
your smartphone application market.
WiFi SSID and Password
The SSID and Password are generated from your PICO serial number.
You can find the serial number on the back of the PICO, on the side of the retail box and in
PICO SETTINGS > SYSTEM > System Info.
EXAMPLE: (If your Pico serial number would be 12345678)
SSID: Pico<last four digits of serial number>
Example: Pico5678
Default password: pico<first four digits of serial number>
Example: pico1234
NOTICE! It is important to download the latest PICO – Battery Monitor application before
proceeding with the firmware upgrade. The upgrade process is done in following steps:
Install or upgrade the PICO – Battery Monitor application on your smartphone.
On PICO turn WIFI on.
Connect your smartphone to PICO Wi-Fi Network.
Launch the PICO – Battery Monitor application on your smartphone.
The App displays: "Status: SIMARINE device is connected"
Press the button LIVE VIEW
Press the SETTINGS MENU Icon in the top right corner of your Smartphone and press
FIRMWARE UPGRADE. The upgrade process will put your PICO in upgrade mode.
Press ENTER on PICO to confirm the Firmware upgrade. (as stated on the screen)
Wait for the Firmware to upload on PICO.
PICO will perform a flash upgrade.
After upgrade, PICO reboots and is ready to use.
In rare cases, when the FW upgrade would not work in normal mode please try with the
Emergency Upgrade.
To enter the Emergency Mode follow the following steps:
1. Disconnect PICO from power outlet.
2. Turn on PICO and wait for the SIMARINE logo to appear.
3. As soon as SIMARINE logo appears, press and hold the back button (<)
Warning: you have to be quick as the logo disappears quickly.
4. Under the SIMARINE LOGO on PICO a series of dots will appear.
5. PICO will enter into Firmware upgrade mode (as stated on the screen)
6. Connect your phone to PICO Wi-Fi Network.
7. Start the SIMARINE PICO app
8. The app displays: "Status: SIMARINE device is not connected"
9. Press CONNECT
10. The app displays a Firmware upgrade option
11. Press Upgrade and wait for it to upload
12. PICO will reset and the new FW is uploaded
SIMARINE d.o.o. Ulica skofa Maksimilijana Drzecnika 6
SI - 2000 Maribor, Slovenia, EU
http://www.simarine.net
Copyright © 2016 SIMARINE d.o.o., All Rights Reserved.
 Loading...