85 mm
75 mm
34.5 mm
71 mm
29mm
Product Model:
1 753
2 864
1. Check parameter setting:
Under normal working conditions, press and release
the“ ” key once, the screen will display the
temperature setting value; press and release the “ ”
key once, the screen will display the difference setting
value. The display will return to the temperature
display after 2s.
2. Set parameters:
Under normal working conditions, press “ ” for 3s to
enter parameter setting function, at this time the
“Set” indicator will light and the screen displays the
first menu function “F1”. Press the “ ” or “ ” key to
move between setting functions. Press the “ ” key and
the screen then displays the parameter value for the
current function. The parameter value can be adjusted
by pressing the “ ” or “ ” key. Pressing and holding
the “ ” or “ ” key will adjust the parameter’s
value rapidly. After the desired value is set, press and
hold the “ ” key for 3s to save the modified parameter
value and return to the temperature display. If there is
no key operation for 10s, the system won’t save the
modified parameter value and the screen returns to
the temperature display.
The screen displays “Er” if an error occurs during
parameter setting.
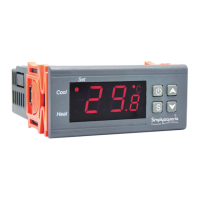
Three digit LED + minus digit + status indicator
(cool, heat) + set indicator
Key description: “ ” key: set key; “ ”key: up key; “ ”
key: down key; “ ” key: power on/off key
Sensor Wire Length: 2m(including the probe).
Under normal working conditions, pressing and
holding the “ ” key for 3s will turn off the controller.
When the controller is switched off, pressing and
holding the “ ” key for 3s will turn the controller on.
Under normal working conditions, the screen displays
the current measured temperature value. The
controller will automatically switch between heating
and cooling to maintain the set temperature within the
difference limits.
The controller will turn on the cooling relay (cool
indicator lit) when the measured temperature value ≥
temperature set value + difference value. If the “cool”
indicator flashes, it means the cooling function is in
the compressor delay protection mode. After the
compressor delay time has elapsed, the cooling relay
will be switched on. When the measured temperature
value ≤ the temperature set value, the cooling relay is
switched off and the “cool” indicator is off. The
controller will turn on the heating relay (heat indicator
lit) when the measured temperature value ≤
temperature set value – difference value. When the
measured temperature ≥ temperature set value, the
“heat” indicator lamp is off and the heat relay is
switched off.
MICROPROCESSOR
CONTROLLED
HEATING & COOLING
TEMPERATURE CONTROLLER
Tel: +44 (0)1684 252080 | Fax: +44 (0)1684 252680
Email: sales@simplyaquaria.co.uk
www.simplyaquaria.co.uk
Technical Parameters: Key Functions:Product Information:
Typical Wiring Diagram:
This controller is mainly used for precise temperature
regulation in aquariums and will control both heating
and cooling devices such as heaters and
chillers/cooling fans.
This device is a control module only and will
require wiring.
RC-316M
KEY FEATURES:
• Temperature measuring range -50°C ~ 99°C
• Temperature differential range 0.1°C ~ 10.0°C
• Compressor delay range 1 ~ 10 mins.
• Temperature calibration range -10°C ~ 10°C
• Alarm Function: Audible and visual
• Alarm function range: 0.2°C ~ 5°C of set
point temperature
• Display Resolution: 0.1°C
• Accuracy: ± 1°C
• Power supply: 220VAC±15%, 50/60HZ
• Temp Sensor: 1 x 2 metre NTC sensor
• 16A Heating Control (resistive load, such as heater)
max 1840W
• 16A Cooling Control (inductive load, such as a chiller)
max 500W
• Operating Temperature Range: 0°C ~ 60°C
• Operating Humidity range: 20% ~ 85%
• Power consumption: ≤3W
• Power off memory function: Settings retained
when power lost
THANK YOU
FOR CHOOSING OUR PRODUCT!
PLEASE READ THIS INSTRUCTION GUIDE
CAREFULLY BEFORE USE.
Product Size: Display Description: Operating Instructions:
Indicator status Description:
Indicator Note
Cool
indicator
Heat
indicator
Set
indicator
Function
On: Cooling switched on;
Off: cooling switched off;
Flashing: compressor delay
On: heating switched on;
Off: heating
On: parameter setting
The Cool & Heat
indicators can
NOT be “on”
simultaneously