cs
F \
H
ta
r
h
41/
D F2
G
A
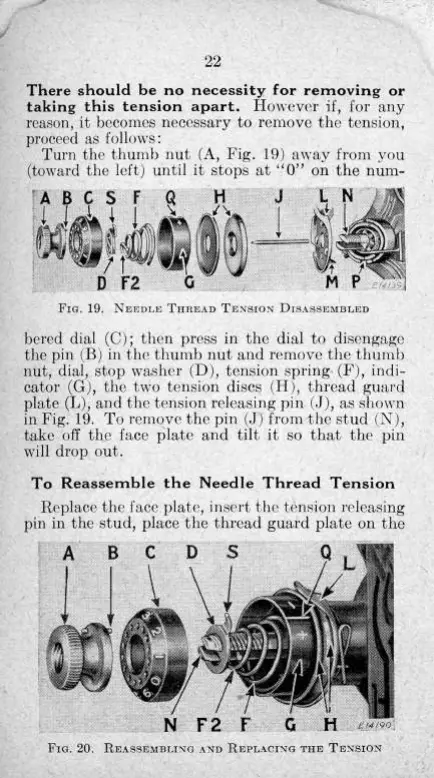
22
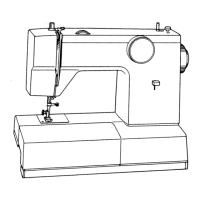
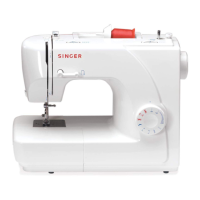
There should be no necessity for removing or
taking this tension apart. However if, for any
reason, it becomes necessary to remove the tension,
proceed as follows:
Turn the thumb nut (A, Fig. 19) away from you
(toward the left) until it stops at "0" on the num-
FIG. 19. NEEDLE THREAD TENSION DISASSEMBLED
bered dial (C); then press in the dial to disengage
the pin (B) in the thumb nut and remove the thumb
nut, dial, stop washer (D), tension spring- (F), indi-
cator (G), the two tension discs (H), thread guard
plate (L), and the tension releasing pin (J), as shown
in Fig. 19. To remove the pin (J) from the stud (N),
take off the face plate and tilt it so that the pin
will drop out.
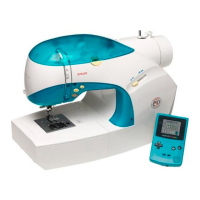
To Reassemble the Needle Thread Tension
Replace the face plate, insert the tension releasing
pin in the stud, place the thread guard plate on the
FIG. 20. REASSEMBLING AND REPLACING THE TENSION
22
There
should be no necessity for removing or
taking
this
tension
apart.
However if, for any
reason, it
becomes
necessary to remove the tension,
proceed
as follows:
Turn
the thumb nut (A, Fig. 19) away from you
(toward the left)
until
it
stops
at "0" on the num-
FiG. 19,
NEEDLE
THREAD
TENSION
DISASSEMBLED
bered
dial
(C); then press in the
dial
to
disengage
the pin (B) in the thumb nut and remove the thumb
nut,
dial,
stop
washer (D), tension spring (F),
indi-
cator (G), the two tension discs (H), thread guard
plate
(L),
and the tension releasing pin
(J),
as shown
in Fig.
19. To remove the pin (J) from the stud (N),
take
off the face plate and
tilt
it so that the pin
will
drop
out.
To
Reassemble the Needle
Thread
Tension
Replace the face plate, insert the tension releasing
pin
in the stud, place the thread guard plate on the
Fic;.
20.
fii:\-si:\iHi,l\<:
wu
i
I
ij'i.\r! NCJ THE
TENSION
N
F2
F
G
n