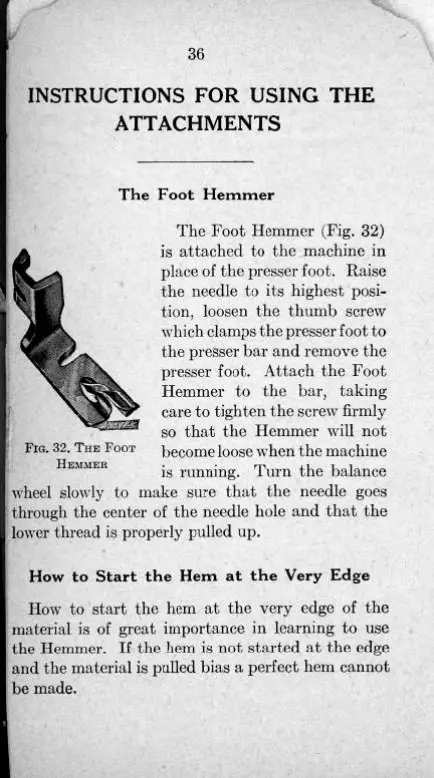
FIG. 32.
THE FOOT
HEMMER
36
INSTRUCTIONS FOR USING THE
ATTACHMENTS
The Foot Hemmer
The Foot Hemmer (Fig. 32)
is attached to the machine in
place of the presser foot. Raise
the needle to its highest posi-
tion, loosen the thumb screw
which clamps the presser foot to
the presser bar and remove the
presser foot. Attach the Foot
Hemmer to the bar, taking
care to tighten the screw firmly
so that the Hemmer will not
become loose when the machine
is running. Turn the balance
wheel slowly to make sure that the needle goes
through the center of the needle hole and that the
lower thread is properly pulled up.
How to Start the Hem at the Very Edge
How to start the hem at the very edge of the
material is of great importance in learning to use
the Hemmer. If the hem is not started at the edge
and the material is pulled bias a perfect hem cannot
be made.
36
INSTRUCTIONS
FOR
USING
THE
ATTACHMENTS
The
Foot Hemmer
The
Foot Hemmer (Fig. 32)
is
attached to the machine in
place of the presser
foot.
Raise
the needle to its highest posi-
tion,
loosen
the thumb screw
which
clamps the presser
foot
to
the presser bar and remove the
presser
foot.
Attach the Foot
Hemmer to the bar, taking
care to tighten the screw
firmly
so that the Hemmer
will
not
become
loose
when the machine
is
running.
Turn
the balance
wheel
slowly to make sure that the needle
goes
through the center of the needle hole and that the
lower thread is properly pulled up.
FIG.
32, THE
FOOT
HEMMER
How
to
Start
the Hem at the
Very
Edge
How to
start
the hem at the very
edge
of the
material
is of great importance in learning to use
the Hemmer. If the hem is not started at the
edge
and
the material is pulled bias a perfect hem cannot
be made.