49
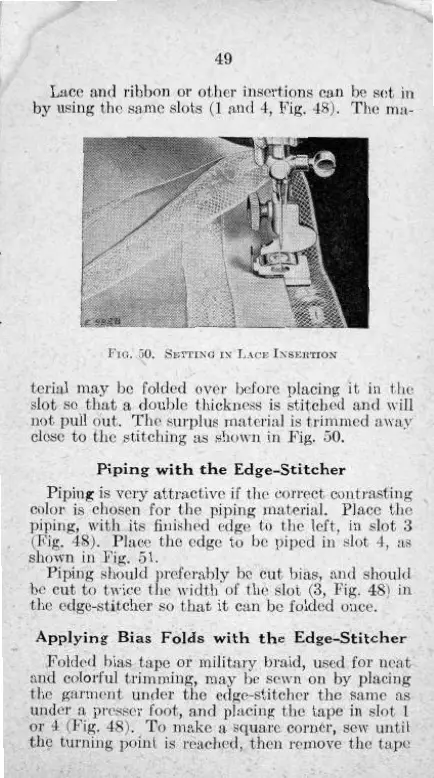
Lace and ribbon or other insertions can be set in
by using the same slots (1 and 4, Fig. 48). The ma-
FIG. 50. SETTING IN LACE INSERTION
terial may be folded over before placing it in the
slot so that a double thickness is stitched and will
not pull out. The surplus material is trimmed away
close to the stitching as shown in Fig. 50.
Piping with the Edge-Stitcher
Piping is very attractive if the correct contrasting
color is chosen for the piping material. Place the
piping, with its finished edge to the left, in slot 3
(Fig. 48). Place the edge to be piped in slot 4, as
shown in Fig. 51.
Piping should preferably be cut bias, and should
be cut to twice the width of the slot (3, Fig. 48) in
the edge-stitcher so that it can be folded once.
Applying Bias
Folds with the Edge-Stitcher
Folded bias tape or military braid, used for neat
and colorful trimming, may be sewn on by placing
the garment under the edge-stitcher the same as
under a presser foot, and placing the tape in slot 1
or 4 (Fig. 48). To make a square corner, sew until
the turning point is reached, then remove the tape
49
FIG.
50.
rSKTxixG
ix ].a.ce
IXSERTION
terial
may be folded over
before
placing it in the
slot so that a
double
thickness is stitched and
will
not
pull
out. The surplus material is trimmed away
close
to the stitching as shown in Fig. 50.
Piping
with
the
Edge-Stitcher
Piping
is very attractive if the correct contrasting
color
is chosen for the piping
material.
Place the
piping,
with
its finished
edge
to the left, in slot 3
(Fig.
48). Place the
edge
to be piped in slot 4, as
shown in Fig. 51.
Piping
should preferably be cut bias, and should
be cut to twice the width of the slot (3, Fig. 48) in
the edge-stitcher so that it can be folded
once.
Applying
Bias
Folds
with
the
Edge-Stitcher
Folded bias tape or
military
braid, used for neat
and
colorful trimming, may be sewn on by placing
the garment under the edge-stitcher the same as
under a presser
foot,
and placing the tape in slot 1
or 4 (Fig. 48). To make a square corner, sew
until
the turning point is reached, then remove the tape
 Loading...