Do you have a question about the Singer C7250 and is the answer not in the manual?
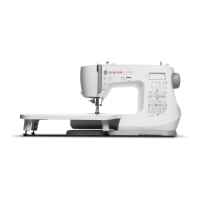
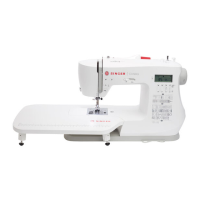
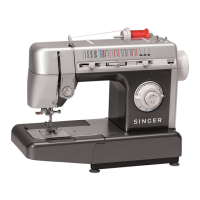
Identification and function of major sewing machine parts and controls.
Detailed explanation of the sewing machine's needle area components.
Description of different presser feet and their specific uses.
Guide to selecting and using utility and decorative stitch patterns.
Explains decorative and lettering stitches and their usage.
Guide to connecting the sewing machine to electrical power safely.
This document is an instruction manual for a SINGER® household sewing machine, specifically models C7200, C7205, C7220, C7225, C7250, and C7255. It provides comprehensive guidance on the machine's operation, maintenance, and various sewing functions. The machine is designed for optimal use in a household setting and is not intended for industrial or commercial purposes.
The SINGER® sewing machine is an electrical appliance designed for sewing various types of fabrics and creating a wide range of stitches. It features both utility and decorative stitching capabilities, as well as alphanumeric stitch patterns for lettering. The machine's core function is to feed fabric under a needle, creating stitches that join fabric pieces, finish edges, or add decorative elements. It is equipped with a foot control for regulating sewing speed and a start/stop button for operation without the foot control. The machine also includes a bobbin winding system, a needle threader, and a thread knife for convenience.
The manual details numerous features that enhance the user experience:
Machine Overview: The machine has a main spool pin for horizontal thread feeding and an auxiliary spool pin for vertical feeding, accommodating different thread spool styles and specialty threads. The thread tension dial allows for adjustment based on the stitch, thread, and fabric. Machine operation controls are conveniently located for ease of use. A display shows the current stitch and settings, while function buttons control stitch width, length, and pattern memory for alphanumeric stitches. A stitch chart provides a visual reference of all available stitches.
Needle Area Overview: The needle plate provides a flat sewing surface with guidelines for seam allowances. Feed teeth move the fabric, and the presser foot holds it against the feed teeth. The presser foot holder secures the presser foot, which can be released with a dedicated button. A buttonhole lever is used for buttonhole sewing, and a built-in needle threader simplifies threading. Thread guides ensure smooth thread flow. The bobbin cover protects the bobbin, and a release button allows access.
Presser Feet: The machine comes with several presser feet, each designed for specific tasks:
Stitch Overview: The machine offers a variety of utility and decorative stitches.
Preparations:
Free Arm/Removable Accessory Tray: The accessory tray provides a flat work surface and storage for tools. It can be removed to access the free arm, which is useful for sewing trouser legs and sleeve hems.
Presser Foot Lifter: Located on the right side of the machine head, this lever raises and lowers the presser foot. It has an extra lift height for placing thick fabric layers under the foot.
Thread Knife: A convenient feature for trimming thread ends, ensuring the needle remains threaded for the next use.
Spool Pin: Guidance on using the main spool pin (horizontal) and auxiliary spool pin (vertical) with appropriate spool caps and felt pads to ensure smooth thread feeding.
Bobbin Winding: Instructions for winding thread onto the bobbin.
Bobbin Insertion: Steps for correctly inserting the bobbin into the machine.
Machine Threading: Detailed instructions for threading the upper thread through the machine, including the needle threader.
Needles: Important information on needle selection, including a guide for needle size, fabric, and thread. Instructions for changing the needle are also provided.
Thread Tension: Guidance on adjusting the thread tension for optimal stitch quality.
Sewing without Feed Teeth: Instructions for disengaging the feed teeth for specialized sewing techniques.
Presser Foot Change: Steps for changing the presser foot.
Operating Your Machine:
Sewing:
The manual provides essential maintenance instructions to ensure the longevity and optimal performance of the sewing machine:
The manual also includes important safety instructions, emphasizing the need to read all instructions before use, keep the machine unplugged when unattended or during maintenance, and avoid using it as a toy or with damaged components. It highlights the importance of using proper attachments and wearing safety glasses. For European users, specific guidelines regarding children's use and the required foot control type (C-8000) are provided. For users outside Europe, similar guidelines for supervision and foot control type are given.
| Brand | Singer |
|---|---|
| Model | C7250 |
| Category | Sewing Machine |
| Language | English |