26 GB/IE
Maintaining the machine
An overlock machine requires more maintenance than a regular sewing
machine. There are two main reasons for this:
1. Trimming the fabric edges produces a lot more fabric dust.
2. And overlock machine runs at very high speeds and therefore requires
regular oiling to ensure the moving parts remain moving.
Cleaning the machine
ATTENTION! Always unplug
from the socket before cleaning
the machine.
Regularly remove dust and lint
from the looper and knife area.
Use a dry brush to do so.
Note: a lint brush is sold separately.
Oiling the machine
ATTENTION! Always unplug
from the socket before oiling the
machine.
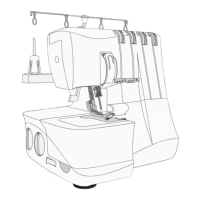
Regularly oil the lubricating points
indicated in the illustration.
Note: only use sewing machine
oil. Using other oils can damage
the machine.
Replacing the
lower knife
ATTENTION! Always unplug
from the socket before replacing
the lower knife.
The lower knife should be replaced
as soon as it becomes dull.
The lower knife can be replaced
with the help of these instructions.
If you do have difficulties, please
contacted your authorised
SINGER retailer.
Verify the power plug is unplugged.
Open the looper cover and bring
the upper knife (1) to the rest
position.
Loosen the retaining screw (2)
and remove the lower knife (3).
Insert a new lower knife into the
notch of the lower blade holder.
Tighten the retaining screw (2).
Return the upper knife (1) into the
operating position.
Sewing troubles and how to correct them
Problem Solution
Fabric is not
feeding evenly
– Increase the stitch length
– Increase the presser foot pressure when using thick
fabrics
– Decrease the presser foot pressure when using thin
fabric
Needle
breakage
– Insert needle correctly
– Do not pull the fabric whilst sewing
– Tighten needle retaining screw
– Use a thicker needle for heavy fabrics
Thread
breakage
– Check threading
– Check if the thread got caught
– Insert needle correctly
– Insert new needle, as the old one may be bent or
dull
– Use a better quality thread
– Loosen thread tension
Skipped stitches – Insert new needle, as the old one may be bent or
dull
– Tighten needle retaining screw
– Insert needle correctly
– Change needle type and size
– Check threading
– Increase presser foot pressure
– Use a better quality thread
Irregular stitch
formation
– Adjust thread tension
– Check if the thread got caught
– Check threading
Work piece is
gathering
– Adjust thread tension
– Check if the thread got caught
– Use a light, high-quality thread
– Reduce the stitch length
– Decrease the presser foot pressure when using thin
fabric
Unclean cutting
edge
– Check alignment of the knives
– Replace one or both knives
Fabric is
jamming
– Close looper cover before sewing
– Check if the thread got caught
– Sew thick fabric layers together with a regular sew-
ing machine, then sew over with an overlock machine
Machine won't
work
– Connect machine to power
Material-, thread- and needle chart
Material Thread
Needle
SINGER
Cat. no. 2022
Light
Cambric, organza, chiffon
Cotton no. 100
Silk no. 100
Synthetic fibre no. 80–
90
Polyester no. 80–100
No. 11
Medium weight
Muslin, fine linen, satin,
gabardine, fine wool
fabric
Cotton no. 60–80
Silk no. 50
Synthetic fibre
no. 60–80
Polyester no. 60–80
No. 11, no. 14
347907_BE 26 24-Apr-2020