Do you have a question about the SIRUI KX Series and is the answer not in the manual?
Instructions for attaching the ball head to a tripod using the 3/8" mounting screw and locking securely.
Guides camera QR plate attachment, emphasizing proper alignment, tightening, and screw usage.
Details how to secure the camera with QR plate onto the ball head clamp via lateral or top insertion.
Explains the safety lock that prevents camera slippage from the clamp when slightly loosened.
Steps to safely detach the camera with QR plate from the ball head using the security pin release.
Step-by-step guide to set the ball head to factory default settings by adjusting knobs and rings.
The SIRUI KX Series Ball Head is a professional photographic equipment designed for precise camera positioning and stability. It features a robust construction and intuitive controls, making it suitable for a wide range of photographic applications.
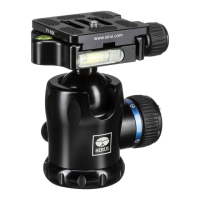
The KX Series Ball Head serves as an interface between a camera and a tripod, allowing for flexible camera adjustments. Its primary components include a Quick Release Clamp, Support Ball, Main Locking Knob, Friction Adjuster Dial, Panning Base, Bubble Levels, and a Main Body. The Quick Release Clamp facilitates rapid attachment and removal of the camera, while the Support Ball enables smooth, multi-directional camera movement. The Main Locking Knob secures the ball in place, and the Friction Adjuster Dial allows users to set the desired resistance for ball movement. The Panning Base provides a 360-degree rotation capability for panoramic shots, independent of the ball's movement. Bubble levels are integrated to assist in achieving horizontal alignment.
The manual provides a "Ball Head Data Chart" which includes specifications for various models within the KX series, such as maximum height, maximum weight, and net weight. For instance, a model might have a maximum height of 91mm, a maximum weight capacity of 16kg, and a net weight of 0.44kg. The mounting screw for attaching the ball head to a tripod is typically 3/8", though adapters for 1/4" screws may be necessary depending on the tripod. The Quick Release Plate utilizes a 1/4" screw with a buckle, and a standard 1/4" screw for different camera socket positions. The operating temperature range for the product is specified as -40°C to +100°C (-40°F to 212°F).
To attach the ball head, ensure the tripod's mounting screw is 3/8". If it's 1/4", an adapter or 3/8" screw is required. Many professional tripods have reversible screws; consult your tripod manual for details. Lock the Panning Base Locking Knob clockwise. Align the 3/8" thread hole at the bottom of the ball head with the tripod's mounting screw. Hold the base of the ball head and rotate it clockwise until it's securely tightened.
The Quick Release Clamp features a security pin release button and clamp jaws that tighten and loosen. The Quick Release Plate includes a slide-proof rubber mat, a strap holder, and a 1/4" screw with a buckle. The 1/4" screw with buckle is for the middle slot of the QR Plate, while a standard 1/4" screw can be used in the left or right slot for off-center camera tripod sockets.
Select the QR Plate that matches your camera's base. It's recommended to leave the QR Plate permanently attached to the camera to prevent excessive wear. Ensure the slide-proof rubber mat faces the camera base and the QR Plate screw aligns with the tripod socket. Tighten the screw with a coin or allen key, especially for long-term attachment or with medium/large format cameras.
Slightly loosen the Clamp Locking Knob counter-clockwise. Slide the QR plate laterally into the Quick Release Clamp and tighten the clamp clockwise. Alternatively, fully open the Clamp Locking Knob and place the plate from the top, then tighten the knob.
The Quick Release Clamp has a safety lock (security pin) that prevents the camera from sliding off if the clamp is slightly loosened. This allows for minor camera position adjustments without risk. This feature is available with all Sirui QR plates, but may not work with other brands. Always hold your camera when loosening the Quick Release Clamp.
While holding the camera, slightly loosen the Clamp Locking Knob counter-clockwise. Push the Security Pin Release Button and slide the camera off. Alternatively, fully open the clamp and lift the camera out.
Mount your camera. While holding the camera, loosen the Main Locking Knob. The ball head will be very loose. Rotate the Friction Adjustment Knob counter-clockwise until it stops. While slowly rocking the camera, tighten the Main Locking Knob until you feel the desired resistance. Set the friction adjustment to prevent the camera from tipping over easily, while allowing for adjustments without excessive force. This is crucial for telephoto lenses and critical alignments. Once the desired resistance is achieved, stop turning the Main Locking Knob and turn the Friction Adjustment Knob clockwise until it stops. For immediate shooting or firm locking, tighten the Main Locking Knob fully. Use bubble levels to ensure horizontal alignment.
If the ball head is locked due to excessive force, mount it on the tripod (if possible). Turn the Main Locking Knob clockwise. Turn the Friction Adjustment Dial counter-clockwise until it stops.
The product should not be used in environments outside the specified temperature range (-40°C to +100°C). If used in damp, dirty, or dusty environments, clean and dry thoroughly after use to ensure proper functioning. Keep the product away from high temperatures and direct sunlight. Remove camera gear from the tripod/ball head when transporting to protect it. Prevent sand, grit, or foreign matter from entering the ball head. If movement is not smooth, gently wipe the mechanism with a clean, soft cloth. No lubrication is needed for any parts of this product; lubricants can gum up mechanisms and reduce gliding characteristics. Sirui professional Ball Heads are precisely constructed, requiring no extra maintenance. Keep the product away from all electrical power sources. Regularly check that the Quick Release plate is securely attached to the camera, especially since it has a strap holder for direct camera strap attachment.
Specifications are subject to change without notice.
| Brand | SIRUI |
|---|---|
| Model | KX Series |
| Category | Camera Accessories |
| Language | English |