-9-
FEEDING THE ROUTER
As seen from the top of the router, the bit
turns clockwise and the cutting edges face
accordingly. Therefore, the most efficient cut
is made by feeding the router so that the bit
turns into the work, not away. Figure 4 shows
proper feed for various cuts. How fast you
feed depends on the hardness of the wood
and the size of the cut. For some materials,
several cuts of increasing depth are required.
As a general rule, it is best to pull the router
— not push. You get greater visibility, cleaner
cut, more control and less flying sawdust.
If the router is hard to control, heats up, runs
very slowly or leaves an imperfect cut,
consider these causes:
1. Wrong direction of feed — hard to control.
2. Feeding too fast — overloads motor.
3. Dull bit -— overloads motor.
4. Cut is too large for one pass — overloads
motor.
5. Feeding too slow — leaves friction burns
on work.
Feed smoothly and steadily (do not force).
You will soon learn how the router sounds
and feels when it is working best.
FIG. 4
CUTTER
WORK
DIRECTION
OF ROUTER
FEED
GUIDING ROUTER
The router can be guided through the work in
any of several ways. The method you use
depends, of course, on the demands of the
particular job and on convenience.
STRAIGHT AND CIRCULAR EDGE GUIDE
(Not included, available as accessory)
Use this handy accessory for ease and
accuracy in making curved and straight cuts.
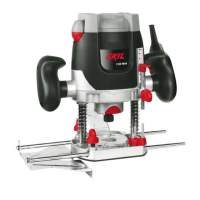
ATTACHING GUIDE
Insert edge guide rods through holes in base,
slide edge guide to desired width as shown in
(Fig. 5), and secure in place with the two wing
screws provided.
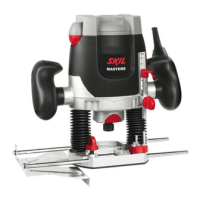
One method of locating the guide is to mark
the center of groove to be cut, set the router
flat on the work with the bit just touching and
aligned over the center of groove. Bring the
guide to the edge of the work, and securely
tighten screws. Whenever in doubt about
dimensions, make a trial cut on scrap
material. For guiding along a circular edge,
the notch in the center of the edge guide will
contact the material at the two points shown
(Fig. 6).
FIG. 5
FIG. 6
DESIRED
WIDTH
CUT
BASE
EDGE GUIDE
WORK
WING
SCREWS
EDGE
GUIDE
RODS
CUT
WORK
EDGE GUIDE
POINTS OF
CONTACT