EXPLANATION OF SYMBOLS ON CHARGERBATTERY
3 Read the instruction manual before use
4 Only use the charger indoors
5 Double insulation no earth wire required
6 Failsafe isolating transformer the power source is
electrically separated from the transformer output
7 Automatic shutoff when charger gets too hot thermic
fuse blows and charger becomes useless
8 Incorrect polarity of the charger connection could
cause a hazard only charge the battery with the
charger supplied
9 Do not dispose of the charger together with household
waste material
0 Do not dispose of the battery together with household
waste material
WHEN CONNECTING NEW PIN PLUG UK ONLY
Do not connect the blue neutral or brown live wire
in the cord of the charger to the earth terminal of the plug
If for any reason the old plug is cut o the cord of the
charger it must be disposed of safely and not left
unattended
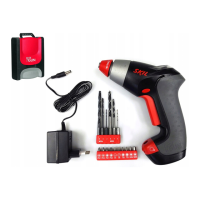
USE
Charging battery !
battery of new tools is not fully charged
connect charger to power source as illustrated
green light G will turn on indicating that the charger is
ready for operation
insert battery into charger
red light H will turn on indicating that the battery is
being charged
red light H will stay on as long as the battery is
connected to the charger and the charger is in the wall
socket
remove battery from charger after charging
period has ended thereby lengthening the service
life of the battery
IMPORTANT
after hours the charging operation will be
completed and the battery may be used
while charging the charger and the battery may
become warm to touch this is normal and does not
indicate a problem
ensure that the outside surface of the battery is clean
and dry before inserting into charger
do not charge at temperatures below C and over
C this will seriously damage the battery as well as
the charger
do not remove battery from tool while it is running
a battery that is new or has not been used
for a longer period does not develop its full
capacity until after approximately charging
discharging cycles
do not repeatedly recharge the battery after only a few
minutes of operation this may result in a reduction of
operating time and battery eciency
if you anticipate long periods of nonuse for the tool it
is best to unplug the charger from its power source
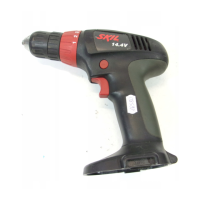
Ono @
Changing direction of rotation #
when not properly set in leftright position switch A 2
cannot be activated
change direction of rotation only when tool is at a
complete standstill
Changing bits $
insert the bit as deep as possible in the chuck
do not use bits with a damaged shank
Torque control VariTorque %
limits the amount of output torque delivered by the
chuck clutch settings
when turning in a screw rst try VariTorque position
and increase until the desired depth has been reached
Holding and guiding the tool ^
while working always hold the tool at the
greycoloured grip areas
keep ventilation slots E 2 uncovered
do not apply too much pressure on the tool let the tool
do the work for you
APPLICATION ADVICE
Use the appropriate bits &
only use sharp bits
When drilling ferrous metals
predrill a smaller hole when a large hole is required
lubricate drill bit occasionally with oil
When turning in a screw atnear the cross cut end or an
edge of wood predrill a hole in order to avoid cracking of
the wood
For an optimal use of the tool a steady pressure on the
screw is required especially while removing
When screwdriving in hard wood one should predrill a
hole
Splinterfree drilling in wood *
Dustfree drilling in walls (
Dustfree drilling in ceilings )
Drilling in tiles without skidding ¡
For more tips see wwwskileuropecom
MAINTENANCE SERVICE
Keep tool and charger clean
clean charging contacts in charger with alcohol or
contact cleaner
unplug charger from power source
before cleaning
If the toolcharger should fail despite the care taken in
manufacturing and testing procedures repair should be
carried out by an aftersales service centre for SKIL
power tools
send the tool or charger undismantled together with
proof of purchase to your dealer or the nearest SKIL
service station addresses as well as the service
diagram of the tool are listed on wwwskileuropecom

 Loading...