1. Open up the Easy Clip™ and place it underneath
the existing ribbon wires of the wall button/wall
console.
2. Ensure the ribbon wires are placed properly inside
the channels of the Easy Clip™.
3. Press and lock the clip by snapping it together.
4. Using the crimper
(included), press down
to lock the cover until
you hear a “click”.
5. If the ribbon wires are hidden inside the wall,
connect the Easy Clip™ to the exposed wires
attached to the terminals of the garage door
opener.
6. Disconnect the existing wall button from the wall.
7. Pick up one wire from the Smart Button™ and
connect to the screw terminal of your existing wall
button. Polarity does not matter.
8. Connect the second wire to the other screw
terminal.
9. Reconnect back the wall button.
INSTALLATION INSTRUCTIONS
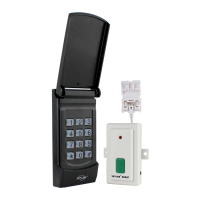
Universal Garage Door Keyless Control
MODEL: KN-1
Congratulations on your purchase of the Skylink
Universal Garage Door Keyless Control Model KN-1.
This keyless control allows you to wirelessly control
the garage door opener.
This device complies with FCC Rules and Industry
Canada license-exempt RSS standard(s). Operation is
subject to the following two conditions: (1) this device
may not cause harmful interference, and (2) this device
must accept any interference, including interference
that may cause undesired operation of the device.
WARNING:
Changes or modifications to this unit not expressly
approved by the party responsible for compliance could
void the user’s authority to operate the equipment.
NOTE: This equipment has been tested and found to
comply with the limits for a Class B digital device,
pursuant to Part 15 of the FCC Rules. These limits are
designed to provide reasonable protection against
harmful interference in a residential installation. This
equipment generates, uses and can radiate radio
frequency energy and, if not installed and used in
accordance with the instructions, may cause harmful
interference to radio communications.
However, there is no guarantee that interference will
not occur in a particular installation. If this equipment
does cause harmful interference to radio or television
reception, which can be determined by turning the
equipment off and on, the user is encouraged to try to
correct the interference by one or more of the following
measures:
● Reorient or relocate the receiving antenna.
Increase the separation between the equipment
and receiver.
● Connect the equipment into an outlet on a circuit
different from that to which the receiver is
connected.
● Consult the dealer or an experienced radio/TV
technician for help.
Smart Button™Garage Door Keypad
Crimper
Mounting accessories –
screws, anchors and
double-sided tape
SAFETY INFORMATIONSAFETY INFORMATION SECTION 1 – INSTALLATION OF THE SMART BUTTON™SECTION 1 – INSTALLATION OF THE SMART BUTTON™
PACKAGE CONTENTS
PACKAGE CONTENTS
If the Easy Clip™ cannot clip the ribbons from your
wall button, cut off the Easy Clip™ then connect two
wires from the Smart Button™ to the wall button/wall
console.
Unplug the power cord of your garage door opener
before installation to disconnect power.
DO NOT let children use the garage door transmitter
without adult supervision. Children can injure
themselves or others by the garage door.
This product is guaranteed to be free of defects in
materials and workmanship for 1 year from the date of
purchase. Guarantee does not include normal wear and
tear or batteries.
If you have any questions, problems or missing parts,
please call Skylink Customer Support:
1-800-304-1187
9:00 AM Ð 5:00 PM EST, Monday-Friday
Or e-mail us at support@skylinkhome.com
www.skylinkhome.com
P/N: 101Y439
ONE YEAR WARRANTY / CUSTOMER SERVICEONE YEAR WARRANTY / CUSTOMER SERVICE