1. INTRODUCTION
Dimmable Receiver Module
Dimmable Receiver
Module
Model MD-318
TM
Thank you for your purchase of a SkylinkHome lighting receiver,
Dimmable Receiver Module Model MD-318. This Dimmable Receiver
Module allows you to wirelessly turn on and off, dim and brighten different
TM
lighting fixtures with the SkylinkHome lighting transmitters.
The Dimmable Receiver Module MD-318 can communicate with up to
8 transmitters, so user has the option to add more transmitters to the
system, such as more remote controls, or motion sensors etc.
TM
All wireless signal communications within the SkylinkHome lighting
system are based on rolling code technology to ensure highest security
is used.
The following items are included in this package:
- Dimmable Receiver Module
- Screws and Accessories
2. INSTALLATION
“PROG” switch
Press the
desired
button
1. Turn off power to the circuit at the circuit breaker of the lighting fixture
that you plan on installing the Dimmable Receiver Module to. Remove
the lighting fixture so the Live and Neutral wires are exposed.
WARNING:
Failure to turn off power at the circuit breaker can result in electrical
shock causing severe or fatal injury.
Note: Lighting Load
The Dimmable Receiver Module is designed to operate maximum load of
300W at 120VAC. Do not connect loading that exceeds this maximum
rating.
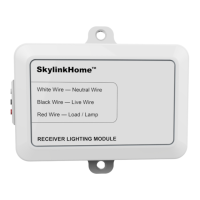
2. Follow the diagrams below to install the Dimmable Receiver Module
with the 3 wires: Neutral, Live and Load. Use the provided screws to
secure the Dimmable Receiver Module.
3. After all the wires are connected, ensure that all of the wire connectors
are attached securely and there should be no exposed copper wiring.
Straighten the antenna.
4. Secure the MD-318 to a flat surface by 2 screws or you may place it
inside the lighting fixture. Install the lighting fixture back to the original
configuration.
5. Turn the circuit breaker back on and turn on the wall switch that is
used to operate this lighting fixture.
6. The light will be on and you should hear a single beep. The Dimmable
Receiver Module is installed properly and you can begin programming
transmitters to the Dimmable Receiver Module.
3. PROGRAMMING TRANSMITTERS
In order to operate the Dimmable Receiver Module remotely with a trans-
mitter, it must be programmed to the Dimmable Receiver Module. Each
Dimmable Receiver Module can be operated by up to 16 different trans-
mitters (or 16 different command signals).
To program a transmitter into the Dimmable Receiver Module, follow the
instructions below.
1. The Dimmable Receiver Module should be power off
initially. This can be done by switching off the wall
switch or circuit breaker of the lighting fixture.
2. Power on the Dimmable Receiver Module by switching
on the wall switch or circuit breaker. You will hear
beeping from the Dimmable Receiver Module and the
light connected to the module should be on. The
beeping indicates the Dimmable Receiver Module
is now in programming mode and it will stay in this
mode for 20 seconds.
3. Press the PROG button on the back of the transmitter
with a sharp object.
4. Press the button on the transmitter that you would
like to program into the Dimmable Receiver Module.
5. Once the transmitter is programmed, the light will
be off, indicating you have successfully programmed
the transmitter to the Dimmable Receiver Module.
6. You may operate the light with the programmed
transmitter.
Note: To program other transmitters/sensors (besides TC transmitter),
please refer to the instructions of the transmitters/sensors.
You may follow the same instructions to program additional transmitters
or sensors to operate the Dimmable Receiver Module.
CAUTION
Installation is required and enclosed instructions must be followed carefully
to all steps and notes. If you are uncertain or uncomfortable performing this
installation, please consult a qualified electrician. This manual should also
be retained for future reference.
4. OPERATING MODES
The Dimmable Receiver Module can control the light in 2 different
operating modes.
1) On / Off Mode - Allows operating the light either on and off, without
dimming function.
2) Dimming Mode - Allows operating the light in on, off and dimming
(dim / brighten) modes. Light must be either incandescent light and
designated dimming compact fluorescent light.
The factory default operating mode is on/off mode. However, if your
light is dimmable, you may change the operating mode to Dimming
Mode. To change the operating modes, please follow the instructions
below.
1. Turn on the light by activating the programmed transmitter.
2. Press and hold onto a button on the transmitter that is programmed to
the module for 10 seconds.
3. The light will flash. If it flashes once, that means it is in On / Off Mode.
If the light flashes twice, that means it is in Dimming Mode.
4. Repeating step 3 above will toggle the setting between On / Off Mode
and Dimming Mode.
5. ON / OFF OPERATION
The MD-318 Dimmable Receiver Module allows on / off operation, when
the programmed button is activate, it will transmit a signal to toggle its
current status. For example, if a signal is received when the light is off,
that signal will turn on the light.
Note:
If the Dimmable Receiver Module is
installed on a ceiling lighting fixture,
you can use the transmitter to
operate the light remotely only if
the wall switch is in the ON position.
If the wall switch is off, no power
is provided to the Dimmable Receiver
Module and therefore, it cannot
operate the light.
In case the transmitter is misplaced,
you can still operate the lighting
fixture with the wall switch normally.
Screws and Accessories
ON
OFF
Remote
Works
Remote Does
Not Work
Before Installation
Live
(Usually Black)
Load
Live
(Usually
Black)
Neutral
(Usually White)
Neutral
(Usually
White)
(White)
(Red)
(Black)
TM
After Installation