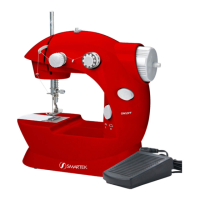
The provided manual describes the Smartek Mini Sewing Machine, model no. RX-08, a compact and portable sewing device designed for basic sewing tasks.
Function Description:
The Smartek Mini Sewing Machine is designed to perform basic sewing operations, creating a lockstitch. It can be powered by 4 AA batteries for portability or by an external DC 6V 800mA power adapter (not included). The machine offers two speed settings (high and low) to accommodate different sewing needs and fabric types. It features a bobbin winding function, allowing users to prepare their own bobbins with desired thread colors. The machine is suitable for various fabrics, with recommendations for needle sizes based on fabric weight.
Important Technical Specifications:
- Model Number: RX-08
- Power Source: 4 AA batteries or DC 6V 800mA adapter (adapter not included)
- Stitch Type: Lockstitch
- Speed Settings: High and Low
- Needle Compatibility: Various sizes, with smaller numbers for delicate fabrics and larger numbers for heavier fabrics.
- Bobbin: Windable by the user.
Usage Features:
The machine's operation involves several key steps:
- Powering On/Off: The machine has an On/Off switch. When using batteries, turning the switch to "ON" starts immediate sewing. When using the foot pedal (included), the machine should be in the "OFF" position and will only operate when the pedal is pressed.
- Threading: The threading process is detailed, involving guiding the thread from the spool through a series of guides, including a tension adjusting screw, a take-up lever hole, and finally through the eye of the needle from front to back. The manual highlights the importance of positioning the thread correctly between the two washers behind the tension adjusting screw for proper lockstitch tension.
- Bottom Bobbin Placement: The bobbin is placed in a compartment, with approximately 10 inches of thread extended. The hand wheel is turned counterclockwise to bring the needle down to pick up the bobbin thread, ensuring both spool and bobbin threads are pulled to the back under the presser foot before sewing. The machine comes pre-threaded, which can serve as a guide for new users.
- Sewing:
- The needle must be raised above the presser foot by turning the hand wheel clockwise.
- The presser foot is raised using a lever at the back of the machine.
- Fabric is positioned under the raised presser foot, aligning the seam direction.
- The presser foot is then lowered.
- Speed selection is made via a button: extended for high speed, pressed in for low speed. Low speed is recommended for intricate projects requiring frequent stops and turns, while high speed is for long, uninterrupted seams.
- The fabric is gently guided during sewing, avoiding pulling, which could damage the needle or machine.
- After sewing, the switch is turned off, the needle is raised, the presser foot is lifted, and the fabric is pulled away, leaving about 10 inches of thread before cutting.
- Adjusting Tension: While factory-set, stitch tension can be adjusted if stitches are too loose or too tight. Turning the tension screw counter-clockwise loosens the stitch, and clockwise tightens it. Heavier fabrics may require looser stitches, and lighter fabrics tighter stitches. Bobbin tension is not adjustable.
- Winding a Bobbin: The machine includes a bobbin winder. To wind a bobbin, an empty bobbin is placed on the winder (on the hand wheel), and thread from a spool is guided through a small hole in the bobbin rim and wound several turns around the inside of the bobbin. The thread should wind onto the bobbin in a counter-clockwise direction (underneath). The machine is turned on while lightly guiding the thread until the bobbin is full, then turned off.
Maintenance Features:
- Changing Needle:
- The hand wheel is turned clockwise to raise the needle to its highest position.
- The needle clamp screw is loosened by turning it counter-clockwise (a small slotted screwdriver or metal piece like a dime may be needed).
- The old needle is removed by pulling it down and away from the clamp.
- A new needle is inserted with its flat side facing in against the clamp, pushed gently as far up as it will go.
- The needle clamp screw is tightened while holding the needle in place.
- Users are advised to use appropriate needle sizes for different fabric weights.
- Safety Precautions:
- Always disconnect power (including removing batteries) when changing needles or threading.
- Never open the main motor case, as the mechanism is factory-adjusted.
- Always check lockstitch threading before sewing to prevent damage.
- Do not pull on fabric while sewing; guide it gently.
- Remove batteries during long periods of non-use to save battery life and protect the machine.
- Keep the machine away from children.
- Do not submerge the unit in water or operate with wet hands.
- Do not change needles or thread the machine while it is on.
- Do not touch needles before turning off power.
- Do not use with a damaged power cord or plug.
- Keep the power cord away from heated surfaces.
- Unplug by grasping the plug, not the cord.
- Do not sew clothing while it is on your body.
- Use only a DC 6V 800mA adapter; other adapters may cause injury or damage.
- Never leave the machine unattended when plugged in; turn off and unplug when not in use.
The Smartek Mini Sewing Machine is presented as a user-friendly device for basic sewing, emphasizing ease of use and safety. It includes a 6-month limited warranty covering defects in material and workmanship, with instructions for claiming warranty service.