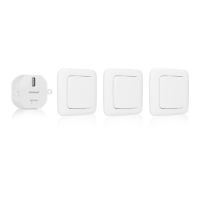
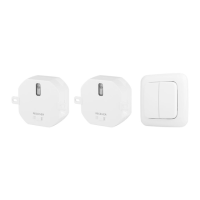
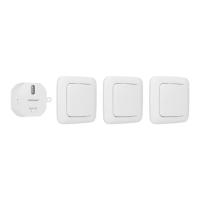
EN Switch set with remote control
DE Funschalter-Set
BG Комплект превключвател с дистанционно управление
HR Skupina prekidača s daljinskim upravljačem
NL Schakelset met afstandsbediening
IT Set interruttori con telecomando
PL Zestaw przełączników z pilotem
PT Conjunto de interruptores com controle remoto
SI Nabor stikal z daljinskim upravljalnikom
RO Set de comutatoare cu telecomandă
CZ Sada spínačů s dálkovým ovládáním
FR Ensemble d'interrupteurs avec télécommande
ES Conjunto de interruptores con control remoto
GR Σετ διακόπτη με τηλεχειριστήριο
EN Instruction manual
PREPARATION BEFORE USE
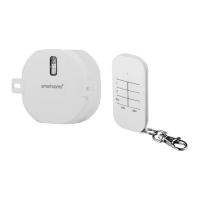
Insert battery
• Open the battery lid at the back of the remote (1) by turning it
counter clockwise.
• Insert the battery with the negative polarity downward.
To check if the battery is inserted correctly, briefly press a button on
the remote. If the LED flashes, then the battery is inserted successful.
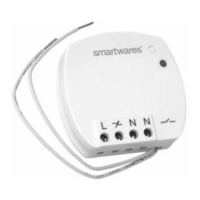
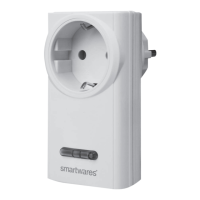
• Insert the receiver into the wall outlet (2).
NOTE: The socket-outlet must be installed close to the equipment
and must be easily accessible.
PAIRING THE REMOTE TO THE RECEIVER
• Press the button on the receiver (3) for 3 seconds and release it.
When the LED starts to blink, the receiver is in pairing mode.
Attention: the LED should blink only after releasing the button. If
the LED starts to blink while holding the button, there will be no
pairing.
• Press any of the ON buttons on the remote. If the LED stops
blinking and is constantly lit, the pairing was successful.
OPERATING RECEIVERS
A. Press the ”ON” button on the remote control to turn on the
receiver.
B. Press the “OFF” button on the remote control to turn off the
receiver.
C. Press the ”ON” button beneath ALL (on the remote control) to
turn on all paired devices at the same time.
D. Press the ”OFF” button beneath ALL (on the remote control) to
turn off all paired devices at the same time. (5)
Disconnecting a remote
A. Press and hold the button on the receiver for 3 seconds (4) and
then release it. During this operation the LED starts to blink. Your
receiver is now switched into the pairing mode. Attention: the
LED should blink only after releasing the button. If the LED starts
to blink while holding the button, there will be no pairing.
B. Perform one of the following steps:
– Press an ”OFF” button on the row on the remote you wish to
disconnect from a receiver. During this operation the LED on
the receiver blinks quickly and then turns off.
– Press the ”OFF” button next to ALL (on the remote) to
disconnect all links. During this operation the LED on the
receiver turns off.
To reset the receiver:
• Press and hold the button for more than 6 seconds (6). The LED
will start to blink rapidly.
DE Bedienungsanleitung
VORBEREITUNG
Batterie einsetzen
• Öffnen Sie den Batteriefachdeckel auf der Rückseite der
Fernbedienung (1), indem Sie ihn gegen den Uhrzeigersinn
drehen.
• Setzen Sie die Batterie mit dem Minuspol nach unten ein.
Um zu prüfen, ob die Batterie korrekt eingesetzt ist, drücken Sie kurz
eine Taste auf der Fernbedienung. Wen die LED blinkt, ist die
Batterie korrekt eingesetzt.
• Stecken Sie den Empfänger in die Wandsteckdose (2).
HINWEIS: Die Steckdose muss in der Nähe des Geräts installiert
werden und leicht zugänglich sein.
FERNBEDIENUNG UND EMPFÄNGER SYNCHRONISIEREN
• Drücken Sie die Taste am Empfänger (3) 3 Sekunden lang und
lassen Sie sie dann los. Wenn die LED zu blinken beginnt,
befindet sich der Empfänger im Kopplungsmodus.
Wichtiger Hinweis:Die LED darf erst nach dem Loslassen der
Taste blinken. Wenn die LED zu blinken beginnt, während Sie
die Taste gedrückt halten, erfolgt keine Kopplung.
• Drücken Sie eine der ON-Tasten auf der Fernbedienung. Wenn
die LED aufhört zu blinken und konstant leuchtet, war die
Kopplung erfolgreich.
EMPFÄNGERBETRIEB
A. Drücken Sie auf der Fernbedienung die Taste „ON“, um den
Receiver einzuschalten.
B. Drücken Sie auf der Fernbedienung die Taste „OFF“, um den
Receiver auszuschalten.
C. Drücken Sie (auf der Fernbedienung) die Taste „ON“ unterhalb
von ALL, um alle gekoppelten Geräte gleichzeitig einzuschalten.
D. Drücken Sie (auf der Fernbedienung) die Taste „OFF“ unterhalb
von ALL, um alle gekoppelten Geräte gleichzeitig auszuschalten.
(5)
Empfänger trennen
A. Halten Sie die Taste am Empfänger 3 Sekunden lang gedrückt
(4) und lassen Sie sie dann los. Während dieses Vorgangs
beginnt die LED zu blinken. Ihr Empfänger befindet sich nun im
Kopplungsmodus. Wichtiger Hinweis:Die LED darf erst nach
dem Loslassen der Taste blinken. Wenn die LED zu blinken
beginnt, während Sie die Taste gedrückt halten, erfolgt keine
Kopplung.
B. Führen Sie einen der folgenden Schritte aus:
– Drücken Sie eine Taste „OFF“ in der Reihe der
Fernbedienung, die von einem Empfänger getrennt werden
soll. Während dieses Vorgangs blinkt die LED am
Empfänger schnell und erlischt dann.
– Drücken Sie die Taste „OFF“ neben „ALL“ (auf der
Fernbedienung), um alle Empfänger zu trennen. Während
dieses Vorgangs erlischt die LED am Empfänger.
Zum Zurücksetzen des Empfängers:
• Drücken Sie die Taste und halten Sie sie länger als 6 Sekunden
gedrückt. Die LED beginnt schnell zu blinken.
BG Наръчник с инструкции
ПОДГОТОВКА ПРЕДИ УПОТРЕБА
Поставете батерията
• Отворете капака на отделението за батерията на гърба на
дистанционното управление (1), като го завъртите обратно
на часовниковата стрелка.
• Поставете батерията с отрицателния полюс надолу.
За да проверите дали батерията е поставена правилно,
натиснете за кратко бутон на дистанционното управление. Ако
светодиодът мига, значи батерията е поставена правилно.
• Включете приемника в контакт (2).
ЗАБЕЛЕЖКА: контактът трябва да бъде монтиран близо до
оборудването и трябва да е лесно достъпен.
СДВОЯВАНЕ НА ДИСТАНЦИОННОТО С ПРИЕМНИКА
• Натиснете бутона на приемника (3) за 3 секунди и го
отпуснете. Когато светодиодът започне да мига, приемникът
е в режим на сдвояване.
Внимание: светодиодът трябва да мига само след отпускане
на бутона. Ако светодиодът започне да мига, докато държите
бутона, няма да има сдвояване.
Specifications:
Battery: 3VDC, type CR 2032 (incl.)
Radio Frequency: 433.92Mhz
Maximum output: 0dBm
Maximum range: 30m
Maximum power: 2300 W
AC input Voltage: 230V ~ 50Hz
INFO@SMARTWARESGROUP.COM
Remote control (SH4-90152)
EU plug (SH4-90268)