EasyManua.ls Logo

Snap-on Equipment EELR501A - User Manual

Snap-on Equipment EELR501A
75 pages
Print Icon
To Next Page IconTo Next Page
Loading...
1 of 73
Snap-on Equipment
INSTALLATION AND OPERATING MANUAL
READ THOROUGHLY BEFORE INSTALLING, SERVICING
OR MAINTAINING THE
LIFT.
SAVE THIS MANUAL
INSTALLATION and OPERATION MANUAL
12K SCISSOR LIFT
EELR501A, EELR525A
EELR709A, EELR724A
Nov. 2019 REV.F
309 EXCHANGE AVENUE, CONWAY, ARKANSAS, 72032
TEL: 501-450-1500 FAX: 501-450-1585
EAZ0080V44A

Table of Contents

Questions and Answers

  • L
    Laurie MccoyAug 3, 2025
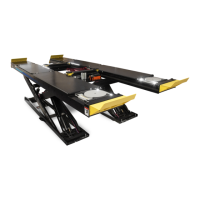
    Why won't the motor run on my Snap-on Equipment Scissor Lifts?
    • M
      Megan WillisAug 3, 2025
      If the motor of your Snap-on Equipment Scissor Lift isn't running, several factors could be at play. It might be due to a bad fuse or contactor, in which case you should replace them. Another possibility is incorrect voltage reaching the motor, so ensure the proper voltage is supplied. Incorrect wiring could also be the culprit, so it's advisable to have a certified electrician inspect it. The motor switch itself might be malfunctioning and need replacement, or, in the worst-case scenario, the motor might be burned out and require replacement.
  • S
    sherijamesAug 8, 2025
    What to do if motor runs but Snap-on Equipment EELR501A won't go up?
    • Y
      youngpatrickAug 8, 2025
      If the motor runs but your Snap-on Equipment Scissor Lift doesn't lift, check the hydraulic oil level and fill the reservoir with the correct type if it's low. Also, verify the motor's rotation and check for proper oil flow; if necessary, reverse the electrical leads.
  • K
    Kenneth JonesAug 13, 2025
    What to do if my Snap-on Equipment Scissor Lifts won't come down?
    • Q
      qreedAug 13, 2025
      If your Snap-on Equipment Scissor Lift is stuck in the up position, start by securing the vehicle on the lift and cleaning the hydraulic lines, as dirt could be the cause. Also, verify that the solenoids are receiving power.
  • L
    Lisa HayesAug 18, 2025
    Why do my Snap-on Equipment Scissor Lifts go up un-level?
    • I
      imccarthyAug 19, 2025
      If your Snap-on Equipment Scissor Lift is rising unevenly, the flow-divider might be defective; try reversing the hydraulic connections. Alternatively, there could be a blockage in the hydraulic hose, so remove and inspect the line for obstructions.
  • J
    Jasmine FisherAug 23, 2025
    Why anchor bolts do not stay tight on Snap-on Equipment Scissor Lifts?
    • P
      Pamela PerryAug 23, 2025
      If the anchor bolts on your Snap-on Equipment Scissor Lift keep coming loose, it could be due to oversized holes; relocate the lift using the correct drill size. Another reason might be an inadequate concrete floor specification, so consider replacing the concrete with an appropriate pad, consulting the product manufacturer or supplier for specific details.
  • A
    Amber MoralesAug 28, 2025
    How to fix clicking noise from sliders and pivot points on Snap-on Equipment EELR501A Scissor Lifts?
    • D
      Daniel MartinezAug 28, 2025
      A clicking noise from the sliders and pivot points on your Snap-on Equipment Scissor Lift is likely due to low contact pressure on bearing surfaces, causing a stick-slip situation. To resolve this, use Lubrication kit # EAK0299T39A on all affected locations.

Summary

1.0 IMPORTANT SAFETY INSTRUCTIONS

2.0 SAFETY WARNING DECALS

3.0 SPECIFICATIONS

5.0 TOOLS REQUIRED FOR INSTALLATION OF LIFT

6.0 INSTALLATION OVERVIEW

7.0 INSTALLATION INSTRUCTIONS

7.1 Surface Mount Bay Layout

Details the layout requirements for surface mounting the lift bay.

7.2 Base frame Location

Specifies how to position and mark the base frames for lift installation.

7.3 Flush Mount Bay Layout (Rear Mount Console)

Details bay layout for flush mounting with a rear console.

7.4 Flush Mount Bay Layout (Front Mount Console)

Details bay layout for flush mounting with a front console.

7.5 Unpacking the Lift

Instructions for safely unpacking and inspecting the lift components.

7.6 Hydraulic Connections

Details on how to connect the hydraulic lines for the lift system.

7.7 Air Safety and Auxiliary Air connections

Connects air lines and FRL assembly for pneumatic operations.

7.8 Electrical Connections

Guide for making safe and correct electrical connections for the lift.

7.9 Initial Operation

Procedure for the first test run of the lift without load.

7.10 Bleed The Hydraulic System

Steps to remove air from the hydraulic system for proper operation.

7.11 Level and Support

Ensuring the lift is correctly leveled and supported using bolts and shims.

7.12 Anchoring Procedure

Detailed steps for securely anchoring the lift to the floor.

7.13 Grouting Procedure (Optional)

Procedure for grouting under the base frames for added stability.

8.0 ACCESSORY INSTALLATION

8.1 Installation of Wheel Stops

Steps for installing the front wheel stops on the runways.

8.2 Installation of Rear Bolster Bar

Instructions for installing the bolster bar at the rear end of the runways.

8.3 Installation of Transition Ramps

Procedure for attaching the transition ramps to the runways.

8.4 Position of approaching ramps

How to position and level the approaching ramps before anchoring.

8.5 Position of Jack Beams

Steps for positioning the sliding jack beams on the scissor lift.

8.6 Installation of Line Covers

Guide for installing line covers to manage hoses and cables.

8.7 Installation of Extension Line Covers

Instructions for installing extension line covers, often part of a kit.

9.0 INSTALL FRONT TURNTABLES

9.1 Installation of Front Turntables

Procedure for correctly positioning and adjusting front turntables.

9.2 Moving and Locking the Rear Slip Plate

Instructions for moving and locking the rear slip plates for alignment.

10.0 FINAL PROCEDURES

10.1 Check of Assembled Lift

Checks to perform after assembly and anchoring, before operation.

10.2 Operation Test with Vehicle

Procedure for testing the lift's functionality with a vehicle.

11.0 LIFT OPERATION

11.1 Raising the Lift

Step-by-step instructions for safely raising the lift with or without a vehicle.

11.2 Lowering the Lift

Step-by-step instructions for safely lowering the lift.

11.3 Approaching Ramp Operation

How to operate the sliding approaching ramps in different positions.

12.0 RECOMMENDED INSPECTION AND MAINTENANCE

12.1 Lubrication SPECS

Specifies the types of hydraulic oil, grease, and pneumatic oil required.

12.2 Mechanical Safety Locks

How to check and adjust the mechanical safety locks for proper function.

12.3 Air Cylinders, Air Lines, Valve and Fittings

Inspection and maintenance of pneumatic components and air lines.

12.4 Hydraulic Power Pack and Hose

Checking and maintaining the hydraulic power unit and hoses.

12.5 Hydraulic Cylinders

Inspect hydraulic cylinders and associated hardware for wear and leaks.

12.6 Check Base Frames and Approach Ramps

Inspect base frames and approach ramps for corrosion and anchor bolt tightness.

12.7 Fasteners

Check all attaching bolts and nuts for proper tightness.

12.8 Transition Ramps, Chocks, Front Wheel Stops

Inspect accessories like ramps, chocks, and wheel stops for wear.

12.9 Runways

Check runways for damage, deformation, or abnormal conditions.

12.10 Front and Rear Steer Plates

Inspect and maintain front turntables and rear slip plates.

12.11 Rolling Air Jacks

Lubricate and maintain rolling air jacks.

12.12 Entire Lift

General inspection of the entire lift for corrosion, damage, and operation.

12.13 Lubrication of Pivot Point and Sliders

Lubrication procedure for pivot points and sliders to reduce noise.

12.14 Lock Out and Tag Out Instructions

Procedures for safely isolating energy sources before maintenance.

12.15 Emergency Operation

Steps to safely lower the lift in an emergency situation.

13.0 TROUBLE SHOOTING

14.0 RECORD OF MAINTENANCE; TRAINING

15.0 LIFT PARTS LIST

15.1 Lift Parts List

Detailed list of parts for the lift, including part numbers and quantities.

15.2 Ramp Parts List

List of spare parts specifically for the ramps.

16.0 HYDRAULIC AND AIR LINE ASSEMBLY

16.1 Hydraulic Line Routing Map

Diagram showing the routing of hydraulic lines throughout the lift.

16.2 Hydraulic Line Routing Parts List

List of parts used in the hydraulic line routing.

16.3 Hydraulic Circuit Map

Schematic diagram of the lift's hydraulic circuit.

16.4 Hydraulic Circuit Parts List

List of parts specific to the hydraulic circuit.

16.5 Air Line Routing Part List

List of parts used in the air line routing.

16.6 Air Line Routing Map

Diagram showing the routing of air lines throughout the lift.

17.0 CONSOLE ASSEMBLY

17.1 Electrical and Control Panel

Details of the lift's electrical and control panel components.

17.2 TERMINAL ASSEMBLY FOR 12 K ALI CONSOLE

Specifics of the terminal assembly within the console.

17.3 Console: Pneumatic & Filtering System

Details the pneumatic and filtering system components of the console.

17.4 Console Box Assembly

Exploded view and parts list for the console box.

17.5 Console Labeling

Diagram showing the location of various decals and labels on the console.

17.6 Power Pack

Assembly details and parts list for the power pack unit.

18.0 ACCESSORY

18.1 Line Covers and Nails

Parts list for line covers and nails.

18.2 Wedge Anchors

List of wedge anchors used for securing the lift.

18.3 Turntables

Parts list for the optional turntables.

18.4 Jackbeam and Accessory

Parts list for jackbeams and related accessories.

18.5 Hose Extension Kit for Flush Mount - Front Console

List of parts included in the hose extension kit.

18.6 Shim kit

List of shims for leveling and support.

18.7 14 L tank kit

Kit contents for the 14L tank, including parts and instructions.

APPENDIX Foundation Plan

Snap-on Equipment EELR501A Specifications

General IconGeneral
BrandSnap-on Equipment
ModelEELR501A
CategoryScissor Lifts
LanguageEnglish