Do you have a question about the Snow Peak Amenity Dome L and is the answer not in the manual?
Provides critical safety advice regarding fire, fuel, and enclosed spaces.
Advises on weather preparedness, high temperatures, and site selection.
Details risks like low-temperature burns, fire hazards, and material degradation.
Covers spreading the tent, orienting vestibule, and inserting inner tent poles (X and Side).
Guides on connecting the flysheet, securing it with Velcro, and installing the vestibule pole.
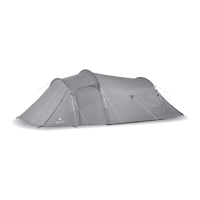
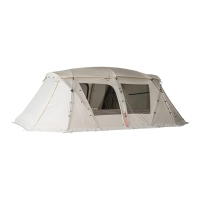
This document serves as an instruction manual for the Snow Peak SDE-003RH Amenity Dome L tent, an outdoor lifestyle product designed for camping and recreational use. It provides comprehensive guidance on setup, maintenance, and safety to ensure proper and enjoyable use of the tent.
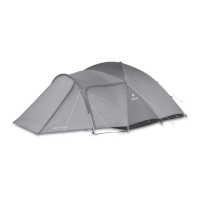
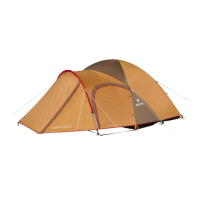
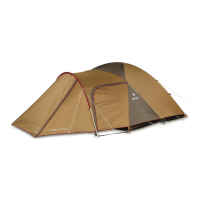
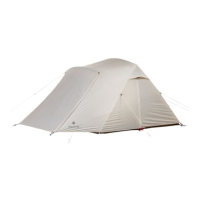
The Snow Peak Amenity Dome L is a camping tent designed to provide shelter and comfort in outdoor environments. It features an inner tent and a fly, offering a dual-layer structure for enhanced protection against the elements. The tent is constructed with materials that offer water-repellent and waterproof properties, ensuring dryness during rain. Additionally, the fly material is treated for UV protection, which helps to reduce the permeation of harmful ultraviolet rays and slow down material deterioration. The tent is designed for temporary use and is not intended for permanent setup. It includes various components such as poles, pegs, ropes, and a carry bag for portability and ease of assembly. The design incorporates features like ventilators to help manage condensation and loops on the roof for hanging small items, each capable of bearing up to 1kg (2.2 lbs).
Setting up the Amenity Dome L requires at least two people. The process begins by spreading the inner tent on a flat area, ensuring the vestibule side, which has the building tape, faces downwind to prevent wind and rain from entering the main entrance and to avoid damage from strong gusts. The tent utilizes three inner tent poles: two "X Poles" with yellow ends and one "Side Pole" with a green mark. These poles are extended and firmly connected, then slowly inserted into their corresponding sleeves. The X Poles are inserted through sleeves with yellow marks, and the Side Pole goes into the sleeve with a green mark, passing over the X Pole. Pins are then inserted into the ends of the X Poles, followed by the Side Pole, to secure the structure. It is crucial to adjust the sleeves to be centered when inserting pins to prevent damage to the poles.
After the poles are in place, plastic hooks are attached to the poles, and the inner tent is pegged down at six corner loops, following a numbered sequence to stretch out any slack. The door panels should be closed during pegging to ensure proper closure later. The fly is then laid over the inner tent, aligning the vestibule and back room directions. Velcro tape on the inside of the fly is used to secure it to the poles, preventing movement. The vestibule pole is extended and inserted into the fly's sleeve, and its pins are secured. Six buckles on the fly's edge are connected to the bottom rings, and adjusting tapes are pulled to apply tension and smooth out the fly. Additional pegs are inserted through rubber corner loops of the vestibule and back room, and tensioning guy lines are stretched and pegged down, with rope tensioners used to increase tension. Care must be taken not to pull ropes or edges too forcefully to avoid damage. When opening the vestibule door panel, additional poles, ropes, and pegs are required to keep it open.
The manual also addresses condensation, explaining that it is a natural phenomenon in tents due to water vapor from breathing and perspiration. To minimize condensation, steady ventilation is recommended while the tent is in use.
Proper maintenance is essential for extending the lifespan of the Amenity Dome L. Before storage, the tent must be thoroughly cleaned and dried. Storing a wet tent can lead to mold buildup, bad odors, color migration, and material deterioration. The tent should be dried in a breezy and shaded area, and its surface cleaned with a soft brush. Poles should also be cleaned and dried before storage to prevent corrosion, and a small amount of silicone lubricant can be applied to the joints to ensure smooth movement. It is important not to pull the cords inside the poles unnecessarily.
The water-repellent finish of the tent will diminish over time with repeated use. When this occurs, a water-repellent spray, purchased from a local outdoor gear retailer, should be applied according to its instructions. The UV protection treatment on the fly also helps to slow deterioration, but prolonged exposure to sunlight can still cause color degradation or strength loss, so the tent should not be left assembled permanently.
Zippers should be kept clean from mud, sand, or dust to prevent wear and damage. A brush can be used for cleaning, and small amounts of silicone lubricant can be applied regularly for smooth operation. Minor damage to the tent fabric can be repaired using repair tape, available from outdoor gear retailers. For more significant damage or professional repairs, users are advised to contact the dealer or Snow Peak Customer Service. When sending the product for repair, it should be dried and cleaned, with a memo detailing the damage attached to the affected area. Regular checks and maintenance of all components, including pegs, are recommended to maximize the product's longevity.
| Materials | Polyester, Aluminum |
|---|---|
| Doors | 2 |
| Capacity | 6 persons |
| Weight | 9.8 kg |
| Peak Height | 185 cm |
| Poles | Aluminum |