Do you have a question about the SNOWJOE SUNJOE 24V-ST14B and is the answer not in the manual?
The Sun Joe 24V-ST14B is a cordless grass trimmer designed for cutting lawns and trimming along the borders of flower beds. It is powered by a 24V MAX* (4.0 Ah) iON+ lithium-ion battery, featuring EcoSharp® technology, and has a 14-inch cutting width.
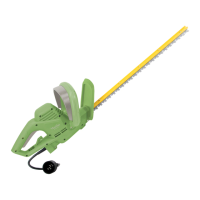
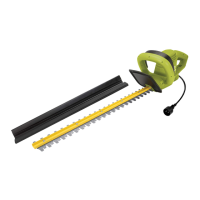
The grass trimmer operates with a brushless motor, delivering 450 W of power. It offers two variable speed settings: Low (4500 rpm) and High (6000 rpm), allowing users to adjust the cutting speed based on the task. The trimmer uses a bump feed spool advance system with a 0.080-inch (2 mm) diameter nylon line, which can be advanced by lightly tapping the trimmer head on the ground while the motor is running. The cutting line comes in a 16.4 ft (5 m) dual-line replacement spool (model 24V-ST14B-SPOOL). The unit is designed for ease of use, with an auxiliary handle for comfortable grip and balance, and a safety guard to protect the operator and bystanders from thrown objects.
The trimmer is designed for safe and efficient operation. Users must wear safety glasses, footwear, snug-fitting clothing, protective gloves, and hearing/head protection. It's crucial to keep children and bystanders at least 50 feet (15 meters) away from the work area due to flying debris. The tool should not be forced and should be used at the rate for which it was designed. Proper footing and balance must be maintained at all times. The trimmer should be disconnected (turned off and battery removed) when not in use, unattended, being examined, changing the cutting line, or being moved.
To start, the battery pack is slid into the compartment until it snaps into position. The safety lock button is pressed and held with the thumb, then the ON/OFF trigger switch is squeezed with the fingers. Once powered on, the safety lock button can be released. To switch off, the trigger switch is released, and the battery is removed during work breaks and after finishing work.
For trimming, the user should hold the grass trimmer with their right hand on the rear handle (right arm slightly bent) and their left hand on the front auxiliary handle (left arm straight). The trimmer should be held at hip height, with the trimmer head parallel to the ground. For best cutting action against walls, fences, and tall grass, the trimmer should be moved slowly, cutting with the tip of the high-speed nylon line. It's recommended to cut tall grass from top down to prevent wrapping around the shaft housing and string head, which can cause overheating. The trimmer should only be used when grass and weeds are dry.
The battery pack includes a push button for checking the charge level via LED indicators. Three lit LEDs indicate a high charge, two indicate decreasing charge (requiring charging soon), and one indicates a flat battery (requiring immediate charging). The battery pack does not develop a "memory" and can be "topped-off" before or after use. Charging takes approximately 1 hour 50 minutes for a fully discharged pack within the normal temperature range (32°F/0°C to 113°F/45°C).
Regular maintenance is essential for optimal performance and safety. The cutting lines should be kept sharp and clean. The grass trimmer should only be repaired at an authorized service facility. Handles should be kept dry, clean, and free from oil and grease. Before any maintenance, the battery must be removed. Protective gloves should always be worn during maintenance tasks, and maintenance should not be performed when the motor is running or hot.
The trimmer line can dry out over time; to keep it in top condition, spare pre-wound spools or bulk line should be stored in a plastic resealable bag with a tablespoon of water. The grass trimmer should never be cleaned with water or chemical cleaners; a dry cloth is sufficient. Plastic parts can be cleaned with mild soap and a damp rag. The motor ventilation slots should be kept clean, and the unit should always be stored in a dry place, preventing any liquid from getting inside. When storing, the trimmer should be hung by the upper handgrip to prevent the safety guard from touching any surface, which could alter its shape and dimensions.
Replacing the spool involves pressing release tabs on the spool cover, removing the cover and spool, cleaning out any remaining line or debris, and then re-inserting a new pre-wound spool or re-winding the line. When re-winding, the line should be inserted into the groove in the center of the spool and both ends wound into the grooves with slight tension, following the direction of the arrows. Only original replacement parts specified for this machine should be used.