EasyManua.ls Logo

solarbike KT-LCD8H User Manual

solarbike KT-LCD8H
2 pages
To Next Page IconTo Next Page
Page #1 background imageLoading...
Page #1 background image
KT-LCD8H E-Bike Display User Manual
Dear customer, please read this manual before you use KT-LCD8HDisplay. The manual will guide you use the instrument
correctly to achieve a variety of vehicle control and vehicle status displays.
Functions and Display
Instruments using the structure form of instrument body portion and the operation buttons are
designed separately.
1
UP Button
10
Backlight and headlights
2
SW Button
11
Environment temperature
3
DOWN Button
Environment fahrenheit
4
MOTOR W
Power display
12
Km/H
Riding speed(metric)
5
ASSIST
Pas level
13
AVS
Average speed
6Km/H push power assist
MXS
MAX speed
6
THROTTLE
Run sign
14
DST
Trip distance
7
Battery capacity indicator
ODO
Total distance
8
VOL
Battery voltage
15
TIM
Single trip time
9
The brake display
TTM
Total trip time
1. Operation
1. ON/OFF
Hold button long to turn on the power, and hold long for a second time to turn off
the power. When the motor stops driving and when the e-bike is not used for a consecutive 5
minutes, it will automatically shut down and turn off the motor power supply.
2. Display 1
Hold button to start up and enter display .
2.1 Turn on backlight and headlights
Hold long to turn on backlight and headlights (the controller
should have headlight drive output function); hold long again to
turn off the backlight and headlights.
2.2 Assist ratio gear (ASSIST) switch
Press or to switch 1-5 file gear. Gear 1 is for
the minimum power, gear 5 is for the highest power. Each
startup will automatically restore the gear shutdown last time
(the user can set randomly). Gear 0 is without booster
function.
2.3 6Km/H assist promotion function
Hold and flashes, the vehicle drives at the speed
not more than 6Km /h. Release button, the function is
invalid.
2.4 Display and delete of single data
After power on for 5 seconds, hold and at the
same time, single trip riding time (TM) and single trip distance
(DST) flash, hold button shortly, the content of both is
cleared. If failed holding the button within 5 seconds, it will
automatically return the display interface after 5 seconds,
original content is preserved.
3.Display 2
Press button in display 1 to enter display 2.
In the riding mode after 5 seconds, display 2 automatically
returns to display 1, and the original motor power (MOTOR
W) display is replaced with motor operating temperature
display (MOTOR ) display (the internal motor should be
equipped with the temperature sensor and the output of temperature detection signal).
4.Display 3
Press button in display 2 to enter display 3.
In the riding condition, five seconds later, a single maximum
speed (MXS) display automatically returns to the real riding
speed (Km/H).
5. In display 3, hold button shortly (SW),and the
display will re-enter display 1.
Question and Answer IconNeed help?

Do you have a question about the solarbike KT-LCD8H and is the answer not in the manual?

solarbike KT-LCD8H Specifications

General IconGeneral
Brandsolarbike
ModelKT-LCD8H
CategoryBicycle Accessories
LanguageEnglish

Summary

Functions and Display Overview

Instrument Button Functions

Details the function of each button on the e-bike display instrument.

Display Indicators and Parameters

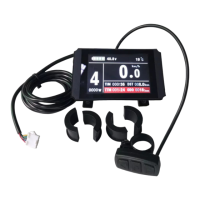
Explains the various indicators and parameters shown on the e-bike display.

E-Bike Display Operation

Power On/Off and Auto Shutdown

Instructions for turning the e-bike display and power supply on and off.

Display Interface Navigation

Guide to navigating through display modes, controlling backlight, and assist functions.

Assist Ratio Gear Adjustment

Details on switching between assist levels (0-5) for motor power.

6Km/H Walk Assist Function

Explanation of the 6Km/h assist function for walking assistance.

Single Data Display and Reset

How to view and clear single trip time and distance data.

Display Mode Transitions

How to switch between Display 2, Display 3, and return to Display 1.

System Settings and Functions

Display and Power Off

Instructions for turning off the display and power supply of the controller.

Error Code Display

Explains how fault codes are displayed and automatically exited.

Motor Temperature Alarm

Details the motor temperature alarm and protective measures.

General Project Settings

Guides through setting maximum speed, wheel diameter, and metric units.

Routine Project Setting Exit

How to exit setting environments and save values.

Technical Specifications and Diagrams

Metric Unit Settings

Procedure for setting metric units for speed, mileage, and temperature.

Main Instrument Dimensions

Provides the physical dimensions of the main instrument body.

Mounting Dimensions

Details the mounting dimensions for double brackets.

Button Box Dimensions

Shows the dimensions of the button control box.

Wiring Diagram

Illustrates the wiring connections for the display and controller.