EasyManua.ls Logo

SolidRun CuBox-i Series - User Manual

SolidRun CuBox-i Series
6 pages
Print Icon
To Next Page IconTo Next Page
Loading...
SOLIDRUN LTD
CuBox-i series
SolidRun Ltd.
P.O Box 75
Migdal-Tefen, 2495900
ISRAEL
http://www.solid-run.com/
Quick Users Guide
Contents of package
One CuBox-i Miniature Computer.
Optionally, one microSD card inserted in the CuBox-i with Android OS installed.
Optionally, one power supply adapter ( input: 110V-220V AC ; output 5V DC )
One Warranty note.
One User Manual
Models covered by this User Manual:
I1-300-D, I1W-300-D, I2-300-D, I2W-300-D, I2eX-300-D, I2eXw-300-D and I4P-300-D
Setting up the system
1. The CuBox-i boots from the microSD. If you purchased a microSD from SolidRun then skip to
step #3.
2. When using your own micro SD device, we recommend a 4GB micro SD class4 or higher.
3. Skip to step #7 if you are using a SolidRun supplied power adapter.
4. Power Adapter: you may choose your own power adapter, make sure to use a power adapter
with the following specification:
Regulated 5V supply with 2A source capacity (3A for I4P-300-D model).
2.1mm internal diameter and 5.5mm external diameter. At least 10.5mm long.
Use only limited power source (LPS) power adapter with adequate protections.
Power adapter should meet local safety regulations.
DO NOT USE 9V or 12V adapters or any other adapters with output voltage higher
than 5V. These adapters will damage the CuBox-i and possibly other connected USB
devices.
5. To run applications or distributions on your CuBox-i, you must install them on the microSD
card. Visit this link for more details: http://cubox-i.com/install-os-on-micro-sd-flash-card/
6. Once you have your CuBox-i, microSD and power adapter ready, insert the micro SD in the
microSD slot with the microSD pins facing up.
7. Internet: If you have purchased I1-300-D, I1W-300-D, I2-300-D, I2W-300-D- first connect an
Ethernet cable to your CuBox-i device. Models I2eX-300-D, I2eXw-300-D and I4P-300-D, can be
connected via wireless or wired connection.
8. Connect the CuBox-i to a display screen via an HDMI cable.
9. Connect your power adapter to the DC jack, and then connect the adapter to mains supply.
A red LED in the front should light, indicating that the system is booting. The system should be up and
running in few moments, and Android graphical interface should be displayed on the monitor:
All manuals and user guides at all-guides.com
all-guides.com
Question and Answer IconNeed help?

Do you have a question about the SolidRun CuBox-i Series and is the answer not in the manual?

Summary

Setting up the System

Power Adapter Requirements

Specifies voltage, current, and connector for the power adapter.

Connection Steps

Guides for connecting Ethernet, display via HDMI, and power adapter.

Product Information

Overview

General description of the CuBox-i family and its applications.

Interfaces

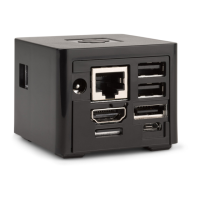
Details the available physical interfaces on the CuBox-i.

System Specifications and Software

Hardware Specifications

Details hardware components like chipset, memory, and GPU for different models.

Software Support

Lists available operating systems and applications for the CuBox-i.

Operating Environment

Specifies temperature and humidity ranges for operation.

Compliance and Safety Information

FCC Compliance

Statement regarding compliance with US Federal Communications Commission rules.

CE Compliance

Statement regarding compliance with EU directives for EMC and Low Voltage.

Safety Notices

Important safety warnings related to power adapters and operating conditions.

Disposal Guidelines

Instructions for proper disposal of the product according to local regulations.

Overview

The CuBox-i series, manufactured by SolidRun Ltd., is a family of low-cost, highly energy-efficient, and small form-factor open-source miniature computers. These devices are designed for a wide range of applications, including smart TV boxes, media centers, gaming machines, set-top boxes, NAS (Network Attached Storage) servers, and digital signage.

Function Description:

The CuBox-i functions as a versatile miniature computer, capable of running various operating systems and applications. It boots from a microSD card, which can be pre-installed with Android OS or configured with other distributions like Ubuntu, XBMC, freeBSD, Debian, and GeexBox. The device provides essential connectivity for networking, display output, and peripheral connections, making it suitable for both home entertainment and more specialized computing tasks.

Important Technical Specifications:

Models Covered:

  • I1-300-D, I1W-300-D
  • I2-300-D, I2W-300-D
  • I2eX-300-D, I2eXw-300-D
  • I4P-300-D

Commercial Names:

  • CuBox-i1 (I1-300-D, I1W-300-D)
  • CuBox-i2 (I2-300-D, I2W-300-D)
  • CuBox-i2eX (I2eX-300-D, I2eXw-300-D)
  • CuBox-i4Pro (I4P-300-D)

Chipset:

  • CuBox-i1/i1w: i.MX6 Solo
  • CuBox-i2/i2w: i.MX6 Dual Lite
  • CuBox-i2eX/i2eXw: i.MX6 Dual
  • CuBox-i4Pro: i.MX6 Quad

Core Count:

  • CuBox-i1/i1w, CuBox-i2/i2w, CuBox-i2eX/i2eXw: 1 or 2 @ 1 GHz
  • CuBox-i4Pro: 4 @ 1 GHz

Memory Size:

  • CuBox-i1/i1w: 512MByte DDR3
  • CuBox-i2/i2w, CuBox-i2eX/i2eXw: 1GByte DDR3
  • CuBox-i4Pro: 2GByte DDR3

Memory Config:

  • CuBox-i1/i1w, CuBox-i2/i2w: 32 bit @ 800Mbps, 64 bit @ 800Mbps respectively
  • CuBox-i2eX/i2eXw, CuBox-i4Pro: 64 bit @ 1066Mbps

3D GPU:

  • CuBox-i1/i1w, CuBox-i2/i2w: GC880
  • CuBox-i2eX/i2eXw, CuBox-i4Pro: GC2000

3D GPU Type:

  • All models: OpenGL ES 1.1/2.0
  • CuBox-i2eX/i2eXw, CuBox-i4Pro: also OpenCL 1.1E

HW Video Dec/Enc: Multi Format for all models.

HDMI 1080p: 1.4, 3D support for all models.

Ethernet:

  • CuBox-i1/i1w, CuBox-i2/i2w: 10/100 Mbps (Fast Ethernet)
  • CuBox-i2eX/i2eXw, CuBox-i4Pro: 10/100/1000 Mbps (Gigabit Ethernet)

USB 2.0 Host: 2 x Hosts for all models.

WiFi 11n/Bluetooth:

  • CuBox-i1/i2: Not supported
  • CuBox-i1w/i2w: Optional
  • CuBox-i2eX/i2eXw: Optional
  • CuBox-i4Pro: Supported

Micro SD Interface: Supported for all models.

eSata II 3Gbps:

  • CuBox-i1/i1w, CuBox-i2/i2w: Not supported
  • CuBox-i2eX/i2eXw, CuBox-i4Pro: Supported

RTC With Backup Battery:

  • CuBox-i1/i1w, CuBox-i2/i2w: Not supported
  • CuBox-i2eX/i2eXw, CuBox-i4Pro: Supported

Optical S/PDIF Audio Out: Supported for all models.

Micro USB to RS-232:

  • CuBox-i1/i1w, CuBox-i2/i2w: Not supported
  • CuBox-i2eX/i2eXw, CuBox-i4Pro: Supported

InfraRed for Remote Control:

  • CuBox-i1/i1w, CuBox-i2/i2w: Receiver only
  • CuBox-i2eX/i2eXw, CuBox-i4Pro: Receiver & Transmitter

Operating Environment:

  • Temperature: 0°C to 40°C
  • Relative humidity: 5% to 90%

Usage Features:

Initial Setup:

  1. MicroSD Card: The device boots from a microSD card. If a SolidRun-supplied microSD is used, it comes pre-installed with Android OS. For user-supplied microSD cards, a 4GB Class 4 or higher card is recommended.
  2. OS Installation: To run applications or other distributions, the OS must be installed on the microSD card. Instructions are available at http://cubox-i.com/install-os-on-micro-sd-flash-card/.
  3. Insertion: Insert the microSD card into the slot with the pins facing up.
  4. Power Adapter:
    • SolidRun provides a power adapter.
    • If using a user-supplied adapter, it must be a regulated 5V supply with 2A source capacity (3A for I4P-300-D models).
    • The barrel connector should have a 2.1mm internal diameter, 5.5mm external diameter, and be at least 10.5mm long.
    • Only Limited Power Source (LPS) power adapters with adequate protections should be used, meeting local safety regulations.
    • WARNING: Do not use 9V, 12V, or any adapter with an output voltage higher than 5V, as this will damage the CuBox-i and connected USB devices.
  5. Internet Connection:
    • For I1-300-D, I1W-300-D, I2-300-D, I2W-300-D models, connect an Ethernet cable to the device.
    • For I2eX-300-D, I2eXw-300-D, and I4P-300-D models, connection can be via wireless or wired Ethernet.
  6. Display: Connect the CuBox-i to a display screen using an HDMI cable.
  7. Power On: Connect the power adapter to the DC jack, then to the mains supply. A red LED on the front will light, indicating the system is booting. The Android graphical interface should appear on the monitor shortly.

Interfaces (Refer to CuBox Back and Side Diagrams):

  • Ethernet (1): Connects to an Ethernet switch or router for local wired networking (LAN). Fast Ethernet for I1/I2 series, Gigabit Ethernet for I2eX/I4P series.
  • DC Jack (2): Power input. Requires a 5V limited power supply.
  • Push Button (3): User-defined functionality.
  • HDMI (4): Full HD HDMI output to a TV set.
  • MicroSD (5): Slot for the microSD card, essential for device operation with an OS and application.
  • Ethernet Indication LED (6): Off indicates no link; always on indicates a link is established.
  • USB0 (7) & USB1 (8): Powered USB ports for connecting peripherals like keyboards, mice, and hard drives. Do not overload with more than 0.5A current consumption per port.
  • eSATA (9): External SATA Hard Drive connection (supported on I2eX/I4P series).
  • microUSB (10): Service port for serial port connection, used for lab and development.
  • SPDIF (11): Optical audio output. A SolidRun or equivalent SPDIF cable is recommended due to the small connector size.
  • Infra Red Tx/Rx (12): IR receiver for remote control support (all models); IR transmitter for controlling nearby devices (I2eX/I4P series). The indicator LED shares the IR receiver window.

Software:

  • Default: Android
  • Optional Installations: UBUNTU, XBMC, freeBSD, Debian, GeexBox, and others.
  • Users are encouraged to visit the "Getting Started" page (http://cubox-i.com/getting-started/) for information on alternative operating systems and upgrades.

Maintenance Features:

Safety Notices:

  • Power Adapter: Ensure the power adapter meets local safety standards and product-intended use requirements, as well as the specified operating environment conditions.
  • FCC Compliance (USA): The device complies with Part 15 of FCC Rules, designed to provide reasonable protection against harmful interference. If interference occurs, users are advised to:
    • Reorient or relocate the receiving antenna.
    • Increase separation between equipment and receiver.
    • Connect equipment to an outlet on a different circuit.
    • Consult a dealer or experienced radio/TV technician.
  • CE Compliance (EU): The device complies with EMC Directive 2004/108/EC and Low Voltage Directive 2006/95/EC.
  • Shielded Ethernet Cable: A shielded Ethernet cable must be used to comply with emission limits.

Disposal:

  • Follow local regulations for product disposal. Do not dispose of these items in household or business trash.

The CuBox-i series offers a robust and adaptable platform for various computing needs, emphasizing energy efficiency and a compact design, supported by a range of connectivity options and software flexibility.

SolidRun CuBox-i Series Specifications

General IconGeneral
BrandSolidRun
ModelCuBox-i Series
CategoryComputer Hardware
LanguageEnglish